Watercolor Christmas Ornament Cookies: A Festive Masterpiece of Flavor and Art
The History of Watercolor Christmas Ornament Cookies
The tradition of baking festive cookies during the holiday season dates back centuries, with roots in German and Scandinavian customs. Originally, gingerbread and spice cookies were shaped into symbolic figures and decorated to represent winter festivities, religious themes, or good luck charms. As cookie decorating evolved, especially in the 20th century, royal icing became a popular medium for intricate designs—paving the way for modern sugar cookie artistry.
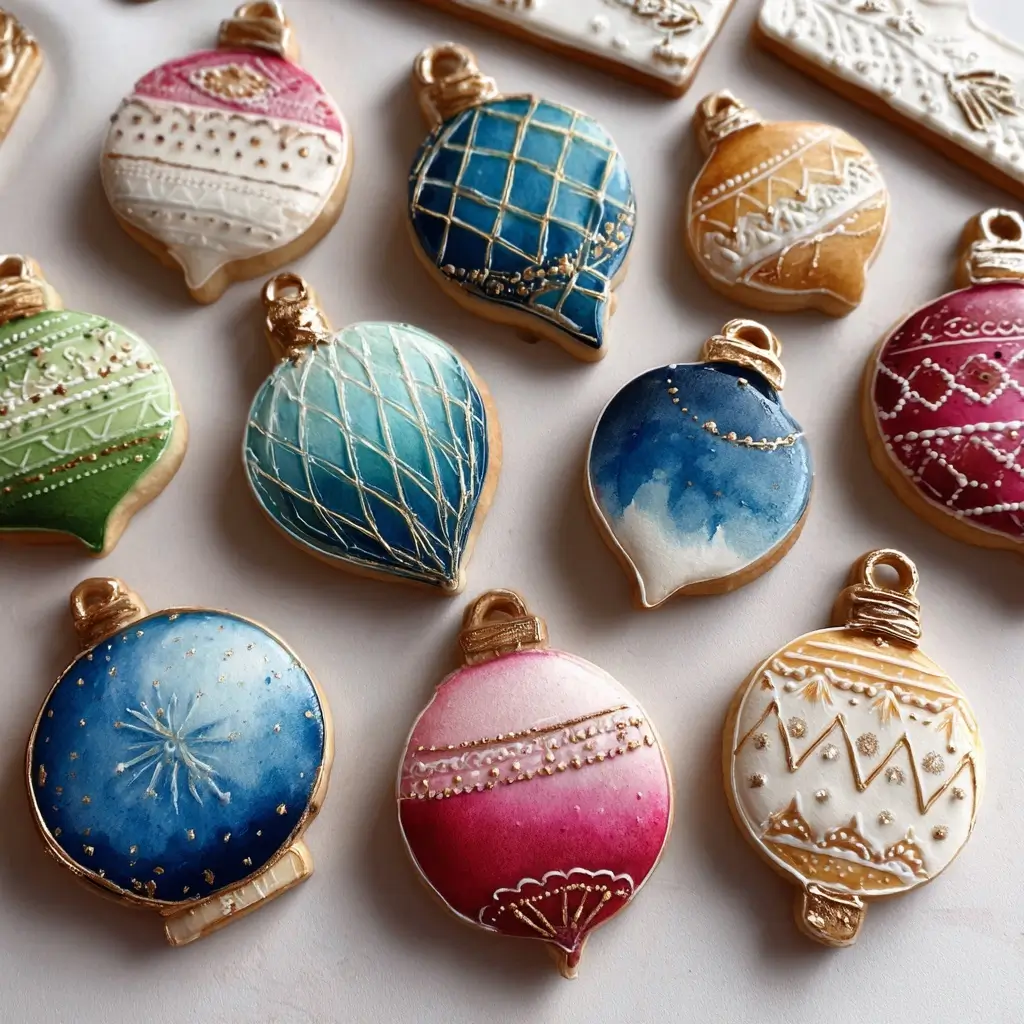
Watercolor Christmas ornament cookies are a relatively recent innovation, emerging from the growing trend of edible art in the 2010s. Inspired by watercolor painting techniques, bakers began experimenting with diluted food coloring and edible paints to create soft, blended hues on smooth royal icing surfaces. These cookies mimic the look of hand-painted glass ornaments, often featuring translucent color washes, metallic accents, and delicate detailing that evoke the charm of vintage holiday decor. Today, they’re a favorite among home bakers and professional pastry artists alike, symbolizing both creativity and seasonal joy.
Ingredients Breakdown
Creating stunning watercolor Christmas ornament cookies requires two key components: a sturdy, buttery sugar cookie base and a smooth, glossy royal icing canvas. Each ingredient plays a vital role in achieving the perfect texture, flavor, and decorative potential.
Sugar Cookie Ingredients:
- All-Purpose Flour: Provides structure. Sifted to avoid lumps and ensure a tender crumb.
- Unsalted Butter (cold): Adds richness and flakiness. Cold butter helps prevent spreading during baking.
- Granulated Sugar: Sweetens the dough and contributes to a crisp edge while keeping centers soft.
- Large Egg: Binds ingredients and adds moisture for pliability.
- Vanilla Extract: Enhances flavor with warm, aromatic notes.
- Salt: Balances sweetness and amplifies other flavors.
- Baking Powder (optional): For a slightly softer texture, though many prefer omitting it for sturdier cutouts.
Royal Icing Ingredients:
- Powdered Sugar (confectioners’ sugar): The base of royal icing; when combined with liquid, it dries hard and smooth.
- Meringue Powder or Fresh Egg Whites: Provides stability and allows the icing to dry with a porcelain-like finish. Meringue powder is safer and more convenient for most bakers.
- Warm Water: Activates the meringue powder and adjusts consistency. Warm water dissolves sugar better.
- Food Coloring Gels (not liquids): Highly concentrated, these allow vibrant colors without thinning the icing too much.
- Edible Luster Dust or Pearl Powder: For shimmer effects mimicking metallic ornament finishes.
- Clear Alcohol (like vodka) or Extract (e.g., lemon): Used to dilute gel colors into “watercolor” washes. Evaporates quickly, leaving color behind.
Step-by-Step Recipe
Step 1: Prepare the Sugar Cookie Dough
- In a stand mixer fitted with a paddle attachment, beat 1 cup (2 sticks / 227g) cold unsalted butter with 3/4 cup (150g) granulated sugar on medium speed until just combined—do not cream excessively to avoid air pockets.
- Add 1 large egg and 2 teaspoons vanilla extract. Mix until smooth.
- In a separate bowl, whisk together 3 cups (360g) sifted all-purpose flour and 1/4 teaspoon salt.
- Gradually add the dry ingredients to the wet mixture on low speed until the dough forms a shaggy mass.
- Turn out onto a lightly floured surface and gently knead into a disc. Wrap in plastic and chill for at least 2 hours (or up to 3 days).
Step 2: Roll and Cut the Cookies
- Preheat oven to 350°F (175°C). Line baking sheets with parchment paper.
- Roll the chilled dough to 1/4-inch thickness between two sheets of parchment or silicone mats.
- Use ornament-shaped cookie cutters (teardrop, round, or bell shapes work well) to cut out cookies.
- Transfer carefully to baking sheets using a spatula. Re-roll scraps once for best texture.
- Bake for 9–11 minutes, until edges are just beginning to turn golden. Cool completely on wire racks before decorating.
Step 3: Make Royal Icing
- In a stand mixer with a whisk attachment, combine 4 cups (480g) powdered sugar, 3 tablespoons meringue powder, and 6 tablespoons warm water.
- Beat on low for 1 minute, then increase to high for 7–10 minutes until stiff peaks form. The icing should be thick but spreadable.
- Divide icing into portions: one large portion for “flood” consistency (add water drop by drop until it flows like honey), and smaller portions for “outline” consistency (thicker, like toothpaste).
Step 4: Outline and Flood the Cookies
- Fit piping bags with small round tips (#2 or #3) for outlining. Fill with thick icing.
- Pipe a border around each cookie, staying just inside the edge to contain the flood icing.
- For flooding, thin the remaining icing with water (1/4 tsp at a time) until it reaches 10–15 second consistency (a ribbon of icing disappears into the mix in about 10–15 seconds).
- Use a squeeze bottle or offset spatula to fill the outlined area. Tilt the cookie gently to spread evenly.
- Pop air bubbles with a toothpick. Let dry completely—at least 4–6 hours or overnight.
Step 5: Paint the Watercolor Effect
- Prepare watercolor paints: In small bowls, mix gel food coloring with clear alcohol (vodka) or lemon extract (about 1 part color to 3 parts liquid).
- Dip a clean, soft paintbrush (size 1–3) into a light color and gently brush it across one side of the dried icing.
- Add secondary colors while the first is still damp to allow natural blending—just like real watercolor painting.
- Use a dry brush or paper towel to lift color if needed, creating highlights or soft gradients.
- Optional: Add gold or silver luster dust mixed with alcohol for metallic streaks or glittery details.
- Let painted cookies dry upright in a cooling rack for several hours to prevent smudging.
Tips for Perfect Watercolor Christmas Ornament Cookies
- Chill the dough thoroughly—this prevents spreading and keeps sharp edges.
- Use parchment or silicone mats when rolling to prevent sticking without excess flour.
- Don’t overmix royal icing after reaching stiffness—overbeating can introduce bubbles.
- Label your icing consistencies clearly: outline (thick), flood (medium), and paint (very thin).
- Work in a low-humidity environment; moisture slows drying and causes colors to bleed unpredictably.
- Use separate brushes for each color to avoid muddying your palette.
- Dry cookies vertically using foam blocks or a DIY rack made from cardboard and straws to preserve delicate paintwork.
- Store finished cookies in an airtight container with parchment layers to protect the surface.
- Practice your watercolor technique on a spare cookie or white paper first.
- Less is more—start with light washes and build intensity gradually.
Variations and Customizations
One of the joys of watercolor ornament cookies is their versatility. You can customize them for any theme, color scheme, or skill level.
Color Themes:
- Traditional Red & Green: Classic holiday elegance with emerald greens and cranberry reds.
- Winter Wonderland: Soft blues, silvers, and whites with iridescent sheen.
- Rustic Gold & Cream: Elegant neutrals with antique gold accents—perfect for farmhouse décor.
- Ombre Pastels: Dreamy pinks, lavenders, and mint greens for a whimsical touch.
- Blacklight Glow: Use UV-reactive food coloring for a fun party twist!
Shape Ideas:
- Teardrop (classic ornament)
- Round baubles
- Stars, snowflakes, or hearts
- Miniature picture frames with edible “photos”
- House-shaped ornaments for village displays
Decorative Enhancements:
- Edible Glitter Spritzes: Spray with edible glitter mist for instant sparkle.
- Piped Details: After painting, add fine lines with black or white icing for trim or hanger strings.
- Hand-lettering: Write names, dates, or short messages like “Joy” or “Noel.”
- Texture Effects: Use a stippling brush for a frosted glass look.
- Layered Icing: Apply a tinted base coat, let dry, then paint over it for depth.
Health Considerations and Nutritional Value
While undeniably delicious, watercolor Christmas ornament cookies are best enjoyed in moderation due to their sugar and fat content.
Nutritional Estimate (per cookie, approx. 2.5 inches, with icing):
- Calories: 120–160
- Total Fat: 5–7g (mostly from butter)
- Saturated Fat: 3g
- Carbohydrates: 20–25g
- Sugars: 15–18g (primarily from icing and dough)
- Protein: 1–2g
- Sodium: 50–80mg
Health Notes:
- Sugar Content: High due to royal icing and dough. Consider reducing sugar slightly in the dough (down to 1/2 cup) if desired, though this may affect texture.
- Gluten-Free Option: Substitute with a quality 1:1 gluten-free flour blend. Add 1/4 tsp xanthan gum if not included.
- Egg-Free/Vegan: Use a flax egg (1 tbsp ground flax + 3 tbsp water) and vegan butter. For royal icing, use aquafaba (chickpea brine) instead of meringue powder or egg whites.
- Allergens: Contains dairy, eggs, wheat, and potential tree nut traces if using extracts processed in shared facilities.
- Food Dyes: Some artificial colors may affect sensitive individuals. Opt for natural plant-based dyes where possible (though results may be subtler).
Ingredients
Sugar Cookies (makes 24–30 cookies):
- 3 cups (360g) all-purpose flour, sifted
- 1 cup (227g) cold unsalted butter, cubed
- 3/4 cup (150g) granulated sugar
- 1 large egg
- 2 tsp vanilla extract
- 1/4 tsp salt
Royal Icing:
- 4 cups (480g) powdered sugar
- 3 tbsp meringue powder
- 6 tbsp warm water (plus more as needed)
- Gel food coloring (assorted)
- Edible luster dust (gold, silver, pearl)
- Vodka or lemon extract (for diluting colors)
Directions
- Make the dough: Beat cold butter and sugar until combined. Add egg and vanilla. Mix in flour and salt until a dough forms. Chill 2+ hours.
- Roll and cut: Roll dough to 1/4 inch. Cut into ornament shapes. Bake at 350°F for 9–11 minutes. Cool completely.
- Prepare royal icing: Beat powdered sugar, meringue powder, and warm water until stiff peaks form. Adjust consistency for outlining and flooding.
- Outline and flood: Pipe borders, then fill with thinned icing. Allow to dry 4–6 hours or overnight.
- Create watercolor paint: Mix gel colors with vodka or extract (1:3 ratio).
- Paint designs: Use soft brushes to apply color in soft washes. Blend while damp. Add metallic accents if desired.
- Dry and store: Let painted cookies dry upright for 2–4 hours. Store in an airtight container with parchment between layers.
FAQ
- Can I make these cookies ahead of time?
- Absolutely! Baked cookies freeze well for up to 3 months. Undecorated iced cookies keep for 1 week at room temperature. Fully decorated cookies last 2–3 weeks in a cool, dry place.
- Why did my royal icing crack?
- This usually happens if the icing dries too fast (from airflow or low humidity) or if it’s too thick. Try adding a tiny bit more water or covering cookies with a damp cloth during drying.
- Can I use liquid food coloring?
- Liquid colors add too much moisture and can ruin icing consistency. Always use gel, paste, or powder colors for best results.
- How do I fix bleeding colors?
- Wait until the base layer is completely dry before adding new colors. Work with less liquid in your paint mixture.
- What if I don’t have meringue powder?
- You can substitute pasteurized egg whites (3 large egg whites ≈ 3 tbsp meringue powder + 6 tbsp water), but handle with care due to raw egg risks.
- Can kids help decorate?
- Yes! Let them paint with pre-mixed watercolor solutions using small brushes. It’s a safe, creative activity (supervised near alcohol-based paints).
- How do I hang them as decorations?
- Before baking, insert a small loop of baker’s twine or ribbon into the top edge of each cookie. Once cooled and decorated, they double as edible ornaments!
Summary
Watercolor Christmas ornament cookies combine timeless holiday charm with artistic flair, offering a delicious canvas for edible masterpieces. From buttery shortbread perfection to dreamy painted finishes, these cookies bring joy to bakers and recipients alike.