
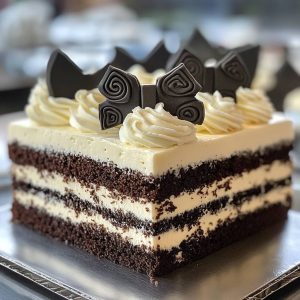
Tuxedo Bar Cake is an elegant, indulgent dessert known for its contrasting layers of rich chocolate and creamy vanilla, often highlighted with a glossy chocolate ganache and sleek presentation reminiscent of a formal tuxedo. A feast for the eyes and the taste buds, this cake brings together multiple textures—moist chocolate cake, smooth cream layers, and silky ganache—all crafted into a rectangular or bar-shaped form that’s perfect for slicing into neat, sophisticated portions. The name “Tuxedo” reflects its refined, two-tone aesthetic of deep brown and pale white layers, evoking the look of formalwear, making it a standout dessert for celebrations, holiday gatherings, or any occasion where an upscale dessert is desired. It’s both nostalgic and modern, combining classic cake elements with a sleek bakery-style look that feels right at home in high-end patisseries as well as family kitchens.
The history of Tuxedo Bar Cake is somewhat modern compared to other traditional layered cakes, with its origins tied more to commercial bakeries and the dessert counters of grocery stores and cake shops rather than homemade traditions passed down through generations. The concept likely evolved from popular American layer cakes like Devil’s Food Cake and Black and White Cake, merging the idea of rich chocolate and light cream elements into a more refined, sliceable format. During the mid-to-late 20th century, as presentation in desserts became just as important as flavor, bakeries began introducing elegant rectangular cakes that could be neatly packaged and displayed. The Tuxedo Cake rose in popularity during this time, often seen in upscale supermarket bakeries and restaurant dessert menus. Its rectangular, bar-like shape made it easy to serve in even slices, and the dual flavors gave it broad appeal. Today, Tuxedo Bar Cake is a staple in both commercial and home baking, appreciated for its balanced flavor, stylish presentation, and nostalgic familiarity.
Ingredients Breakdown
Chocolate Cake Layer: Made with all-purpose flour, unsweetened cocoa powder, baking powder, baking soda, and salt to form the dry base. Wet ingredients typically include eggs, granulated sugar, vegetable oil or butter, milk or buttermilk, and boiling water or hot coffee to intensify the cocoa flavor.
Vanilla Cream Layer: A light, creamy filling made from heavy cream, cream cheese or mascarpone, powdered sugar, and vanilla extract. Some variations include gelatin or stabilizers to help the cream set firmly between cake layers.
Ganache Topping: High-quality semi-sweet or dark chocolate is combined with heavy cream and sometimes a bit of butter or corn syrup for shine and smoothness.
Optional Add-ins: Layers may include chocolate chips, shaved chocolate, or even a thin layer of chocolate mousse or custard for more texture and richness.
Decoration: Chocolate shavings, cocoa powder dusting, piped whipped cream, or a drizzle of white chocolate can be used to enhance the finished look.
Step-by-Step Recipe:
- Preheat the oven to 350°F (175°C). Grease and line a 9×13-inch rectangular baking pan with parchment paper.
- Make the chocolate cake layer: In a large bowl, whisk together 1 ¾ cups all-purpose flour, ¾ cup unsweetened cocoa powder, 1 ½ teaspoons baking powder, 1 ½ teaspoons baking soda, and ½ teaspoon salt.
- In another bowl, beat 2 large eggs with 1 ¾ cups granulated sugar until fluffy. Add ½ cup vegetable oil, 1 cup milk, and 2 teaspoons vanilla extract. Mix until smooth.
- Gradually add the dry ingredients to the wet mixture, stirring until just combined. Add 1 cup boiling water or hot coffee last, and mix gently—batter will be thin.
- Pour the batter into the prepared pan and bake for 30–35 minutes, or until a toothpick inserted in the center comes out clean. Let the cake cool completely in the pan, then slice horizontally through the center to form two even layers, or bake two thinner layers in separate pans.
- Prepare the cream layer: In a mixing bowl, beat 8 oz cream cheese or mascarpone until smooth. Add 1 cup powdered sugar and 2 teaspoons vanilla extract, and continue beating until fluffy. In a separate bowl, whip 1 cup heavy cream until stiff peaks form, then fold it into the cream cheese mixture until well combined.
- Assemble the cake: Place one layer of chocolate cake on a serving tray or board. Spread the entire cream mixture evenly across the top. Carefully place the second layer of cake on top and press down gently. Chill in the refrigerator for at least 30–60 minutes to set.
- Make the ganache topping: Heat ½ cup heavy cream until steaming but not boiling. Pour over 4 oz chopped semi-sweet chocolate and let sit for 2 minutes, then stir until smooth. Add 1 tablespoon butter for shine. Let cool slightly, then pour over the top of the chilled cake. Use a spatula to gently spread to the edges.
- Garnish and chill: Decorate with chocolate curls, white chocolate drizzle, or leave plain for a minimalist look. Refrigerate until set, about 1 hour more. Slice into bars to serve.
Tips for the Perfect Tuxedo Bar Cake
Use high-quality cocoa powder and chocolate to enhance the richness and depth of flavor. Allow the cake to cool completely before assembling to prevent the cream from melting. Chill the assembled cake before adding the ganache so the topping sets smoothly and doesn’t slide off. When slicing into bars, use a sharp knife dipped in hot water and wiped clean between cuts for perfect, bakery-style slices. Don’t rush the chilling steps—this cake looks and tastes best when given time to firm up in the fridge.
Variations and Customizations
You can flavor the cream layer with espresso powder, almond extract, or orange zest for added dimension. Swap the vanilla cream for a light chocolate mousse or cookies-and-cream filling. Add chopped nuts, such as hazelnuts or almonds, between the layers for crunch. For a festive version, add peppermint extract to the ganache and sprinkle crushed peppermint on top. Try replacing the chocolate cake layer with red velvet for a “Black Tie” themed twist. Mini versions of the cake can also be made in loaf pans or cut into individual square servings.
Health Considerations and Nutritional Value
Tuxedo Bar Cake is a decadent dessert high in sugar, saturated fat, and calories, making it best enjoyed in moderation. A typical slice includes refined flour, sugar, heavy cream, and chocolate, all of which contribute to its rich texture but also its indulgent nutritional profile. To lighten it up, consider using reduced-fat cream cheese, substituting Greek yogurt for part of the cream, or using unsweetened cocoa powder and dark chocolate with higher cacao content. You can also reduce the sugar in the cream layer slightly without compromising taste. For those with dietary restrictions, gluten-free flour blends and dairy-free whipped cream alternatives can be used to accommodate special diets. While it’s not a health food, mindful ingredient choices can make this cake a slightly less guilty pleasure.
FAQ
Can I make Tuxedo Bar Cake ahead of time? Yes, this cake actually benefits from resting overnight in the refrigerator to allow the layers to set and flavors to meld.
Can I freeze Tuxedo Bar Cake? Yes, the assembled cake can be frozen for up to 1 month. Wrap tightly in plastic wrap and foil. Thaw in the fridge before serving.
Is there a no-bake version? You can make a no-bake version by using chocolate wafer cookies or brownies as the base and layering with whipped cream and ganache, but the classic version is baked.
Can I use boxed cake mix? Yes, a high-quality chocolate cake mix can be used as a shortcut, but homemade yields better flavor and texture.
How should I store leftovers? Keep the cake covered in the refrigerator for up to 5 days. Slice and wrap individual bars for easy grab-and-go treats.
Tuxedo Bar Cake
Ingredients
Cake
- 1 cup unsalted butter cubed
- 1 cup water
- 1/3 cup unsweetened dark cocoa powder
- 2 cups all-purpose flour
- 1 1/2 cups packed light brown sugar
- 2 teaspoons espresso powder optional
- 1 teaspoon baking soda
- 1/2 teaspoon fine sea salt
- 1/2 cup buttermilk at room temperature
- 2 large eggs at room temperature
- 1 teaspoon vanilla extract
Chocolate Mousse Layer
- 1 cup heavy cream divided
- 1/2 cup semisweet chocolate chips or finely chopped semisweet chocolate
Vanilla Cream Cheese Layer
- 4 oz cream cheese
- 3 oz white chocolate melted and slightly cooled (such as Baker’s brand)
- 1/3 cup unsalted butter at room temperature
- 1/2 tablespoon lemon juice
- 1/3 cup confectioners’ sugar
- 1 teaspoon vanilla extract
Marbled Ganache Topping
- 1 cup semisweet chocolate chips or chopped semisweet chocolate
- 1/2 cup heavy cream
- 1 tablespoon sunflower oil or vegetable oil
- 1/2 cup confectioners’ sugar
- 1 tablespoon milk plus more if needed
- Chocolate Buttercream and Decorations
- 3 tablespoons unsalted butter at room temperature
- 1/2 cup confectioners’ sugar
- 2 tablespoons unsweetened cocoa powder
- Milk or cream as needed to thin
- 1 rolled cookie wafer e.g., Pirouette
- 3 decorative chocolate truffles store-bought
Instructions
Cake
- Preheat your oven to 350°F. Grease a 17×11-inch rimmed baking sheet and line it with parchment paper.
- In a medium saucepan, combine the cubed butter, water, and cocoa powder. Heat over medium-low, whisking occasionally until the butter has melted and the mixture is smooth—avoid boiling. Once smooth, remove from the heat and let cool until just warm, about 15 minutes.
- Meanwhile, in a large mixing bowl, whisk together the flour, packed light brown sugar, espresso powder (if using), baking soda, and salt. If there are any clumps of sugar, break them up using your fingers until the dry mixture is smooth. Create a well in the center.
- In a separate bowl or a large measuring cup with a pour spout, whisk together the buttermilk, eggs, and vanilla extract. Slowly add the buttermilk mixture into the slightly cooled cocoa mixture in the saucepan, whisking constantly to combine.
- Pour the wet ingredients into the dry mixture and beat until smooth and fully incorporated. Scrape down the sides of the bowl and mix briefly again to ensure everything is well blended.
- Pour the batter into the prepared baking sheet, spreading it evenly. Tap the pan on the counter a few times to release air bubbles and level the batter.
- Bake for 18–20 minutes, or until a toothpick inserted into the center comes out clean. The cake should slightly pull away from the pan’s edges, but if it doesn’t, run a knife along the sides. Let the cake cool completely in the pan.
- Once cooled, transfer the cake to the freezer until it’s firm—at least 30 minutes, or overnight if desired.
- When firm, invert the cake onto a clean work surface. If it sticks to the pan, allow it to sit at room temperature for 5 minutes, then try again. Remove and discard the parchment paper. Trim the cake into three equal 11×5-inch rectangles. (There will be leftover scraps—perfect for snacking!) Cover the layers in plastic wrap while you prepare the fillings.
Chocolate Mousse Layer
- In a microwave-safe bowl, combine ½ cup of the heavy cream and the semisweet chocolate chips. Microwave for 1 minute, then let sit for another minute. Whisk until a smooth ganache forms and let it cool for about 10–15 minutes, until nearly room temperature.
- In a separate bowl, whip the remaining ½ cup of heavy cream with an electric mixer until stiff peaks form. Gently fold the whipped cream into the cooled ganache until no streaks remain. Cover and refrigerate while making the next layer.
Vanilla Cream Cheese Layer
- In the bowl of an electric mixer, beat the cream cheese on high speed for 2 minutes until fluffy. Add in the melted white chocolate and beat until the mixture is smooth, scraping down the sides as needed.
- Add the softened butter and lemon juice, and continue beating until fully incorporated. Reduce speed to low and mix in the confectioners’ sugar until smooth. Finally, beat in the vanilla extract. Cover and set aside.
- Place the first cake layer on a serving platter. Spread the chocolate mousse evenly over the surface. Top with the second cake layer and spread the vanilla cream cheese mixture evenly across. Add the final layer of cake on top and press down gently. Refrigerate the assembled cake while you prepare the ganache topping.
Marbled Ganache Topping
- To make the ganache, place the semisweet chocolate chips, heavy cream, and oil in a microwave-safe bowl. Microwave for 1 minute, then let it sit for another minute. Whisk the mixture until smooth and shiny.
- For the white glaze, whisk together the confectioners’ sugar and milk in a small bowl until the mixture falls in thin ribbons from a spoon. Add more milk, a little at a time, if it’s too thick. Transfer the glaze to a piping bag or a small zip-top bag with a corner snipped.
- Pour the chocolate ganache over the top of the chilled cake and gently spread it to cover, allowing some to drip over the sides if desired. Immediately pipe thin lines of white glaze across the top and use the tip of a butter knife to drag through the lines, creating a marbled effect. Refrigerate the cake again to set while you make the buttercream.
Chocolate Buttercream and Décors
- In a bowl using an electric mixer (a hand mixer works well), beat together the softened butter, confectioners’ sugar, and cocoa powder until combined. Add milk, 1 tablespoon at a time, to thin the frosting to a pipeable consistency. Beat until fluffy and smooth.
- Transfer the buttercream to a piping bag fitted with a ½-inch round tip or snip a similar-sized hole in a zip-top bag.
- Take the cake from the refrigerator and pipe a large sweeping ‘S’-shaped scroll across the top, from one short end to the other. Place the rolled wafer cookie in the center and arrange three chocolate truffles attractively around it.
- Keep the cake refrigerated until ready to serve. For best texture and flavor, bring to room temperature before slicing. Stored in an airtight container, the cake will keep for up to one week in the refrigerator.