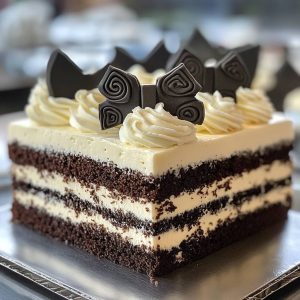
Tuxedo Bar Cake
Tuxedo Bar Cake is a strikingly elegant layered dessert featuring moist chocolate cake, luscious vanilla cream, and rich ganache for a perfect flavor and texture contrast. With its refined look and classic flavor pairing, it’s ideal for entertaining, gifting, or any time you want a sophisticated sweet treat.
Ingredients
Cake
- 1 cup unsalted butter cubed
- 1 cup water
- 1/3 cup unsweetened dark cocoa powder
- 2 cups all-purpose flour
- 1 1/2 cups packed light brown sugar
- 2 teaspoons espresso powder optional
- 1 teaspoon baking soda
- 1/2 teaspoon fine sea salt
- 1/2 cup buttermilk at room temperature
- 2 large eggs at room temperature
- 1 teaspoon vanilla extract
Chocolate Mousse Layer
- 1 cup heavy cream divided
- 1/2 cup semisweet chocolate chips or finely chopped semisweet chocolate
Vanilla Cream Cheese Layer
- 4 oz cream cheese
- 3 oz white chocolate melted and slightly cooled (such as Baker’s brand)
- 1/3 cup unsalted butter at room temperature
- 1/2 tablespoon lemon juice
- 1/3 cup confectioners’ sugar
- 1 teaspoon vanilla extract
Marbled Ganache Topping
- 1 cup semisweet chocolate chips or chopped semisweet chocolate
- 1/2 cup heavy cream
- 1 tablespoon sunflower oil or vegetable oil
- 1/2 cup confectioners’ sugar
- 1 tablespoon milk plus more if needed
- Chocolate Buttercream and Decorations
- 3 tablespoons unsalted butter at room temperature
- 1/2 cup confectioners’ sugar
- 2 tablespoons unsweetened cocoa powder
- Milk or cream as needed to thin
- 1 rolled cookie wafer e.g., Pirouette
- 3 decorative chocolate truffles store-bought
Instructions
Cake
- Preheat your oven to 350°F. Grease a 17×11-inch rimmed baking sheet and line it with parchment paper.
- In a medium saucepan, combine the cubed butter, water, and cocoa powder. Heat over medium-low, whisking occasionally until the butter has melted and the mixture is smooth—avoid boiling. Once smooth, remove from the heat and let cool until just warm, about 15 minutes.
- Meanwhile, in a large mixing bowl, whisk together the flour, packed light brown sugar, espresso powder (if using), baking soda, and salt. If there are any clumps of sugar, break them up using your fingers until the dry mixture is smooth. Create a well in the center.
- In a separate bowl or a large measuring cup with a pour spout, whisk together the buttermilk, eggs, and vanilla extract. Slowly add the buttermilk mixture into the slightly cooled cocoa mixture in the saucepan, whisking constantly to combine.
- Pour the wet ingredients into the dry mixture and beat until smooth and fully incorporated. Scrape down the sides of the bowl and mix briefly again to ensure everything is well blended.
- Pour the batter into the prepared baking sheet, spreading it evenly. Tap the pan on the counter a few times to release air bubbles and level the batter.
- Bake for 18–20 minutes, or until a toothpick inserted into the center comes out clean. The cake should slightly pull away from the pan’s edges, but if it doesn't, run a knife along the sides. Let the cake cool completely in the pan.
- Once cooled, transfer the cake to the freezer until it’s firm—at least 30 minutes, or overnight if desired.
- When firm, invert the cake onto a clean work surface. If it sticks to the pan, allow it to sit at room temperature for 5 minutes, then try again. Remove and discard the parchment paper. Trim the cake into three equal 11×5-inch rectangles. (There will be leftover scraps—perfect for snacking!) Cover the layers in plastic wrap while you prepare the fillings.
Chocolate Mousse Layer
- In a microwave-safe bowl, combine ½ cup of the heavy cream and the semisweet chocolate chips. Microwave for 1 minute, then let sit for another minute. Whisk until a smooth ganache forms and let it cool for about 10–15 minutes, until nearly room temperature.
- In a separate bowl, whip the remaining ½ cup of heavy cream with an electric mixer until stiff peaks form. Gently fold the whipped cream into the cooled ganache until no streaks remain. Cover and refrigerate while making the next layer.
Vanilla Cream Cheese Layer
- In the bowl of an electric mixer, beat the cream cheese on high speed for 2 minutes until fluffy. Add in the melted white chocolate and beat until the mixture is smooth, scraping down the sides as needed.
- Add the softened butter and lemon juice, and continue beating until fully incorporated. Reduce speed to low and mix in the confectioners’ sugar until smooth. Finally, beat in the vanilla extract. Cover and set aside.
- Place the first cake layer on a serving platter. Spread the chocolate mousse evenly over the surface. Top with the second cake layer and spread the vanilla cream cheese mixture evenly across. Add the final layer of cake on top and press down gently. Refrigerate the assembled cake while you prepare the ganache topping.
Marbled Ganache Topping
- To make the ganache, place the semisweet chocolate chips, heavy cream, and oil in a microwave-safe bowl. Microwave for 1 minute, then let it sit for another minute. Whisk the mixture until smooth and shiny.
- For the white glaze, whisk together the confectioners’ sugar and milk in a small bowl until the mixture falls in thin ribbons from a spoon. Add more milk, a little at a time, if it’s too thick. Transfer the glaze to a piping bag or a small zip-top bag with a corner snipped.
- Pour the chocolate ganache over the top of the chilled cake and gently spread it to cover, allowing some to drip over the sides if desired. Immediately pipe thin lines of white glaze across the top and use the tip of a butter knife to drag through the lines, creating a marbled effect. Refrigerate the cake again to set while you make the buttercream.
Chocolate Buttercream and Décors
- In a bowl using an electric mixer (a hand mixer works well), beat together the softened butter, confectioners’ sugar, and cocoa powder until combined. Add milk, 1 tablespoon at a time, to thin the frosting to a pipeable consistency. Beat until fluffy and smooth.
- Transfer the buttercream to a piping bag fitted with a ½-inch round tip or snip a similar-sized hole in a zip-top bag.
- Take the cake from the refrigerator and pipe a large sweeping ‘S’-shaped scroll across the top, from one short end to the other. Place the rolled wafer cookie in the center and arrange three chocolate truffles attractively around it.
- Keep the cake refrigerated until ready to serve. For best texture and flavor, bring to room temperature before slicing. Stored in an airtight container, the cake will keep for up to one week in the refrigerator.
Notes
Small Shortcut: Since the chocolate buttercream is only used for a small decorative scroll on top, you can simplify this step by using a jar of your favorite chocolate spread instead. Brands like Lindt or Cadbury offer chocolate spreads that taste far better than most canned frostings and make a convenient substitute.
Make Ahead: This cake is perfect for advance preparation. You can fully assemble the cake with its mousse and cream layers, then wrap it tightly in plastic wrap followed by a layer of aluminum foil. Freeze the assembled cake—without the ganache marbling or decorative toppings—for up to 2 months. When you're ready to serve, thaw the cake in the refrigerator and add the ganache and decorations just before serving for the freshest presentation.
Freezing Slices: If the cake has already been topped with ganache, you can still freeze individual slices, especially if you're not overly concerned about maintaining the decorative marble effect. Cut the cake into serving pieces and place them on a parchment-lined baking sheet. Freeze until firm, about 30 minutes. Then wrap each slice individually in plastic wrap and a layer of foil. Thaw the slices in the refrigerator when ready to enjoy. Keep in mind the ganache may show some marks or slight sticking from the wrap, but the flavor and texture will remain delicious.