Screaming Ghost Donuts: A Spooktacular Treat for Halloween and Beyond
When it comes to festive desserts that combine creativity, flavor, and a touch of eerie charm, few treats capture the spirit—quite literally—like Screaming Ghost Donuts. These whimsical, hauntingly delicious pastries are perfect for Halloween parties, fall festivals, or any occasion where you want to add a playful fright to your dessert table. With their fluffy texture, sweet glaze, and ghostly facial features, these donuts are as delightful to make as they are to eat. Whether you’re a seasoned baker or a kitchen novice, this comprehensive guide will walk you through every aspect of crafting the perfect Screaming Ghost Donut—from history and ingredients to tips, variations, health considerations, and more.
The History of Screaming Ghost Donuts
The concept of themed donuts isn’t new, but the rise of seasonal and holiday-specific pastries has skyrocketed in recent years, especially around Halloween. The Screaming Ghost Donut is believed to have emerged from the broader trend of “spooky baking” popularized by home bakers and professional pastry chefs alike during the 2010s. Inspired by classic Halloween imagery—the white-sheet ghost with wide eyes and an open mouth—these donuts take on a cartoonish, almost comically terrifying appearance that appeals to both kids and adults.
While donuts themselves date back centuries (with origins in Dutch olykoeks and Native American fry bread), the Screaming Ghost version is a modern twist, blending traditional donut-making techniques with creative decorating. Social media platforms like Pinterest, Instagram, and TikTok have played a significant role in popularizing these treats, turning them into viral sensations each October. Today, Screaming Ghost Donuts are a staple at haunted houses, school bake sales, and family-friendly Halloween events.
Ingredients Breakdown
To create the perfect Screaming Ghost Donut, you’ll need two main components: the donut base and the decorative elements. Each ingredient plays a vital role in achieving the ideal texture, flavor, and visual impact.
- All-purpose flour – Provides structure to the donuts. Can be substituted with cake flour for a lighter crumb.
- Granulated sugar – Adds sweetness and helps with browning during frying or baking.
- Baking powder & baking soda – Leavening agents that ensure the donuts rise properly and stay airy.
- Salt – Enhances flavor and balances the sweetness.
- Nutmeg (optional) – A warm spice that adds depth and complexity to the donut’s flavor profile.
- Eggs – Bind ingredients together and contribute to richness and moisture.
- Butter (unsalted, melted) – Adds tenderness and a rich mouthfeel.
- Milk or buttermilk – Moistens the batter; buttermilk adds slight tanginess and activates baking soda.
- Vanilla extract – Infuses the donuts with classic aromatic sweetness.
- Vegetable oil or shortening – Used for frying to achieve a golden exterior and soft interior. For baked versions, nonstick spray or parchment paper works.
For the ghostly topping:
- Powdered sugar – Forms the base of the glaze, providing sweetness and opacity.
- Milk or cream – Thins the glaze to a drizzling consistency.
- Vanilla extract – Complements the donut’s flavor in the glaze.
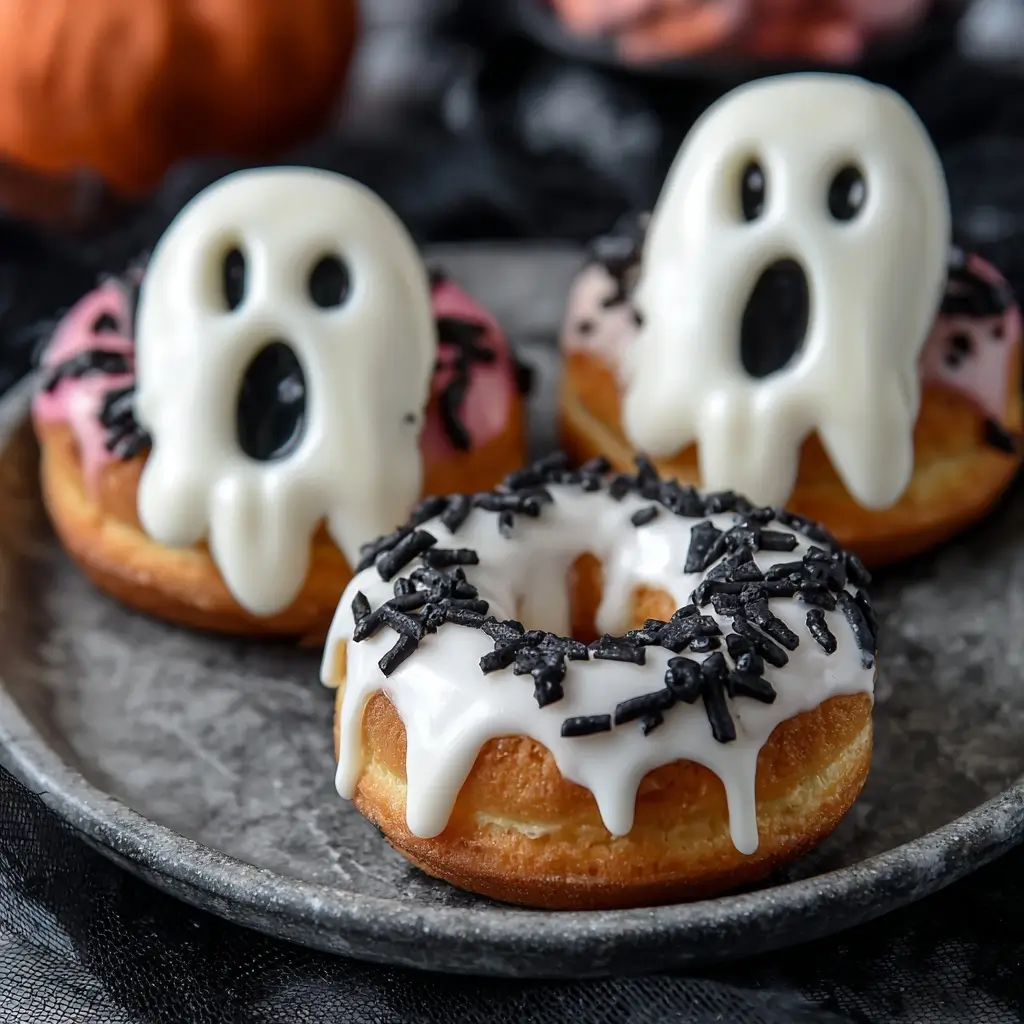
- Black food coloring or edible marker – For drawing the ghost’s screaming face (eyes and mouth).
- Candy eyes (optional) – Store-bought or handmade from fondant or chocolate chips.
- Edible glitter or sprinkles (white or silver) – Adds a magical, ethereal shimmer to the ghosts.
Step-by-Step Recipe
Follow these detailed instructions to create bakery-quality Screaming Ghost Donuts at home:
- Prepare the Dough: In a large mixing bowl, whisk together 3 cups all-purpose flour, 1/2 cup granulated sugar, 2 teaspoons baking powder, 1/2 teaspoon baking soda, 1/4 teaspoon salt, and a pinch of nutmeg (if using). In another bowl, beat 2 eggs, then mix in 1/2 cup melted unsalted butter, 1 cup warm milk (or buttermilk), and 1 teaspoon vanilla extract. Gradually add the wet ingredients to the dry, stirring until just combined. Do not overmix. Cover and let rest for 30 minutes at room temperature.
- Shape the Donuts: On a lightly floured surface, roll out the dough to about 1/2 inch thickness. Use a round donut cutter (about 3 inches in diameter) or two differently sized circular cutters to form the donut shapes. Place them on a parchment-lined tray. Cover loosely and let rise for 15–20 minutes while you heat the oil.
- Fry the Donuts: Heat vegetable oil in a deep pot or fryer to 350°F (175°C). Carefully place 2–3 donuts at a time into the hot oil. Fry for 1–2 minutes per side, until golden brown. Remove with a slotted spoon and drain on a wire rack set over paper towels. Allow to cool completely before glazing.
- Make the Glaze: In a medium bowl, whisk together 2 cups powdered sugar, 3–4 tablespoons milk or cream, and 1/2 teaspoon vanilla extract until smooth. The glaze should be thick enough to coat but thin enough to drip slightly. Add more liquid or sugar as needed.
- Glaze the Donuts: Dip the top of each cooled donut into the glaze, allowing excess to drip off. Place glazed donuts back on the wire rack and let the glaze set for 10–15 minutes.
- Create the Ghost Faces: Once the glaze has firmed up slightly, use a food-safe black marker, piped chocolate, or melted black candy coating to draw wide-open screaming mouths and large, startled eyes. Alternatively, press on pre-made candy eyes and use chocolate sauce for the mouth. For extra drama, sprinkle edible glitter over the wet glaze.
- Serve and Enjoy: Display your Screaming Ghost Donuts on a themed platter or stand. Serve immediately or store in an airtight container for up to 2 days.
Tips for Perfect Screaming Ghost Donuts
- Maintain Oil Temperature: Use a candy thermometer to keep the oil steady at 350°F. Too hot, and the donuts burn outside while staying raw inside; too cool, and they absorb excess oil and become greasy.
- Don’t Overmix the Dough: Overworking the dough can lead to tough donuts. Mix only until ingredients are incorporated.
- Let Donuts Cool Completely: Glazing warm donuts causes the icing to melt and slide off. Patience ensures a clean, crisp finish.
- Use a Piping Bag for Precision: For intricate facial expressions, transfer melted black chocolate or food coloring gel into a small piping bag or ziplock with a corner snipped for fine control.
- Baked Option: Prefer a healthier version? Bake the donuts at 375°F (190°C) for 10–12 minutes. Spray with nonstick oil before baking and glaze after cooling.
- Kid-Friendly Decorating: Let children personalize their own ghosts using safe food markers and colorful sprinkles—it’s a fun activity and encourages creativity!
Variations and Customizations
The beauty of Screaming Ghost Donuts lies in their versatility. Here are some creative ways to customize them:
- Flavored Donuts: Add cinnamon, pumpkin spice, lemon zest, or almond extract to the batter for unique flavor profiles.
- Colored Glazes: While white glaze mimics a ghost sheet, try pale blue, purple, or green for “monster” variations. Use gel food coloring to avoid thinning the glaze.
- Stuffed Donuts: Inject a surprise center with raspberry jam, chocolate ganache, or vanilla custard using a bismark tip before glazing.
- Different Shapes: Instead of round donuts, use ghost-shaped cookie cutters for solid pastries that still scream spooky fun.
- Mini Ghost Donut Holes: Make bite-sized versions by rolling dough into balls, frying or baking, then decorating. Perfect for party favors or snack boxes.
- Vegan Version: Substitute eggs with flax eggs (1 tbsp ground flax + 3 tbsp water per egg), use plant-based milk and butter, and ensure powdered sugar is vegan (some brands use bone char).
- Gluten-Free Option: Use a high-quality gluten-free flour blend designed for baking. Add 1/2 tsp xanthan gum if not included in the mix.
Health Considerations and Nutritional Value
While Screaming Ghost Donuts are undeniably indulgent, being mindful of ingredients and portion size can help balance enjoyment with nutrition.
A typical homemade glazed donut contains approximately:
- Calories: 280–350 per donut
- Total Fat: 12–18g (mostly from frying oil and butter)
- Saturated Fat: 5–7g
- Carbohydrates: 45–55g (including 25–30g of sugar)
- Protein: 4–6g
- Sodium: 200–300mg
Healthier Alternatives:
- Bake Instead of Fry: Reduces fat content significantly. Baked donuts can cut calories by 50–100 per serving.
- Use Natural Sweeteners: Replace part of the sugar with maple syrup or honey (adjust liquids accordingly).
- Whole Grain Flour: Substitute up to half the all-purpose flour with whole wheat pastry flour for added fiber.
- Limit Glaze: Drizzle instead of fully dipping, or use a light dusting of powdered sugar.
- Serve with Fruit: Pair donuts with fresh berries or apple slices to add nutrients and balance sweetness.
Note: Due to high sugar and refined carbohydrate content, individuals with diabetes, insulin resistance, or those managing weight should enjoy these treats in moderation.
Full Ingredient List
For the Donuts:
- 3 cups all-purpose flour (or cake flour for softer texture)
- 1/2 cup granulated sugar
- 2 tsp baking powder
- 1/2 tsp baking soda
- 1/4 tsp salt
- 1/8 tsp ground nutmeg (optional)
- 2 large eggs
- 1/2 cup (1 stick) unsalted butter, melted
- 1 cup warm milk or buttermilk
- 1 tsp vanilla extract
- Vegetable oil, for frying (canola, sunflower, or peanut oil also work)
For the Glaze and Decoration:
- 2 cups powdered sugar (confectioners’ sugar)
- 3–4 tbsp milk or heavy cream
- 1/2 tsp vanilla extract
- Black food coloring gel or edible marker
- Candy eyes (optional)
- Edible glitter, silver sprinkles, or ghost-themed decorations
Detailed Directions
- In a large bowl, sift together flour, sugar, baking powder, baking soda, salt, and nutmeg. Set aside.
- In a separate bowl, whisk eggs until smooth. Add melted butter, warm milk, and vanilla. Mix well.
- Pour wet ingredients into dry ingredients. Stir gently with a wooden spoon or spatula until a soft dough forms. Avoid overmixing. Cover with a damp cloth and let rest for 30 minutes.
- On a floured surface, roll dough to 1/2 inch thickness. Cut into donut shapes using a 3-inch round cutter and a smaller 1-inch cutter for the center hole. Transfer to a parchment-lined tray. Cover and let rest 15–20 minutes.
- Heat oil in a deep pot to 350°F. Fry donuts 2–3 at a time for 1–2 minutes per side, until golden. Drain on wire rack.
- Whisk powdered sugar, milk, and vanilla in a shallow bowl until smooth. Adjust consistency: thicker for coating, thinner for drizzling.
- Once donuts are cool, dip tops into glaze. Allow excess to drip off. Place glazed-side-up on rack to set.
- After 5–10 minutes, when glaze is tacky, draw wide-open screaming mouths and large eyes using a food-safe black marker, piped chocolate, or melted black candy melts.
- Optional: Sprinkle with edible glitter or attach candy eyes for a 3D effect.
- Serve immediately or store in an airtight container at room temperature for up to 2 days.
Frequently Asked Questions (FAQ)
Can I make Screaming Ghost Donuts ahead of time?
Yes! You can prepare the donuts (fried and cooled) up to a day in advance. Store in an airtight container and glaze/decorate the day of serving for best appearance.
Can I freeze Screaming Ghost Donuts?
Absolutely. Freeze unglazed donuts in a single layer on a tray, then transfer to a freezer bag for up to 2 months. Thaw at room temperature, reheat slightly if desired, then glaze and decorate.
Why did my donuts come out dense?
Overmixing the dough or letting it rise too long can cause toughness. Also, oil that’s too cool prevents proper expansion. Always use fresh leavening agents.
How do I prevent the glaze from cracking?
Cracking occurs when the glaze dries too quickly. Avoid placing near fans or vents. Adding a tiny bit of corn syrup to the glaze can improve flexibility.
Are Screaming Ghost Donuts kid-safe?
Yes, but supervise young children when using hot oil. For decorating, use non-toxic food markers and avoid small candies that could be choking hazards.
Can I use store-bought donuts?
Of course! Save time by using plain glazed yeast or cake donuts from a bakery or grocery store. Simply decorate them with ghost faces for the same spooky effect.
What’s the best way to display these donuts?
Arrange them on a black or orange platter, use a donut stand, or insert lollipop sticks and place in a foam block covered with moss or fake cobwebs for a graveyard scene.
Summary
Screaming Ghost Donuts are a fun, flavorful, and frightfully adorable dessert that brings Halloween spirit to life—one bite at a time. With simple ingredients, easy steps, and endless customization options, they’re perfect for bakers of all ages and skill levels.