Introduction
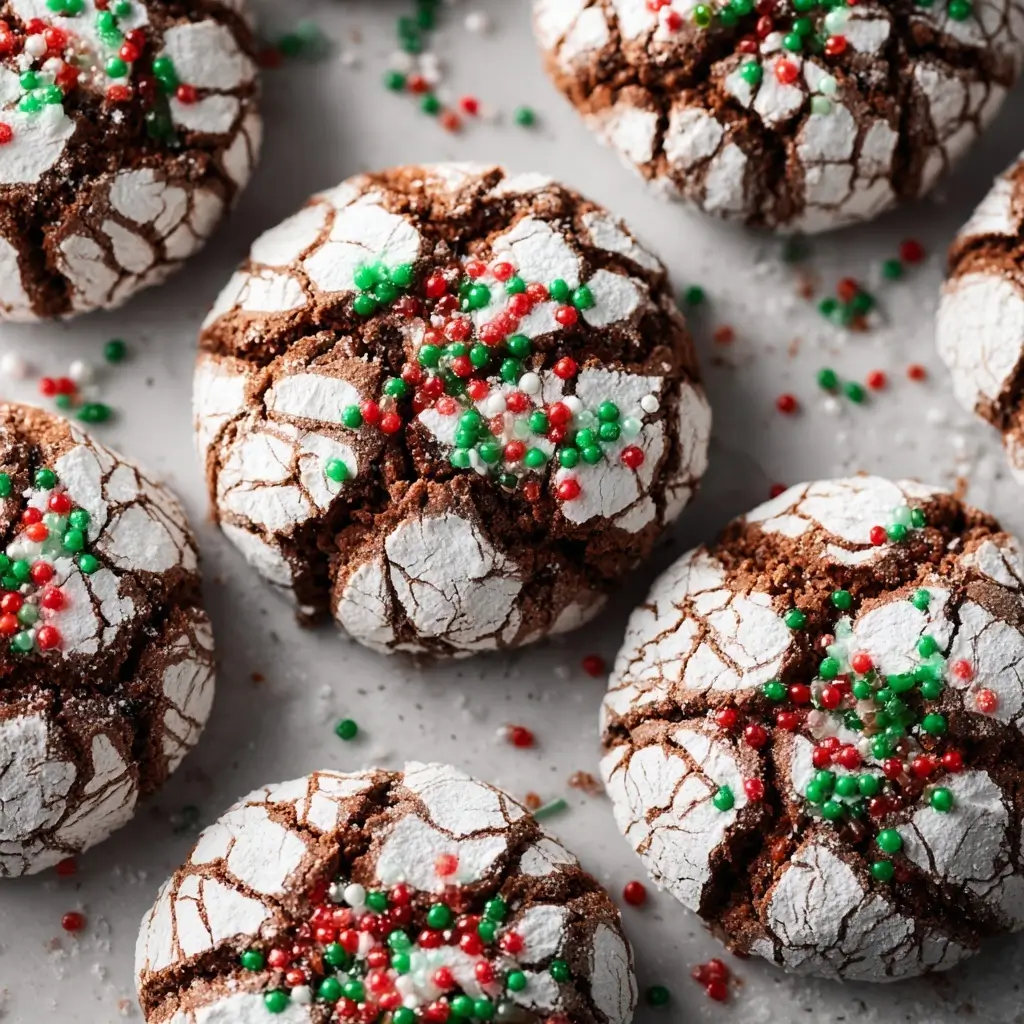
Christmas Crinkle Cookies are the quintessential holiday treat—soft, chewy, richly spiced, and crowned with a dazzling, crackled dusting of powdered sugar that evokes freshly fallen snow. With their festive appearance, nostalgic aroma, and melt-in-your-mouth texture, these cookies have graced Christmas cookie trays, school bake sales, and family dessert tables for generations. More than just a confection, they’re a sensory tradition: the gentle crunch of sugar under fingertips, the warm scent of cocoa and spices wafting through a cozy kitchen, and the quiet joy of sharing something handmade during the most magical time of year. Whether you’re baking them for the first time or continuing a decades-old family ritual, Christmas Crinkle Cookies offer comfort, connection, and a little sparkle in every bite.
The History
The origins of Christmas Crinkle Cookies trace back to mid-20th-century American home baking culture, though their lineage is deeply rooted in earlier European chocolate and spice cookie traditions. While no single inventor is credited, crinkle cookies rose to prominence in the 1940s and 1950s—coinciding with the widespread availability of affordable cocoa powder, granulated sugar, and reliable home ovens. Their signature cracked surface emerged not from design, but from science: the combination of high moisture content, leavening agents (like baking powder and soda), and the dramatic temperature shift when cold, sugar-coated dough hits a hot oven causes rapid expansion and surface fissuring—a happy accident that became iconic. The powdered sugar “snow” finish was both practical (it masked imperfections) and poetic (evoking winter wonderlands), making the cookies instantly festive. By the 1960s, they appeared in church cookbooks, Betty Crocker publications, and community recipe exchanges across the Midwest and South. Over time, regional variations blossomed—some adding espresso for depth, others folding in crushed peppermint or orange zest—but the core identity remained: a fudgy, tender chocolate cookie with a sugary, cratered crust. Today, they’re recognized as a cornerstone of the “Great American Cookie Swap,” symbolizing generosity, patience (they *must* chill!), and the quiet artistry of holiday baking.
Ingredients Breakdown
Every ingredient in Christmas Crinkle Cookies plays a precise, interdependent role—no component is merely filler. Here’s why each matters:
- Unsweetened Cocoa Powder (Dutch-process preferred): Provides deep, nuanced chocolate flavor without acidity; Dutch-process is alkalized, yielding smoother, richer notes and better color contrast against the white sugar crust. Natural cocoa works but may yield a slightly tangier, lighter-brown cookie.
- Granulated Sugar: Not just for sweetness—it aids in creaming with butter to trap air (for lift), contributes to spread and crispness at the edges, and helps stabilize the batter’s structure.
- Brown Sugar (light or dark): Adds moisture, chewiness, and caramel-like complexity. Dark brown sugar intensifies molasses notes; light offers subtler warmth. Its acidity also activates baking soda.
- Butter (unsalted, room temperature): Essential for flavor, richness, and emulsification. Room temperature allows proper creaming—too cold won’t aerate; too warm causes greasiness and excessive spread.
- Eggs (large, room temperature): Act as binders and emulsifiers, adding structure and moisture. Room-temp eggs incorporate more evenly and reduce batter curdling.
- Vanilla Extract (pure, not imitation): Enhances all other flavors and adds aromatic depth. A splash of almond extract (¼ tsp) can elevate complexity without overpowering.
- All-Purpose Flour: Provides gluten structure—but only enough to hold shape without toughness. Too much leads to dry, cakey cookies; too little causes collapse.
- Baking Powder & Baking Soda: A dual-leavening system. Soda reacts with acid (brown sugar, cocoa) for initial lift; powder provides secondary, heat-activated rise—critical for the signature dome and crack formation.
- Salt (fine sea or kosher): Balances sweetness, sharpens chocolate flavor, and strengthens gluten just enough. Never omit—even ¼ tsp makes a perceptible difference.
- Confectioners’ Sugar (for rolling): Must be unsifted and generous—its fine particles adhere to damp dough and crystallize into snowy, brittle fissures during baking. Sifting beforehand reduces adherence; storing it in an airtight container prevents clumping.
Step-by-Step Recipe
- Prep & Chill Equipment: Line two large baking sheets with parchment paper or silicone mats. Place two wire racks nearby. Chill mixing bowls and beaters if possible—cold tools help maintain dough integrity.
- Melt & Cool Cocoa Mixture: In a small saucepan over low heat (or in a heatproof bowl over simmering water), whisk together cocoa powder, ½ cup water, and butter until smooth and glossy. Remove from heat and cool to lukewarm (about 10–15 minutes)—crucial step: hot mixture will cook eggs later.
- Cream Sugars & Butter: In a large stand mixer fitted with paddle attachment, beat granulated and brown sugars with remaining ½ cup softened butter on medium-high for 3–4 minutes until fluffy and pale. Scrape bowl thoroughly.
- Incorporate Wet Ingredients: Add cooled cocoa mixture, then eggs one at a time, beating well after each (about 30 seconds). Mix in vanilla. Batter will look thick and glossy.
- Dry Ingredients Integration: In a separate bowl, whisk together flour, baking powder, baking soda, and salt. On low speed, gradually add dry mix to wet in three additions, mixing *just until no streaks remain* after each. Overmixing develops gluten → tough cookies.
- Chill Dough (Non-Negotiable!): Cover bowl tightly with plastic wrap and refrigerate for *at least 2 hours*, preferably 4–24 hours. This solidifies fats, hydrates flour, concentrates flavors, and prevents overspread. For best cracks, dough must be very cold (near 40°F).
- Preheat & Prep Sugar: Position oven racks in upper and lower thirds. Preheat to 350°F (175°C). Pour 1½ cups confectioners’ sugar into a wide, shallow bowl (a pie plate works perfectly).
- Portion & Coat: Use a 1.5-tablespoon cookie scoop or tablespoon measure. Roll chilled dough into smooth, tight 1-inch balls—don’t skip rolling; uneven surfaces bake inconsistently. Drop each ball into sugar, roll gently to coat completely, then place 3 inches apart on prepared sheets. Re-roll any sugar that falls off for maximum coverage.
- Bake Strategically: Bake 1 sheet at a time in center rack for 10–12 minutes. Edges should look set; centers will appear soft and slightly puffed. Rotate sheet halfway through for even browning. *Do not overbake*—cookies continue cooking on hot sheet.
- Cool & Set Cracks: Let cookies rest on sheet for 5 minutes—this allows cracks to fully form and set. Then transfer carefully to wire racks using a thin spatula. Cool completely before storing (cracks deepen as they cool).
Tips
- Chill Time is Sacred: Skipping or shortening refrigeration guarantees flat, greasy, crack-free cookies. If pressed for time, freeze dough balls for 30 minutes instead of chilling entire batch.
- Measure Flour Correctly: Spoon flour into measuring cup and level with a knife—never scoop directly from bag (adds up to 25% extra flour!). Better yet, weigh it: 180g per cup.
- Room-Temp Eggs Are Key: Cold eggs can cause the warm cocoa-butter mixture to seize. To warm quickly, place eggs in warm (not hot) water for 5 minutes.
- Sugar Coating Technique: Use slightly damp hands to roll dough *before* sugar—if too dry, it won’t adhere well. But don’t over-handle—warm dough melts sugar prematurely.
- Oven Thermometer Required: Most home ovens run hot or cold. An inaccurate temp ruins crack formation—too cool = no rise; too hot = burnt edges, no cracks.
- Rotate & Swap Sheets: For even baking, swap top/bottom sheets halfway through if baking two at once—and always let sheets cool completely between batches.
- Crack Troubleshooting: No cracks? Dough wasn’t cold enough, oven too cool, or sugar coating was too thin. Shallow cracks? Dough too warm or overmixed. Deep, dramatic cracks? Perfect execution!
- Storage Wisdom: Store cooled cookies in airtight container with parchment between layers. They soften slightly on Day 2 (many prefer this!) and stay fresh for 1 week at room temp—or freeze unbaked dough balls for up to 3 months.
Variations and Customizations
While classic chocolate crinkles reign supreme, creative adaptations keep the tradition vibrant and inclusive:
- Peppermint Crinkles: Add ½ tsp peppermint extract + ¼ cup finely crushed candy canes to dough. Roll in sugar mixed with 1 tbsp crushed candy cane for shimmer.
- Orange-Cocoa Crinkles: Substitute 2 tbsp orange juice for part of the water; add 1 tsp finely grated orange zest to cocoa mixture. Optional: dip cooled cookies halfway in dark chocolate, then sprinkle with orange sugar.
- Espresso Crinkles: Dissolve 1 tbsp instant espresso powder into the cocoa-water mixture. Intensifies chocolate without bitterness.
- Gluten-Free Crinkles: Replace AP flour with 1:1 GF blend (like King Arthur or Bob’s Red Mill) + ½ tsp xanthan gum. Ensure all other ingredients (cocoa, baking powder) are certified GF.
- Vegan Crinkles: Use vegan butter, flax eggs (2 tbsp ground flax + 6 tbsp water, rested 10 min), and dairy-free chocolate chips (optional add-in). Coconut oil (refined) works but alters texture—best combined with vegan butter.
- Double-Chocolate Crinkles: Fold in ¾ cup mini semi-sweet chocolate chips or chopped dark chocolate for melty pockets.
- Spiced Crinkles: Add 1 tsp cinnamon + ¼ tsp cloves + ⅛ tsp nutmeg to dry ingredients for warm, chai-inspired depth.
- Coconut Crinkles: Replace ¼ cup flour with toasted coconut flour; stir in ½ cup unsweetened shredded coconut. Roll in sugar mixed with toasted coconut flakes.
- Matcha Crinkles: Replace 2 tbsp cocoa with ceremonial-grade matcha powder. Reduce sugar by 1 tbsp to balance earthiness. Dust with matcha-sugar blend (1 tbsp matcha + 1 cup confectioners’ sugar).
- Pumpkin Spice Crinkles (Fall/Holiday Bridge): Replace water with ½ cup canned pumpkin purée; add 1 tsp pumpkin pie spice. Reduce flour by 2 tbsp to compensate for moisture.
Pro Tip: Label variations clearly when gifting or swapping—guests love knowing what magic awaits in each bite!
Health Considerations and Nutritional Value
A single standard Christmas Crinkle Cookie (approx. 2 inches, 30g) contains roughly 110–130 calories, 6–7g fat (3–4g saturated), 15–18g carbohydrates (12–14g sugars), and 1–1.5g protein. While undeniably indulgent, mindful preparation can enhance nutritional integrity without sacrificing tradition:
- Sugar Reduction Strategies: Reduce granulated sugar by 2 tbsp without major texture loss. Replace ¼ cup brown sugar with date paste (blended dates + water) for fiber and minerals—though note: this increases moisture, so chill dough longer.
- Healthy Fat Swaps: Substitute up to half the butter with unsweetened applesauce or mashed banana for reduced saturated fat and added potassium—but expect denser, less crisp-edged cookies.
- Flour Upgrades: Replace ¼–½ cup AP flour with oat flour (certified GF if needed) or whole wheat pastry flour for added fiber and B vitamins. Avoid regular whole wheat—it creates heaviness.
- Boosting Micronutrients: Stir in 2 tbsp ground flaxseed or chia seeds for omega-3s and fiber. Add 1 tsp spirulina powder for iron and antioxidants (color shifts to deep green-black—still festive!).
- Portion Control Wisdom: Use a 1-tablespoon scoop instead of 1.5 tbsp to yield ~90-calorie cookies—ideal for daily holiday treats without guilt.
- Allergen Awareness: Always disclose nuts, dairy, eggs, or gluten in shared settings. For schools or offices, consider certified nut-free facilities and clear labeling.
- Mindful Enjoyment: Savor slowly—these cookies are designed for presence, not speed. Pair with herbal tea or warm milk to enhance satiety and reduce urge to overindulge.
Note: These cookies are not a health food—but they *are* nourishment for the soul, memory, and community. Balance lies in joyful moderation, thoughtful ingredient choices, and honoring the ritual—not perfection.
Ingredients
- ¾ cup unsweetened Dutch-process cocoa powder
- 1 cup water (divided)
- 1 cup (2 sticks) unsalted butter, divided — ½ cup cold and cubed, ½ cup softened
- 1 cup granulated sugar
- 1 cup packed light or dark brown sugar
- 3 large eggs, room temperature
- 2 teaspoons pure vanilla extract
- 2¼ cups all-purpose flour (spooned & leveled, or 270g)
- 2 teaspoons baking powder
- ½ teaspoon baking soda
- 1 teaspoon fine sea salt
- 1½ cups confectioners’ sugar (for rolling — do not sift)
Directions
- Line two large baking sheets with parchment paper or silicone baking mats. Set aside.
- In a small saucepan over low heat, combine cocoa powder, ½ cup water, and the ½ cup cold, cubed butter. Whisk constantly until butter melts and mixture is smooth and glossy, about 3–4 minutes. Remove from heat and let cool to lukewarm (10–15 minutes). Do not rush cooling—hot mixture will scramble eggs.
- In the bowl of a stand mixer fitted with paddle attachment, beat granulated sugar, brown sugar, and ½ cup softened butter on medium-high speed for 3–4 minutes until light, fluffy, and pale in color. Scrape bowl thoroughly.
- Add the cooled cocoa mixture to sugar-butter mixture. Beat on medium for 1 minute until combined. Add eggs one at a time, beating well (about 30 seconds) after each addition. Mix in vanilla. Batter will be thick and cohesive.
- In a separate medium bowl, whisk together flour, baking powder, baking soda, and salt.
- Reduce mixer speed to low. Gradually add dry ingredients to wet in three equal additions, mixing only until no dry streaks remain after each addition. Do not overmix—batter should be smooth but still slightly shaggy.
- Cover bowl tightly with plastic wrap and refrigerate for at least 2 hours—or up to 72 hours—for optimal texture and crack development.
- When ready to bake, preheat oven to 350°F (175°C). Position racks in upper and lower thirds. Place confectioners’ sugar in a wide, shallow dish (e.g., pie plate).
- Use a 1.5-tablespoon cookie scoop or tablespoon measure to portion dough. Roll each portion firmly between palms into a smooth, tight 1-inch ball. Drop into confectioners’ sugar and roll gently to coat completely. Place coated balls 3 inches apart on prepared baking sheets.
- Bake one sheet at a time on center rack for 10–12 minutes. Cookies should be puffed, set at edges, and cracked on top—but centers will still look soft. Rotate sheet halfway through for even baking.
- Let cookies cool on baking sheet for exactly 5 minutes—this sets the cracks. Then, carefully transfer to wire racks using a thin metal spatula. Cool completely before storing.
- Repeat with remaining dough, allowing baking sheets to cool completely between batches.
- Store cooled cookies in an airtight container at room temperature for up to 1 week. For longer storage, freeze baked cookies for up to 3 months or freeze unbaked dough balls for up to 3 months (bake frozen—add 1–2 minutes to bake time).
FAQ
- Why do my crinkle cookies not crack?
- Likely causes: dough wasn’t cold enough (refrigerate minimum 2 hours), oven temperature too low (use oven thermometer), insufficient confectioners’ sugar coating, or overmixing batter. Also ensure baking powder is fresh (replace every 6 months).
- Can I make the dough ahead of time?
- Absolutely—and highly recommended! Chilled dough improves flavor and texture. Refrigerate up to 3 days or freeze portioned, unrolled dough balls for up to 3 months. Thaw overnight in fridge before rolling and baking.
- Why use Dutch-process cocoa instead of natural?
- Dutch-process is neutral pH, yielding deeper color, milder bitterness, and superior solubility in batters. Natural cocoa is acidic and may react unpredictably with leaveners—resulting in flatter, reddish cookies with less pronounced cracks.
- My cookies spread too much. What went wrong?
- Common culprits: butter too warm during creaming, insufficient chilling, using melted (not softened) butter, or measuring flour incorrectly (too little). Also check expiration on baking powder—old leavener fails to lift.
- Can I substitute oil for butter?
- Not recommended. Butter provides critical structure, flavor, and steam for crack formation. Oil yields greasier, flatter, less flavorful cookies with poor surface definition.
- How do I prevent the powdered sugar from melting or disappearing?
- Roll generously while dough is very cold. Avoid humid environments. Store cooled cookies in single layers or with parchment between—stacking while warm causes sugar to dissolve. If sugar fades, a light re-dusting before serving restores sparkle.
- Are crinkle cookies suitable for mailing?
- Yes—with care! Pack in rigid tins or boxes with parchment between layers. Include a silica gel packet to absorb moisture. Ship via 2-day service and avoid extreme temperatures. Best shipped 1–2 days after baking.
- Can I double the recipe?
- You can—but mix in two separate batches. Doubling increases risk of overmixing, uneven chilling, and inconsistent baking. Better to make two full batches sequentially with clean equipment.
- What’s the best way to gift crinkle cookies?
- Layer in festive tins lined with wax paper or cellophane. Tie with twine and a sprig of dried orange or cinnamon stick. Include a handwritten card with the recipe and a note about their history—it transforms sweets into heirloom keepsakes.
- Why do some recipes include vinegar or sour cream?
- Acidic ingredients boost leavening (reacting with baking soda) and tenderize gluten. While not traditional in classic crinkles, small amounts (1 tsp vinegar or 2 tbsp sour cream) can enhance rise and tenderness—but alter flavor profile subtly.
Summary
Christmas Crinkle Cookies are a beloved holiday tradition defined by their fudgy chocolate base, dramatic cracked surface, and snowy confectioners’ sugar crust—achieved through precise technique, patient chilling, and quality ingredients.
More than a dessert, they embody the spirit of the season: warmth, generosity, nostalgia, and the quiet magic of transforming simple pantry staples into moments of shared joy, one perfectly cracked cookie at a time.