
Introduction
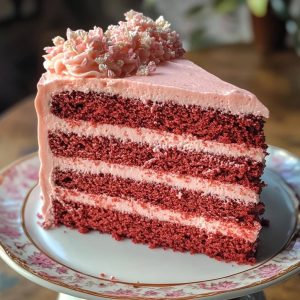
Pink Velvet Cake is a fun and visually striking variation of the classic red velvet cake. Its distinct pink hue, combined with a moist, tender crumb and a rich cream cheese frosting, has made it a popular choice for celebrations like birthdays, weddings, and baby showers. The cake’s mild flavor and vibrant color make it stand out while still offering the soft texture that’s beloved in velvet cakes. It is a perfect choice for those who love both the taste and aesthetic of red velvet but prefer a pink twist. This cake is a great way to make any occasion feel special, providing a balance between visual appeal and deliciousness.
The History of Pink Velvet Cake
While the origins of the traditional red velvet cake can be traced back to the early 20th century, often linked to the southern United States, the pink velvet cake is a more recent, creative variation. It rose to popularity in the 21st century as pink became a trendy color for parties, particularly for baby showers and gender reveal celebrations. The pink version retains the same classic cake structure and frosting style as red velvet, with the only difference being the natural or artificial coloring used to achieve its striking pink appearance. Some bakers even use beet juice or food-grade coloring to achieve the pink hue, making it both visually stunning and subtly flavorful.
Ingredients Breakdown
For the cake itself, the essential ingredients typically include all-purpose flour, sugar, eggs, baking powder, and cocoa powder, giving the cake its signature tenderness and flavor. The use of buttermilk helps achieve a tender crumb, while the addition of vinegar reacts with the baking soda, creating the light and airy texture that velvet cakes are known for. The pink color can be achieved with liquid food coloring, beet juice, or even natural fruit-based coloring, depending on personal preference. The frosting is typically made with cream cheese, butter, powdered sugar, and vanilla extract, providing a smooth and tangy balance to the cake’s sweetness. Together, these ingredients work harmoniously to create a cake that is both visually and gastronomically impressive.
Step-by-Step Recipe:
- Preheat the Oven
Start by preheating your oven to 350°F (175°C). Prepare two 9-inch round cake pans by greasing and lightly flouring them to prevent sticking. You can also line them with parchment paper for an extra layer of assurance. - Mix Dry Ingredients
In a medium bowl, sift together 2 ½ cups of all-purpose flour, 1 teaspoon of baking powder, and 1 tablespoon of cocoa powder. Set this dry mixture aside. - Cream the Butter and Sugar
In a large mixing bowl, beat 1 cup of unsalted butter with 1 ½ cups of granulated sugar until light and fluffy. This will take about 3-4 minutes using an electric mixer on medium speed. - Add Eggs and Flavorings
Add in 2 large eggs, one at a time, beating well after each addition. Then, mix in 2 teaspoons of vanilla extract and 1 teaspoon of liquid food coloring to achieve the pink hue. - Incorporate Wet Ingredients
Add 1 cup of buttermilk and the dry flour mixture to the butter mixture, alternating between the two, beginning and ending with the flour mixture. Be sure to mix gently after each addition until just combined. - Add Vinegar and Baking Soda
In a small bowl, mix 1 teaspoon of white vinegar with 1 teaspoon of baking soda. Once the mixture starts to bubble, fold it into the cake batter. This will create a light, fluffy texture. - Bake the Cake
Divide the batter evenly between the prepared pans and smooth the tops. Bake for 25-30 minutes or until a toothpick inserted into the center comes out clean. Let the cakes cool in the pans for 10 minutes before transferring them to a wire rack to cool completely. - Prepare the Cream Cheese Frosting
While the cake cools, prepare the frosting. Beat together 8 ounces of softened cream cheese and ½ cup of softened butter until smooth. Gradually add 4 cups of powdered sugar and 1 teaspoon of vanilla extract. Beat until light and fluffy. - Assemble the Cake
Once the cakes have cooled completely, spread a layer of cream cheese frosting on top of one of the cake layers. Place the second layer on top and frost the top and sides of the entire cake. - Chill and Serve
For the best results, refrigerate the cake for at least 30 minutes before slicing to allow the frosting to set. Slice and serve the delicious Pink Velvet Cake to your guests!
Tips for the Perfect Pink Velvet Cake
For an even fluffier cake, be sure not to overmix the batter once the dry ingredients are added. Overmixing can lead to a denser cake. If you don’t have buttermilk, you can make a substitute by adding 1 tablespoon of lemon juice or vinegar to 1 cup of milk and letting it sit for 5 minutes. Adjust the amount of food coloring depending on how vibrant you want the cake to be. If you prefer a more natural color, beet juice is an excellent alternative. Also, make sure to allow the cakes to cool completely before frosting to avoid the frosting from melting.
Variations and Customizations
You can easily switch up the flavor profile of the cake by incorporating different extracts. For example, almond extract can give the cake a slightly nutty flavor, while adding a little lemon zest to the batter will add a fresh, zesty note. For a richer texture, you can replace half of the butter with vegetable oil, which keeps the cake moist. You can also experiment with different frostings, such as a traditional buttercream or even a whipped cream frosting, depending on your preference.
Health Considerations and Nutritional Value
While Pink Velvet Cake is not a health food, it can be enjoyed in moderation as part of a balanced diet. The cake contains ingredients like butter, sugar, and cream cheese, which provide energy but are also high in fat and sugar. For a lighter version, you could try reducing the amount of sugar or swapping some of the butter for a healthier fat, such as coconut oil. Additionally, using a sugar substitute like stevia could help lower the calorie content. However, keep in mind that these modifications may affect the flavor and texture of the cake.
FAQ
- Can I make Pink Velvet Cake in advance?
Yes, you can bake the cake ahead of time and store it in an airtight container for up to 3 days at room temperature. The frosting can also be made ahead and stored in the fridge for up to 5 days. Assemble the cake the day before you plan to serve it for optimal freshness. - Can I use a different type of frosting?
Absolutely! While cream cheese frosting is traditional, you can use buttercream frosting, whipped cream, or even a chocolate ganache topping for a twist. - Can I use a boxed cake mix for Pink Velvet Cake?
Yes, you can use a box mix if you’re looking for a quicker option. Just make sure to add the food coloring to achieve that beautiful pink hue and use buttermilk for an extra tender crumb. - How can I make the cake even more colorful?
If you want a brighter pink cake, simply add more food coloring to the batter until you achieve your desired shade. Just be cautious not to add too much, as this can affect the cake’s taste.
pink velvet cake
Ingredients
Pink Velvet Cake Ingredients
- 13 oz cake flour
- 12 oz granulated sugar
- 1 teaspoon salt
- 1 tablespoon baking powder
- ½ teaspoon baking soda
- 5 oz egg whites room temperature
- 4 oz vegetable oil
- 10 oz buttermilk room temperature or slightly warm
- 6 oz unsalted butter softened
- 2 teaspoons vanilla extract
- 2 drops electric pink food coloring
Stabilized Whipped Cream
- 24 ounces heavy whipping cream
- 4 ounces powdered sugar
- 2 teaspoons powdered gelatin
- 1 tablespoon cold water
- 1 teaspoon vanilla extract
- 1 teaspoon heavy whipping cream
Optional Garnish
- 1 cup fresh raspberries
Instructions
- NOTE: It is ESSENTIAL that all room temperature ingredients are truly at room temperature and measured by weight to ensure the ingredients mix and incorporate properly.
- Preheat the oven to 335º F (168º C) – 350º F (177º C). I recommend using the lower setting to prevent the cakes from browning on the outside before the inside is fully baked.
- Prepare three 6″x2″ cake pans with cake goop or your preferred pan spray. Fill the pans about ¾ full with batter.
- In the bowl of a stand mixer with the paddle attachment, combine the flour, sugar, baking powder, baking soda, and salt. Mix for 10 seconds to combine.
- In a separate bowl, combine ½ cup of the milk and the oil, then set aside.
- In another bowl, combine the remaining milk, egg whites, pink food coloring, and vanilla. Whisk the mixture to break up the eggs, and set aside.
- Add the softened butter to the dry ingredients and mix on low speed until the mixture resembles coarse sand (about 30 seconds).
- Next, add the milk/oil mixture and mix until the dry ingredients are moistened. Increase the speed to medium (setting 4 on my KitchenAid) and mix for 2 minutes to develop the cake’s structure. This step is crucial — skipping it can cause the cake to collapse.
- Scrape down the bowl and reduce the speed to low. Add the egg white mixture in three batches, allowing the batter to mix for 15 seconds between each addition.
- Scrape the bowl once more to ensure everything is incorporated, then pour the batter into the prepared pans.
- Bake for 35-40 minutes, or until a toothpick inserted into the center comes out clean, but the cake hasn’t begun shrinking from the sides of the pan.
- IMMEDIATELY TAP the pan firmly on the countertop to release steam from the cake, preventing it from shrinking.
- Allow the cakes to cool for 10 minutes in the pan before flipping them out. The cake may shrink slightly, which is normal. Flip the cakes onto a cooling rack and let them cool completely. I prefer to chill my cakes before handling them, or you can wrap them in plastic wrap and freeze them to lock in moisture. Thaw them at room temperature while still wrapped before frosting.
- Stabilized Whipped Cream
- Sprinkle the gelatin over the water and let it bloom for 5 minutes.
- Melt the gelatin in the microwave for 5 seconds. If it’s not fully melted, heat for an additional 3 seconds. You’ll know the gelatin is fully melted when no granules are visible.
- After the gelatin is dissolved, add 1 teaspoon of heavy cream and mix. If the gelatin has cooled too much, heat it again for 5 seconds until fully melted.
- In a cold mixing bowl, whip the heavy cream to soft peaks.
- Add the powdered sugar and vanilla and mix until combined.
- Turn the mixer to low and drizzle in the gelatin mixture, then continue mixing until stiff peaks form. Be careful not to over-mix, as this can cause the whipped cream to turn into butter.