Go Back
pink velvet cake

pink velvet cake

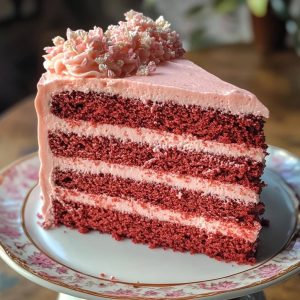
Pink Velvet Cake is a beautiful, flavorful twist on the classic red velvet cake, perfect for any occasion. Its rich flavor and vibrant color make it a crowd-pleasing dessert that is sure to impress.
Prep Time 10 minutes
Cook Time 40 minutes
Total Time 40 minutes
Servings 8

Ingredients
  

Pink Velvet Cake Ingredients

  • 13 oz cake flour
  • 12 oz granulated sugar
  • 1 teaspoon salt
  • 1 tablespoon baking powder
  • ½ teaspoon baking soda
  • 5 oz egg whites room temperature
  • 4 oz vegetable oil
  • 10 oz buttermilk room temperature or slightly warm
  • 6 oz unsalted butter softened
  • 2 teaspoons vanilla extract
  • 2 drops electric pink food coloring

Stabilized Whipped Cream

  • 24 ounces heavy whipping cream
  • 4 ounces powdered sugar
  • 2 teaspoons powdered gelatin
  • 1 tablespoon cold water
  • 1 teaspoon vanilla extract
  • 1 teaspoon heavy whipping cream

Optional Garnish

  • 1 cup fresh raspberries

Instructions
 

  • NOTE: It is ESSENTIAL that all room temperature ingredients are truly at room temperature and measured by weight to ensure the ingredients mix and incorporate properly.
  • Preheat the oven to 335º F (168º C) – 350º F (177º C). I recommend using the lower setting to prevent the cakes from browning on the outside before the inside is fully baked.
  • Prepare three 6"x2" cake pans with cake goop or your preferred pan spray. Fill the pans about ¾ full with batter.
  • In the bowl of a stand mixer with the paddle attachment, combine the flour, sugar, baking powder, baking soda, and salt. Mix for 10 seconds to combine.
  • In a separate bowl, combine ½ cup of the milk and the oil, then set aside.
  • In another bowl, combine the remaining milk, egg whites, pink food coloring, and vanilla. Whisk the mixture to break up the eggs, and set aside.
  • Add the softened butter to the dry ingredients and mix on low speed until the mixture resembles coarse sand (about 30 seconds).
  • Next, add the milk/oil mixture and mix until the dry ingredients are moistened. Increase the speed to medium (setting 4 on my KitchenAid) and mix for 2 minutes to develop the cake’s structure. This step is crucial — skipping it can cause the cake to collapse.
  • Scrape down the bowl and reduce the speed to low. Add the egg white mixture in three batches, allowing the batter to mix for 15 seconds between each addition.
  • Scrape the bowl once more to ensure everything is incorporated, then pour the batter into the prepared pans.
  • Bake for 35-40 minutes, or until a toothpick inserted into the center comes out clean, but the cake hasn’t begun shrinking from the sides of the pan.
  • IMMEDIATELY TAP the pan firmly on the countertop to release steam from the cake, preventing it from shrinking.
  • Allow the cakes to cool for 10 minutes in the pan before flipping them out. The cake may shrink slightly, which is normal. Flip the cakes onto a cooling rack and let them cool completely. I prefer to chill my cakes before handling them, or you can wrap them in plastic wrap and freeze them to lock in moisture. Thaw them at room temperature while still wrapped before frosting.
  • Stabilized Whipped Cream
  • Sprinkle the gelatin over the water and let it bloom for 5 minutes.
  • Melt the gelatin in the microwave for 5 seconds. If it’s not fully melted, heat for an additional 3 seconds. You’ll know the gelatin is fully melted when no granules are visible.
  • After the gelatin is dissolved, add 1 teaspoon of heavy cream and mix. If the gelatin has cooled too much, heat it again for 5 seconds until fully melted.
  • In a cold mixing bowl, whip the heavy cream to soft peaks.
  • Add the powdered sugar and vanilla and mix until combined.
  • Turn the mixer to low and drizzle in the gelatin mixture, then continue mixing until stiff peaks form. Be careful not to over-mix, as this can cause the whipped cream to turn into butter.

Notes

Important Things to Note Before You Begin
  1. Ensure all your ingredients (such as eggs, buttermilk, butter, etc.) are at room temperature or slightly warm. This helps prevent the batter from breaking or curdling during mixing.
  2. For better accuracy, weigh your ingredients (including liquids) using a scale, unless otherwise indicated (such as tablespoons, teaspoons, pinch, etc.). Metric measurements are included in the recipe card. Weighing ingredients provides more precision than using volume measurements and improves the likelihood of your recipe turning out perfectly.
  3. Practice Mise en Place—this means having everything measured and prepared ahead of time. Having all your ingredients ready before you start mixing will minimize the chance of forgetting something.
  4. Be sure to chill your cakes before frosting and filling them. If desired, you can cover a chilled, frosted cake in fondant. This cake also holds up well for stacking. I personally store cakes in the refrigerator before delivery, making transportation easier and more convenient.
  5. If a recipe specifies ingredients such as cake flour, do not substitute them with all-purpose flour and cornstarch unless the recipe allows it. Substituting ingredients without guidance could lead to the failure of the recipe.