Introduction
Welcome to the ultimate dessert experience — S’more Cups: a whimsical, bite-sized reinvention of America’s beloved campfire classic! Imagine the nostalgic crackle of a bonfire, the rich aroma of toasted marshmallows, the deep cocoa notes of premium chocolate, and the buttery crunch of graham cracker — all elegantly layered into individual, no-bake, portion-perfect cups. These aren’t just treats; they’re edible memories, meticulously crafted for texture harmony, visual charm, and pure, unadulterated joy. Whether you’re hosting a summer soirée, packing school lunches, surprising coworkers with a sweet break, or simply craving that magical trifecta of crunchy, gooey, and irresistibly sweet, S’more Cups deliver every time — without the smoke, the sticks, or the sticky fingers (well, maybe just a little stickiness — it’s part of the charm!).
The History
The story of the s’more is as warm and layered as its ingredients. Born in the early 20th century, the first known printed recipe appeared in the 1927 Girl Scouts handbook *Trails to Treasures*, under the playful name “Some More” — a cheeky, phonetic nod to how quickly one would ask for another after devouring the first. Its roots trace back further to rustic American camping culture, where resourceful outdoorsmen sandwiched roasted marshmallows and chocolate between graham crackers — a portable, calorie-dense delight perfect for fueling adventures. Over decades, the s’more evolved from a simple campfire snack into a cultural icon: featured in commercials, reimagined in ice creams, baked into pies, and even elevated by Michelin-starred chefs. S’more Cups represent the next delicious chapter — a modern, minimalist, and highly scalable interpretation designed for today’s busy, style-conscious, and flavor-obsessed home bakers. They honor tradition while embracing convenience, consistency, and Instagram-worthy presentation.
Ingredients Breakdown
Every exceptional S’more Cup begins with intentional, high-quality components — each playing a precise role in the symphony of texture and taste:
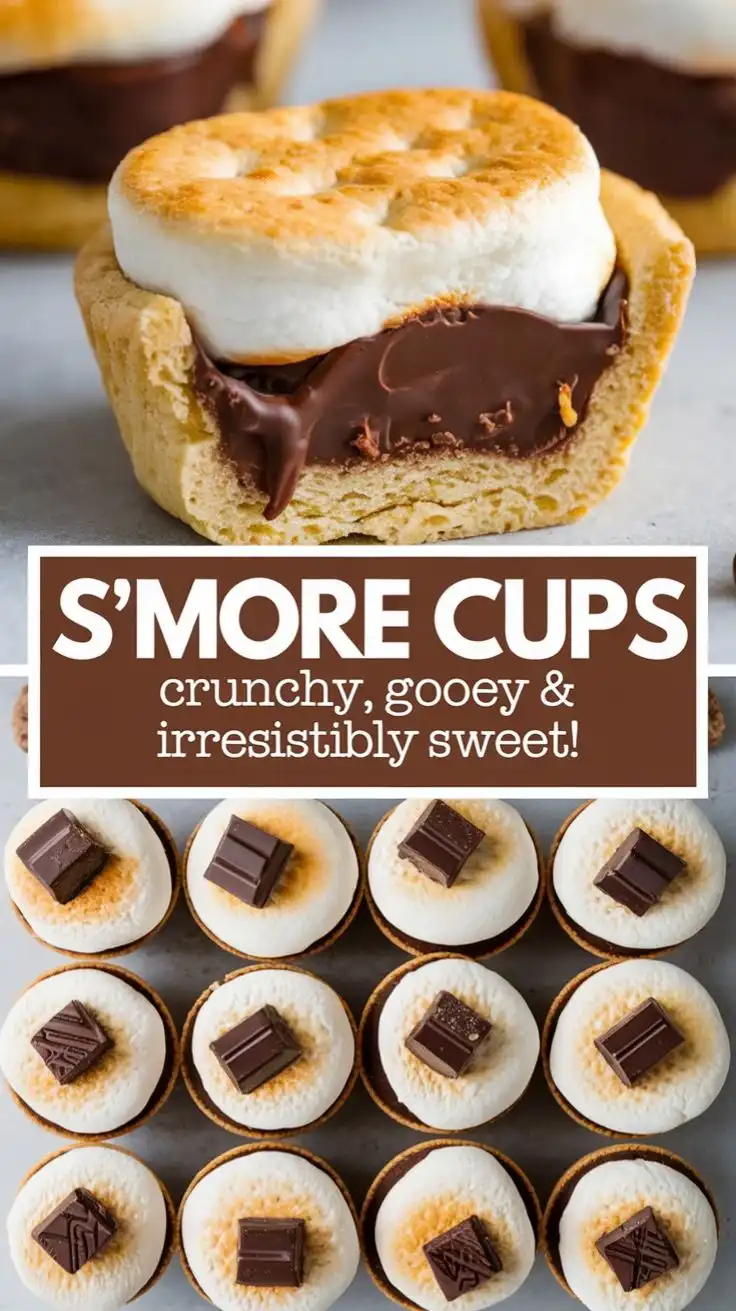
- Graham Cracker Crumbs (Base Layer): Not just filler — these provide foundational structure, earthy honey-sweetness, and that signature sandy-crisp bite. Opt for cinnamon-spiced or honey-sweetened varieties for depth. Gluten-free graham alternatives work beautifully too.
- Unsalted Butter (Binding Agent): Melted and evenly distributed, it transforms crumbs into a firm, cohesive crust that holds its shape when chilled — no crumbling, no sliding, just clean release from the cup.
- Milk Chocolate (Middle Layer): The soul of the s’more. Use bars with 35–45% cocoa for optimal creaminess and sweetness balance. Avoid candy-coated chocolate chips unless specified — their stabilizers inhibit smooth melting and create a waxy mouthfeel.
- Marshmallow Fluff or Homemade Marshmallow Creme (Gooey Crown): Far superior to plain marshmallows for this application — it’s airy, stable, spreadable, and melts *just enough* under gentle heat to become luxuriously molten without collapsing. Look for brands with real vanilla and minimal corn syrup.
- Mini Marshmallows (Optional Toasted Garnish): For that authentic campfire finish — lightly torched with a culinary torch or broiled for 30 seconds until golden and puffed.
- Flavor Enhancers (Secret Weapons): A pinch of flaky sea salt amplifies sweetness and balances fat; a drop of pure vanilla extract deepens aroma; a whisper of espresso powder intensifies chocolate without adding bitterness.
Step-by-Step Recipe
- Prep & Chill: Line a standard 12-cup muffin tin with parchment paper liners (or use silicone cups for effortless removal). Place in freezer for 10 minutes — cold molds ensure crisp crust setting.
- Build the Crust: In a medium bowl, combine 1 ½ cups finely crushed graham crackers (about 10 full sheets) and 6 tbsp melted unsalted butter. Mix until evenly moistened — it should hold together when squeezed. Divide evenly among cups (~1 tbsp per cup), then press firmly using the back of a spoon or a small measuring cup to create an even, compact ¼-inch base. Freeze for 15 minutes.
- Melt the Chocolate: Chop 8 oz high-quality milk chocolate into uniform pieces. Melt gently using a double boiler (or microwave in 20-sec bursts, stirring between) until smooth and glossy — never overheat. Let cool slightly (to ~90°F) so it doesn’t melt the crust.
- Layer the Chocolate: Spoon ~1 tbsp melted chocolate over each chilled crust. Tilt and rotate cups to coat evenly, then tap gently on counter to settle. Refrigerate 10 minutes until set but still cool to touch.
- Add the Gooey Center: Scoop 1 heaping tbsp of marshmallow fluff onto each cup. Using an offset spatula or damp finger, gently swirl and smooth — don’t press down hard; preserve airiness. Optional: dot with tiny chocolate shavings before chilling.
- Chill to Set: Refrigerate uncovered for at least 1 hour — or freeze for 20 minutes for faster firming. This step is non-negotiable for clean slicing and temperature contrast.
- Finish & Serve: Just before serving, carefully peel away parchment. For drama, use a kitchen torch to lightly toast the marshmallow surface (5–8 seconds per cup), watching closely for golden-brown blisters. Alternatively, broil on high for 30–45 seconds. Sprinkle with flaky sea salt and serve immediately.
Tips
- Crumbs Matter: Pulse graham crackers in a food processor until fine — like sand, not gravel. Coarse crumbs won’t bind properly and create crumbly edges.
- Butter Temperature: Use *melted*, not softened, butter — it coats each crumb for maximum cohesion. Too much butter makes the crust greasy; too little leads to cracking.
- Chocolate Tempering? Not Required: Since these are chilled desserts (not shelf-stable), tempering isn’t necessary — just avoid overheating to preserve shine and snap.
- Marshmallow Fluff Hack: If store-bought is too thick, stir in ½ tsp warm water or light corn syrup to loosen — makes swirling effortless.
- No Torch? No Problem: Broil on top rack for 30 sec — watch like a hawk! Or skip toasting entirely — the raw fluff offers pristine, cloud-like sweetness.
- Make-Ahead Magic: Assemble up to 3 days ahead — keep refrigerated in an airtight container with parchment layers. Add toasted marshmallows within 30 minutes of serving.
- Perfect Release: Let cups sit at room temp for 60–90 seconds before peeling parchment — warmth softens the butter just enough for clean lift-off.
- Texture Contrast Tip: For extra crunch, fold 2 tbsp crushed graham cracker or toffee bits into the marshmallow layer before swirling.
Variations and Customizations
S’more Cups are a canvas — endlessly adaptable to dietary needs, seasonal flavors, and creative impulses:
- Dark Chocolate Decadence: Swap milk chocolate for 70% dark chocolate + a drizzle of caramel sauce before adding fluff.
- Peanut Butter Swirl: After spreading chocolate, add ½ tsp creamy peanut butter per cup, then swirl gently with a toothpick before adding fluff.
- Strawberry S’mores: Layer a thin smear of seedless strawberry jam beneath the chocolate — adds bright acidity and vibrant color.
- Maple-Bourbon Infusion: Replace 1 tbsp butter with pure maple syrup; add ¼ tsp bourbon to marshmallow fluff for sophisticated warmth.
- Coconut Campfire: Use coconut graham crackers, dark chocolate, and toasted coconut flakes folded into fluff — garnish with extra coconut.
- Vegan Victory: Vegan graham crackers, dairy-free chocolate (e.g., Enjoy Life), vegan marshmallow creme (Dandies), and coconut oil instead of butter.
- Gluten-Free Grace: GF graham-style crackers (like Schär or Pamela’s), certified GF chocolate, and GF marshmallow fluff — same technique, zero compromise.
- Miniature Magic: Use a 24-cup mini muffin tin — perfect for parties, bridal showers, or portion-controlled indulgence (bake time unchanged).
- Spiced S’mores: Add ¼ tsp cinnamon + pinch of cayenne to graham crumb mixture — subtle heat enhances chocolate’s richness.
- Espresso Crunch: Stir 1 tsp instant espresso powder into melted chocolate; top with crushed chocolate-covered espresso beans.
Health Considerations and Nutritional Value
While S’more Cups are undeniably indulgent, mindful preparation allows for thoughtful enjoyment. Per standard 12-cup recipe (yielding 12 servings), each cup averages approximately 185–210 calories, depending on chocolate fat content and butter ratio. Key nutritional insights:
- Sugar Awareness: A typical cup contains 12–16g added sugar — primarily from graham crackers, chocolate, and marshmallow fluff. Reduce by using lower-sugar graham alternatives (e.g., reduced-sugar Honey Maid) or swapping half the fluff for lightly sweetened whipped coconut cream.
- Fat Profile: Contains saturated fat from butter and chocolate — but also heart-healthy monounsaturated fats from cocoa butter. Choosing dark chocolate (>70%) increases antioxidant flavanols significantly.
- Protein & Fiber Boost: Naturally low in protein/fiber, but easily enhanced: mix 1 tbsp almond flour into graham crumbs, or top with crushed roasted almonds or chia seeds.
- Dietary Accommodations: Easily adapted for vegan, gluten-free, nut-free (verify labels), and kosher diets — empowering inclusive sharing without sacrificing authenticity.
- Portion Control Benefit: Unlike traditional s’mores (often 300+ cal each), these pre-portioned cups prevent overconsumption — supporting intuitive eating habits.
- Functional Additions: Stir ¼ tsp matcha powder into fluff for calm energy; add collagen peptides (unflavored) to melted chocolate for skin/gut support (heat-stable up to 140°F).
- Mindful Indulgence Principle: These are not “health foods,” but joyful, intentional treats. Pair with herbal tea, share with loved ones, savor slowly — that’s where true nourishment lives.
Ingredients
- 1 ½ cups (about 10 full sheets) graham cracker crumbs (finely pulsed)
- 6 tablespoons unsalted butter, melted and cooled slightly
- 8 ounces high-quality milk chocolate (chopped into small, even pieces)
- 1 cup marshmallow fluff (or homemade marshmallow creme)
- ¼ teaspoon flaky sea salt (for finishing)
- Optional garnishes: mini marshmallows, chocolate shavings, crushed graham cracker, espresso beans, toasted coconut
Directions
- Line a 12-cup standard muffin tin with parchment paper liners. Place in freezer for 10 minutes.
- In a medium bowl, combine graham cracker crumbs and melted butter. Mix thoroughly until all crumbs are evenly moistened and the mixture resembles wet sand.
- Divide crumb mixture evenly among the 12 lined cups (about 1 tablespoon per cup). Press firmly and evenly into the bottom using the back of a small measuring cup or flat-bottomed glass to form a compact, level crust.
- Transfer tin to freezer and chill for 15 minutes.
- Meanwhile, melt chocolate using a double boiler or microwave method: place chopped chocolate in a heatproof bowl over simmering (not boiling) water, stirring constantly until smooth and glossy — or microwave in 20-second intervals, stirring between each, until fully melted and fluid.
- Let melted chocolate cool slightly (to about 90°F — warm but not hot to the touch) to prevent melting the crust.
- Remove tin from freezer. Spoon ~1 tablespoon of melted chocolate into each cup, covering the entire crust surface. Gently tilt and rotate each cup to encourage even coating, then tap lightly on the counter to eliminate air bubbles and settle the layer.
- Return tin to refrigerator for 10 minutes, or until chocolate is fully set but still cool.
- Remove from fridge. Spoon 1 heaping tablespoon of marshmallow fluff onto each chocolate layer. Using a damp offset spatula or clean fingertip, gently swirl and smooth — aim for a soft, billowy dome without pressing down.
- Refrigerate uncovered for at least 1 hour — or freeze for 20 minutes — until completely firm and chilled throughout.
- Just before serving, carefully peel away parchment paper liners. For the ultimate finish, use a culinary torch to lightly toast the marshmallow surface until golden-brown and delicately blistered (approx. 5–8 seconds per cup). Alternatively, place on upper rack of oven broiler for 30–45 seconds — watch continuously!
- Immediately sprinkle each cup with a tiny pinch of flaky sea salt. Serve chilled — best enjoyed within 30 minutes of torching for ideal textural contrast.
FAQ
- Can I make these ahead?
- Absolutely! Fully assembled (without torching) cups keep beautifully refrigerated in an airtight container with parchment layers for up to 3 days — or frozen for up to 3 weeks. Thaw in fridge 30 minutes before torching and serving.
- Why does my crust crumble when I remove the liner?
- Two likely culprits: (1) Insufficient butter — ensure exact 6 tbsp melted butter for 1 ½ cups crumbs; (2) Inadequate pressing — use firm, even pressure with a flat tool, not fingers. Also, let sit at room temp 60–90 seconds before peeling.
- Can I use marshmallow cream instead of fluff?
- Yes — but choose brands labeled “marshmallow creme” (e.g., Kraft Jet-Puffed Creme), not “marshmallow spread.” The former has ideal viscosity and stability. Avoid generic “marshmallow topping” — too runny.
- My chocolate layer cracked — what went wrong?
- Cracking usually occurs if chocolate was too hot when poured (melting the crust below) or if chilled too rapidly before setting. Always cool chocolate to ~90°F, and refrigerate (don’t freeze) the chocolate layer for the full 10 minutes before adding fluff.
- Are there nut-free options?
- Yes — all standard ingredients are naturally nut-free. Just verify labels on graham crackers, chocolate, and marshmallow creme for shared-equipment warnings if severe allergy is a concern.
- Can I bake these?
- No — baking alters the delicate balance: fluff will brown excessively, chocolate may seize, and graham crust can dry out. These are intentionally no-bake for optimal texture integrity.
- How do I scale this for a crowd?
- Double or triple with ease! Use multiple tins. For events, assemble 1 day ahead, store chilled, then torch in batches just before guests arrive — the dramatic flame adds unforgettable theater.
- What’s the best way to store leftovers?
- Place in single layer in airtight container with parchment between layers. Refrigerate up to 3 days. Do not cover with plastic wrap directly on marshmallow — it will stick. Re-toast briefly before serving if desired.
Summary
S’more Cups are a masterclass in nostalgic reinvention — delivering the iconic campfire trio of graham, chocolate, and marshmallow in an elegant, portion-perfect, no-bake format that’s equal parts crunchy, gooey, and irresistibly sweet.
With customizable variations, thoughtful health adaptations, foolproof techniques, and endless creative potential, they’re not just a dessert — they’re a joyful, shareable celebration of simplicity, texture, and timeless flavor.