Introduction
Red Velvet Crinkle Cookies are the dazzling, festive lovechild of classic crinkle cookies and beloved red velvet cake—rich, velvety, deeply chocolaty, with a signature crimson hue and a crackled, sugar-dusted exterior that gives way to a luxuriously fudgy, tender interior. These aren’t just holiday staples—they’re year-round showstoppers: elegant enough for Christmas cookie exchanges, whimsical enough for Valentine’s Day, bold enough for birthdays, and irresistibly nostalgic for anyone who adores the subtle tang of buttermilk, the warmth of cocoa, and the magic of that iconic red swirl. With their dramatic visual appeal, melt-in-your-mouth texture, and balanced sweet-tart depth, Red Velvet Crinkle Cookies embody celebration in every bite—transforming simple pantry staples into edible confetti.
The History
While the exact origin of Red Velvet Crinkle Cookies remains delightfully unchronicled (no single patent or 1950s cookbook can claim sole credit), their lineage is richly interwoven with two American baking traditions. First: Red Velvet Cake, which emerged in the early 20th century—likely as a clever adaptation of “velvet cake” recipes using acidic ingredients (like buttermilk and vinegar) reacting with natural cocoa to enhance color and tenderness. The vibrant red we associate today was amplified post-WWII with the rise of affordable red food coloring and the iconic Waldorf Astoria and later, Southern regional interpretations. Second: Crinkle Cookies, whose origins trace back to mid-century American home economics experiments—bakers discovered that rolling dough balls in granulated or powdered sugar before baking created dramatic fissures due to rapid surface drying and expansion, yielding that beloved “cracked” top. Red Velvet Crinkle Cookies emerged organically in the 2000s as bakers began cross-pollinating trends—swapping traditional chocolate crinkle bases for red velvet batter, adding white vinegar and buttermilk for authenticity, and leaning into festive aesthetics. Today, they’re a viral sensation on Pinterest, TikTok, and food blogs—not just for flavor, but for their photogenic drama and emotional resonance: red = love, crinkles = joy, fudge = comfort.
Ingredients Breakdown
Every ingredient in these Red Velvet Crinkle Cookies serves a precise, science-backed purpose—no filler, no afterthought:
- All-Purpose Flour: Provides essential gluten structure—but used in *just* the right amount (not too much!) to avoid toughness. Too little = flat, greasy cookies; too much = dry, cakey ones. We balance it with cornstarch for tenderness.
- Unsweetened Natural Cocoa Powder (NOT Dutch-processed): Critical for authentic red velvet flavor and chemical reactivity. Natural cocoa is acidic, allowing it to interact with baking soda and vinegar to deepen color, lift texture, and enhance that signature tangy-chocolate complexity. Dutch-processed cocoa is neutralized and won’t deliver the same lift or hue intensity.
- Granulated Sugar: Not only sweetens but aids in spreading, browning (via caramelization), and creating crisp edges. Its fine crystals dissolve easily into the butter-sugar cream, building air pockets for lift.
- Packed Brown Sugar: Adds moisture, chewiness, and deep molasses notes that complement the cocoa and balance the acidity. Light brown is preferred for subtlety; dark brown intensifies flavor but may mute the red hue slightly.
- Unsalted Butter: Must be at cool room temperature (65–68°F)—soft enough to cream but firm enough to hold air. Melted butter yields flat, greasy cookies; cold butter won’t cream properly. High-fat European-style butter (82–84% fat) adds extraordinary richness and mouthfeel.
- Large Eggs: Act as emulsifiers, binders, and leaveners. The yolks add fat and richness; the whites provide structure. Using room-temperature eggs ensures even incorporation and prevents seizing the batter.
- Buttermilk: The secret weapon. Its lactic acid reacts with baking soda *and* cocoa, tenderizing gluten, amplifying redness, and imparting that unmistakable velvet-cake tang. No substitutes yield the same effect—though DIY buttermilk (1 cup milk + 1 tbsp white vinegar or lemon juice, rested 5 min) works in a pinch.
- White Vinegar: Reinforces acidity for maximum color development and lift. It also subtly enhances the cocoa’s fruitiness and cuts through sweetness—essential for sophistication.
- Baking Soda: The sole leavener here (no baking powder). It’s activated *only* by acid (vinegar + buttermilk + cocoa), providing gentle, controlled rise—enough to create lift without excessive spread, preserving that dense-fudgy core.
- Red Food Coloring: Use high-quality liquid or gel coloring. Gel provides intense, vibrant red without thinning the batter; liquid is more accessible but may require slightly more. Avoid “natural” beet-based dyes unless you accept muted pink-brown tones and potential flavor interference. For true “velvet” depth, many bakers use a combination of red + a tiny drop of black or purple gel to deepen the base tone.
- Vanilla Extract: Pure, not imitation. Enhances all other flavors and adds aromatic warmth—especially important to round out acidity.
- Pinch of Salt: Crucial for flavor balance. It doesn’t make the cookies taste salty—it makes the chocolate taste *chocolatier*, the sweetness brighter, and the tang more defined.
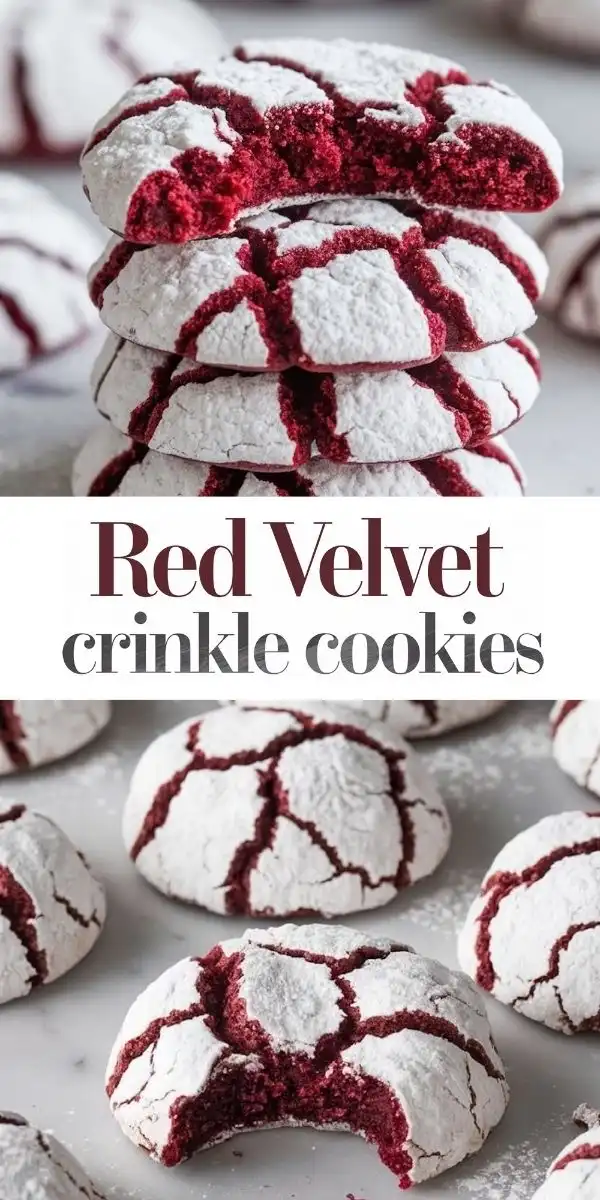
- Powdered Sugar (for rolling): Used generously for coating. Its fine particles adhere well, create instant surface tension, and crystallize beautifully during baking—forming the signature snow-dusted, crackled crust. Sift before use to prevent lumps.
Step-by-Step Recipe
- Prep & Chill (Non-Negotiable!): Line two large baking sheets with parchment paper. Place 1 cup of powdered sugar in a shallow bowl. Chill your mixing bowls and beaters for 10 minutes (this keeps butter cool during creaming). Measure all ingredients precisely—especially cocoa and coloring.
- Cream Butter & Sugars: In a large bowl, beat unsalted butter, granulated sugar, and brown sugar with an electric mixer on medium-high for 3–4 minutes until pale, fluffy, and aerated—scraping the bowl twice. This step incorporates vital air for lift and texture.
- Add Eggs & Vanilla: Beat in eggs one at a time, fully incorporating each (about 20 seconds per egg), then add vanilla and beat 30 seconds more. Batter should look smooth and cohesive—not broken or curdled.
- Whisk Dry Ingredients: In a separate bowl, whisk together flour, cocoa powder, baking soda, and salt until *completely* homogenous—no streaks. Sifting is highly recommended to eliminate cocoa lumps.
- Combine Wet & Dry: Reduce mixer speed to low. Add dry ingredients in three additions, alternating with buttermilk in two additions, beginning and ending with dry ingredients. Mix *just until no flour streaks remain*—overmixing develops gluten and causes toughness. Batter will be thick, glossy, and slightly sticky.
- Activate the Velvet: Stir in white vinegar and red food coloring *by hand* with a silicone spatula—fold gently 15–20 strokes until uniformly deep red. Let batter rest 2 minutes—this allows cocoa to fully hydrate and acids to begin reacting.
- Chill Dough (Essential for Fudginess & Shape): Cover bowl tightly and refrigerate for *minimum 2 hours, ideally 4 hours or overnight*. Cold dough prevents overspreading, concentrates flavor, firms up fats for clean scooping, and allows starches to hydrate—resulting in denser, chewier centers and defined crinkles. Do not skip!
- Portion & Coat: Preheat oven to 350°F (175°C) with racks in upper and lower thirds. Scoop chilled dough using a 1.5-tablespoon cookie scoop (or heaping tablespoon) into 1.5-inch balls. Roll *each ball firmly but gently* in powdered sugar until completely coated—press lightly to adhere. Place 3 inches apart on prepared sheets (they’ll spread!).
- Bake with Precision: Bake 10–12 minutes—rotating pans top-to-bottom and front-to-back halfway through. Cookies are done when edges are set and slightly puffed, tops are cracked and matte (not shiny), and centers look *just barely set*—a slight jiggle is ideal. Overbaking leads to cakiness; underbaking risks greasiness. They firm up as they cool.
- Cool & Set: Let cookies cool on baking sheets for 5 minutes—this sets the crinkles and prevents breakage. Then carefully transfer to wire racks to cool completely (15–20 min). Resist eating warm—they’re fragile and need time for the fudgy interior to fully coalesce.
Tips
- Color Consistency: For the most vibrant, consistent red, use Americolor Super Red or Wilton No-Taste Red gel. Add coloring gradually—start with 1 tsp liquid or ¼ tsp gel, mix, assess, then add more. Too much can impart bitterness.
- Butter Temperature Mastery: Cut butter into tablespoons and leave at room temp for 30–40 minutes—not longer. If it feels greasy or leaves an oily smear on parchment, it’s too warm. Pop it in the fridge for 5 minutes to rescue.
- No-Spread Secret: Chill dough *twice*: once after mixing (to hydrate), and again for 15 minutes after rolling in sugar (if your kitchen is warm >72°F). This prevents melting before baking.
- Crinkle Guarantee: Ensure powdered sugar is *very* dry and sifted. Roll dough balls *immediately* before baking—don’t let them sit. And never skip the 5-minute cooling on the sheet—this is when the cracks truly set.
- Fudgy vs. Cakey: Underbake slightly (10 min), use more brown sugar than granulated, include cornstarch (1 tbsp per cup flour), and chill thoroughly. Overbaking, excess flour, or warm dough = cakey results.
- Uniform Baking: Use an oven thermometer—many ovens run hot or cold. Rotate pans *exactly* at the 5-minute mark. If your oven has hot spots, swap pan positions between upper/lower racks.
- Storage Wisdom: Store cooled cookies in an airtight container at room temp for up to 5 days. For longer life, freeze baked cookies (layered with parchment) for up to 3 months—or freeze unbaked, sugar-coated dough balls for 2 months (bake frozen, +1–2 min).
- Flavor Boosters: Add ¼ tsp almond extract with the vanilla for subtle marzipan nuance. A tiny pinch of espresso powder (⅛ tsp) deepens cocoa without tasting like coffee.
Variations and Customizations
These Red Velvet Crinkle Cookies are a stunning canvas for creativity—every variation maintains the fudgy core and crinkled crown while offering new dimensions of flavor and texture:
- White Chocolate Chunk: Fold in ¾ cup high-quality white chocolate chunks (not chips) after mixing. Their creamy sweetness and melty pockets contrast beautifully with the tangy base.
- Red Velvet & Cream Cheese Swirl: Before rolling in sugar, press a ½-teaspoon dollop of softened, full-fat cream cheese (mixed with 1 tsp powdered sugar) into the center of each dough ball and seal. Creates a luscious, tangy surprise.
- Double Chocolate Red Velvet: Add ¼ cup finely chopped semi-sweet or bittersweet chocolate to the batter—adds textural intrigue and deeper cocoa notes.
- Peppermint Crunch: Add ½ tsp pure peppermint extract with the vanilla and fold in ⅓ cup crushed candy canes or peppermint bark *after* chilling dough (so they don’t bleed color).
- Red Velvet Oatmeal: Replace ¼ cup flour with old-fashioned rolled oats (not quick oats) for hearty, chewy texture and subtle nuttiness.
- Vegan Version: Use vegan butter (Miyoko’s or Earth Balance), flax eggs (1 tbsp ground flax + 2.5 tbsp water per egg), plant-based buttermilk (1 cup soy or oat milk + 1 tbsp vinegar), and vegan red dye. Expect slightly softer texture—chill dough extra-long.
- Gluten-Free: Substitute 1:1 gluten-free all-purpose flour blend *with xanthan gum included* (like King Arthur or Bob’s Red Mill). Add 1 tsp xanthan gum if your blend lacks it. Increase chill time to 5 hours for best structure.
- Mini Crinkles: Scoop with a 1-teaspoon scoop, roll in sugar, and bake 7–9 minutes. Perfect for parties, gift boxes, or portion control—with all the same magic in bite-sized form.
- Red Velvet Sandwich Cookies: Bake as directed, then pair two cooled cookies with a generous swipe of cream cheese frosting or mascarpone ganache—dip edges in red sugar for elegance.
Health Considerations and Nutritional Value
While undeniably indulgent, Red Velvet Crinkle Cookies can be enjoyed mindfully—and understanding their composition helps navigate dietary needs:
- Nutrition Snapshot (per standard 2-inch cookie, approx. 35g): Calories: ~160–185 | Fat: 8–10g (mostly unsaturated from cocoa butter & butter) | Carbs: 22–26g (including 16–19g sugars) | Protein: 2–3g | Fiber: 1g | Sodium: 85–110mg. Contains calcium (from buttermilk), iron (cocoa), and antioxidants (flavanols in cocoa).
- Sugar Awareness: Total sugar includes naturally occurring lactose (buttermilk) and sucrose (cane sugar). To reduce, decrease granulated sugar by 1–2 tbsp (not more—structure suffers) or use coconut sugar (adds caramel notes, lower glycemic index but same calories).
- Fat Perspective: Butter contributes saturated fat, but cocoa butter contains heart-healthy stearic acid (neutral impact on cholesterol). Using half butter/half avocado oil reduces saturated fat while maintaining richness.
- Dietary Adaptations: Naturally egg-free versions exist (applesauce or mashed banana work poorly here—use commercial egg replacer designed for baking). Low-sugar options benefit from erythritol blends (e.g., Swerve Brown), though texture may be drier—add 1 tsp extra buttermilk to compensate.
- Allergen Notes: Contains dairy (butter, buttermilk), eggs, and wheat. Gluten-free and vegan adaptations are robust (see Variations). Always verify food coloring for allergens—some contain corn derivatives or artificial dyes (FD&C Red #40), which may concern sensitive individuals.
- Mindful Enjoyment: These cookies are best savored slowly—two per sitting with a glass of cold milk or herbal tea. Their richness means smaller portions satisfy. Pairing with fresh berries adds fiber, vitamin C, and balances sweetness naturally.
Ingredients
- 1 cup (2 sticks / 227g) unsalted butter, cool room temperature
- 1 cup (200g) granulated sugar
- 1 cup (220g) packed light brown sugar
- 2 large eggs, room temperature
- 2 tsp pure vanilla extract
- 1 cup (240ml) full-fat buttermilk, room temperature
- ⅓ cup (30g) unsweetened natural cocoa powder (not Dutch-processed)
- 2 cups (250g) all-purpose flour
- 1 tsp baking soda
- 1 tsp fine sea salt
- 1 tbsp white vinegar
- 2–3 tsp high-quality red food coloring (liquid) or ½–1 tsp gel (adjust for intensity)
- 1 cup (120g) powdered sugar, sifted (for rolling)
Directions
- Line two large baking sheets with parchment paper. Place 1 cup sifted powdered sugar in a shallow bowl. Chill mixing bowls and beaters for 10 minutes.
- In a large bowl, beat butter, granulated sugar, and brown sugar with an electric mixer on medium-high for 3–4 minutes until pale, fluffy, and well-aerated. Scrape bowl thoroughly.
- Beat in eggs one at a time, fully incorporating each (20 sec), then add vanilla and beat 30 seconds more.
- In another bowl, whisk together flour, cocoa powder, baking soda, and salt until no lumps remain. Sift if needed.
- Reduce mixer to low speed. Add dry ingredients in three parts, alternating with buttermilk in two parts, beginning and ending with dry ingredients. Mix *just until combined*—do not overmix. Batter will be thick and glossy.
- Stir in vinegar and red food coloring by hand with a spatula until uniformly deep red. Let rest 2 minutes.
- Cover bowl tightly and refrigerate dough for at least 2 hours—or preferably 4–24 hours.
- Preheat oven to 350°F (175°C) with racks in upper and lower thirds.
- Scoop chilled dough using a 1.5-tablespoon scoop into 1.5-inch balls. Roll each firmly in powdered sugar until fully coated. Place 3 inches apart on prepared sheets.
- Bake 10–12 minutes, rotating pans top-to-bottom and front-to-back at the 5-minute mark, until edges are set, tops are cracked and matte, and centers are *just* set with a slight jiggle.
- Let cool on baking sheets for 5 minutes, then transfer to wire racks to cool completely (15–20 min) before serving.
FAQ
- Why did my cookies spread too much?
- Most likely causes: butter too warm, insufficient chilling (dough or rolled balls), too much sugar, or expired baking soda. Always chill dough minimum 2 hours—and chill sugar-coated balls 10 minutes if your kitchen is warm.
- Can I use Dutch-processed cocoa?
- Technically yes, but strongly discouraged. Dutch-process is alkalized and neutral, so it won’t react with vinegar/buttermilk to deepen color or lift texture. Your cookies will be darker brown, less tangy, and potentially denser. Stick with natural cocoa for authenticity.
- My cookies aren’t red enough—what went wrong?
- Insufficient food coloring, using low-quality dye, or substituting Dutch-process cocoa. Also, overbaking fades red to brick-red. Use gel coloring, add incrementally, and pull cookies at the perfect moment.
- Can I make the dough ahead?
- Absolutely! Chilled dough keeps beautifully for 5 days in the fridge (well-wrapped) or 3 months frozen (portioned, unbaked, sugar-coated). Thaw frozen dough balls in fridge 1 hour before baking—or bake straight from frozen, adding 1–2 minutes.
- Why do I need both granulated AND brown sugar?
- Granulated sugar promotes spread and crisp edges; brown sugar adds moisture, chew, and complex molasses depth. Omitting either changes texture dramatically—granulated alone yields thinner, crisper cookies; brown alone yields thicker, cakier ones.
- Can I omit the vinegar?
- No—the vinegar is non-negotiable for red velvet authenticity. It activates the baking soda *and* cocoa, enhancing color, tenderness, and tang. Lemon juice is a 1:1 substitute if vinegar is unavailable.
- My crinkles aren’t pronounced—how do I fix that?
- Ensure powdered sugar is ultra-dry and sifted. Roll balls *immediately* before baking—don’t let sugar-coated dough sit. Chill dough thoroughly. Bake on cool (not warm) baking sheets. And never skip the 5-minute cooling on the sheet—it sets the cracks.
- Are these cookies safe for kids? What about food dye concerns?
- Yes—FDA-approved red dyes (like Red #40) are considered safe in typical consumption amounts. For families preferring natural options, beet powder yields a lovely rosy hue (though less vibrant and slightly earthy), or simply embrace the deeper burgundy of cocoa + buttermilk + vinegar chemistry.
Summary
Red Velvet Crinkle Cookies are a masterclass in festive baking—melding the nostalgic tang and crimson allure of red velvet cake with the irresistible, crackled elegance of crinkle cookies, all anchored by a profoundly fudgy, tender crumb that delivers decadence in every bite.
With meticulous attention to ingredient chemistry (natural cocoa + vinegar + buttermilk), precise chilling, and thoughtful technique, these cookies transform humble pantry staples into unforgettable moments of joy—whether shared around a holiday table, gifted in a ribbon-tied box, or savored solo with quiet gratitude for the alchemy of butter, cocoa, and color.