Introduction
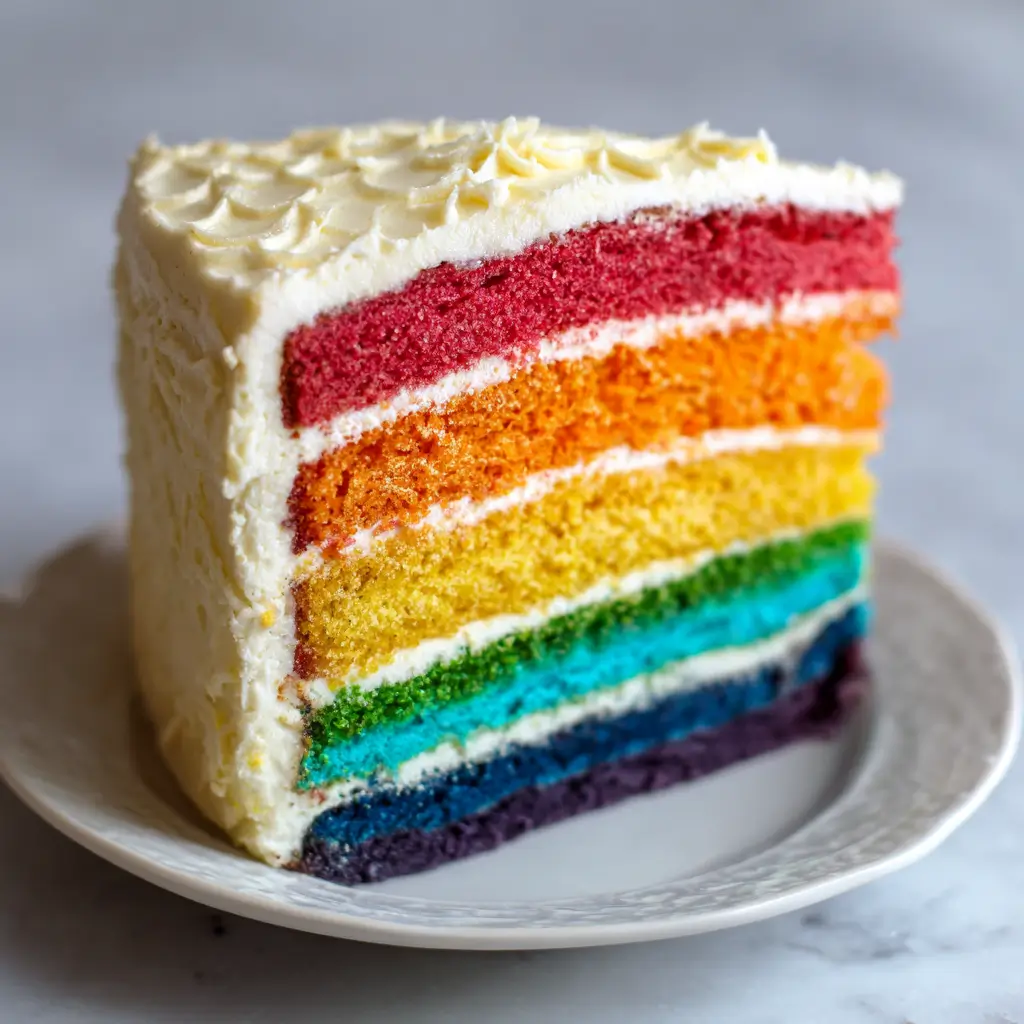
The Rainbow Layer Cake with Cream Cheese Filling is more than just a dessert—it’s a celebration on a plate. With its vibrant, multicolored layers stacked high and crowned with luscious cream cheese frosting, this cake is the ultimate centerpiece for birthdays, pride events, baby showers, or any occasion that calls for joy, color, and sweetness. The sight of each pastel-hued layer peeking through as you slice into it brings smiles and gasps alike. But beyond its dazzling appearance, this cake delivers on flavor: moist vanilla sponge layers embrace a rich, tangy cream cheese filling, creating a perfect harmony of sweetness and balance. Whether you’re a seasoned baker or trying your hand at layer cakes for the first time, this recipe is designed to guide you step-by-step toward baking success.
The History
The origins of the rainbow cake can be traced back to mid-20th century America, during a time when food coloring became widely available and home bakers began experimenting with vibrant hues in their desserts. While some credit the modern version to bakeries in New York City during the 1960s, the concept truly gained popularity in the 1980s and 1990s as birthday cakes evolved into edible works of art. The rainbow cake was often associated with fun, childhood celebrations, and later, embraced by LGBTQ+ communities as a symbol of pride and inclusivity—especially during Pride Month. Over time, variations emerged, from simple three-layer versions to elaborate seven-layer cakes. The addition of cream cheese filling, a nod to classic red velvet cakes, elevated the rainbow cake from sweet spectacle to gourmet indulgence. Today, the Rainbow Layer Cake with Cream Cheese Filling stands as a beloved icon of celebratory baking, combining nostalgia, artistry, and irresistible flavor.
Ingredients Breakdown
To create a stunning and delicious Rainbow Layer Cake with Cream Cheese Filling, every ingredient plays a crucial role in texture, flavor, and visual appeal. Let’s break them down:
- All-Purpose Flour: Provides structure to the cake. Sifted to ensure a light, airy crumb.
- Baking Powder & Baking Soda: Leavening agents that help the cake rise evenly and maintain softness.
- Salt: Enhances flavor and balances sweetness.
- Unsalted Butter (room temperature): Adds richness and moisture. Room temperature ensures smooth incorporation.
- Granulated Sugar: Sweetens the cake and helps aerate the batter when creamed with butter.
- Large Eggs (room temperature): Bind ingredients and add structure while contributing to a tender texture.
- Pure Vanilla Extract: Deepens the flavor profile and complements both cake and filling.
- Buttermilk: Tenderizes the crumb and adds slight acidity, which activates leavening agents.
- Food Coloring (gel-based): Gel colors are highly concentrated and won’t alter the cake’s consistency. Use red, orange, yellow, green, blue, indigo, and violet for a true rainbow effect.
- Cream Cheese (full-fat, softened): Forms the base of the filling, offering tanginess and creamy texture.
- Unsalted Butter (for filling): Blended with cream cheese for stability and richness.
- Powdered Sugar (confectioners’ sugar): Sweetens and thickens the filling and frosting.
- Heavy Cream or Whipping Cream: Optional for smoothing the filling or adjusting frosting consistency.
Using high-quality ingredients ensures the best results—especially when it comes to dairy and extracts.
Step-by-Step Recipe
- Preheat and Prepare: Preheat your oven to 350°F (175°C). Grease and flour six 6-inch round cake pans (or three 8-inch pans), then line the bottoms with parchment paper for easy release.
- Mix Dry Ingredients: In a medium bowl, whisk together 3 cups all-purpose flour, 2 teaspoons baking powder, 1/2 teaspoon baking soda, and 1/2 teaspoon salt. Set aside.
- Cream Butter and Sugar: In a large mixing bowl, beat 1 cup (2 sticks) softened unsalted butter with 2 cups granulated sugar on medium-high speed until light and fluffy (about 4–5 minutes).
- Add Eggs and Vanilla: Add 4 large room-temperature eggs, one at a time, beating well after each addition. Mix in 2 teaspoons pure vanilla extract.
- Alternate Wet and Dry Ingredients: With mixer on low, add 1/3 of the dry mix, followed by 1/2 cup buttermilk. Repeat, ending with dry ingredients. Mix just until combined—do not overmix.
- Divide the Batter: Divide the batter evenly into 6 or 7 bowls (depending on how many colors you want). For six layers: red, orange, yellow, green, blue, purple. For seven, include indigo.
- Add Food Coloring: Tint each bowl with gel food coloring. Start with small amounts and build up intensity. Stir gently to avoid air bubbles.
- Fill Pans and Bake: Pour each colored batter into prepared pans, spreading evenly. Tap pans gently on counter to remove air pockets. Bake 6-inch layers for 18–22 minutes; 8-inch layers for 22–26 minutes, or until a toothpick inserted in center comes out clean.
- Cool Completely: Let cakes cool in pans for 10 minutes, then transfer to wire racks. Remove parchment and cool completely before assembling (at least 2 hours).
- Make Cream Cheese Filling: In a large bowl, beat 1 lb (two 8-oz blocks) softened cream cheese with 1/2 cup softened butter until smooth. Gradually add 4 cups powdered sugar and 1 tsp vanilla. Beat on low initially, then medium until creamy. If too thick, add 1–2 tbsp heavy cream.
- Assemble the Cake: Place first layer on a cake board or plate. Spread a generous layer of cream cheese filling. Repeat with remaining layers, saving the most vibrant color for the top if desired.
- Frost the Cake: Apply a thin crumb coat with remaining filling or additional frosting. Chill for 20–30 minutes. Then frost entire cake smoothly with leftover cream cheese frosting or a stiffer buttercream for sharper edges.
- Decorate: Add sprinkles, edible glitter, fresh berries, or piped rosettes for extra flair. Refrigerate until ready to serve.
Tips
- Use gel food coloring: Liquid dyes dilute the batter and may affect texture. Gel colors provide bold hues without altering consistency.
- Room-temperature ingredients: Ensure butter, eggs, and buttermilk are fully at room temperature to create a uniform, emulsified batter.
- Weigh your batter: For even layers, use a kitchen scale to divide the plain batter equally before coloring.
- Don’t overmix after adding flour: Overmixing develops gluten, leading to a tough cake. Mix only until just combined.
- Level your layers: If any layer domes, use a serrated knife to level it for a professional stack.
- Chill layers before assembling: Cold cakes are easier to handle and produce fewer crumbs.
- Invest in an offset spatula: Makes frosting and smoothing much easier.
- Use a turntable: Rotating cake stand allows even pressure and consistent frosting.
- Keep colors vibrant: Work quickly when adding dye and avoid over-stirring to prevent muddying the colors.
- Store properly: Due to cream cheese, this cake must be refrigerated. Bring to room temperature before serving for best texture.
Variations and Customizations
The beauty of the Rainbow Layer Cake lies in its versatility. Here are creative ways to make it your own:
- Flavor Twists: Infuse the batter with almond extract, lemon zest, or a touch of cinnamon for added depth.
- Different Fillings: Swap cream cheese for whipped chocolate ganache, raspberry curd, or marshmallow fluff between layers.
- Gluten-Free Version: Substitute all-purpose flour with a high-quality gluten-free 1:1 blend. Add 1/2 tsp xanthan gum if not included.
- Vegan Adaptation: Use plant-based butter, flax eggs, almond milk + vinegar (to mimic buttermilk), and vegan cream cheese. Choose egg replacers carefully for structure.
- Less Sweet Option: Reduce sugar slightly in cake (by 1/4 cup) and filling (by 1 cup). Use Greek yogurt to replace some cream cheese for tang without excess sugar.
- Mini Rainbow Cakes: Bake in mason jars, cupcakes, or bundt pans for individual servings.
- Naked Cake Style: Apply minimal frosting between layers and leave sides exposed for a rustic look.
- Theme Decorations: Customize for holidays—add hearts for Valentine’s, stars for Fourth of July, or rainbows for Pride.
- Edible Flowers or Sprinkles: Top with organic flowers or rainbow nonpareils for whimsy.
- Alcohol-Infused: Brush layers with limoncello, amaretto, or berry liqueur for adult-friendly flavor.
Health Considerations and Nutritional Value
While undeniably decadent, it’s important to enjoy the Rainbow Layer Cake with Cream Cheese Filling mindfully. Here’s a general nutritional breakdown per serving (based on 12 servings):
- Calories: ~450–550 kcal
- Total Fat: 22–28g (saturated fat: 12–15g)
- Carbohydrates: 60–70g (sugars: 45–50g)
- Protein: 6–8g
- Sodium: 300–400mg
- Calcium: ~5% DV (from dairy ingredients)
Considerations:
- High in Sugar and Fat: This cake is a treat best reserved for special occasions due to its high sugar and saturated fat content.
- Lactose Intolerance: Contains butter, cream cheese, buttermilk, and heavy cream. Dairy-free alternatives can help accommodate.
- Egg Allergies: Requires whole eggs. Vegan substitutes like flax or chia eggs may work but alter texture.
- Gluten Sensitivity: Not suitable for those with celiac disease unless made with certified gluten-free flour.
- Pregnancy Safety: Fully cooked eggs and pasteurized dairy make this cake generally safe during pregnancy.
- Diabetes Management: High glycemic load. Best consumed in small portions, if at all, by those managing blood sugar.
- Balanced Indulgence: Pair with fresh fruit or a green salad to balance the meal. Share generously to reduce individual intake.
Ingredients
For the Rainbow Cake Layers:
- 3 cups (360g) all-purpose flour, sifted
- 2 teaspoons baking powder
- 1/2 teaspoon baking soda
- 1/2 teaspoon salt
- 1 cup (2 sticks / 226g) unsalted butter, room temperature
- 2 cups (400g) granulated sugar
- 4 large eggs, room temperature
- 2 teaspoons pure vanilla extract
- 1 cup (240ml) buttermilk, room temperature
- Gel food coloring (red, orange, yellow, green, blue, indigo, violet)
For the Cream Cheese Filling:
- 1 (8 oz / 226g) block full-fat cream cheese, softened
- 1 (8 oz / 226g) block full-fat cream cheese, chilled (for stability)
- 1/2 cup (113g) unsalted butter, softened
- 4 cups (480g) powdered sugar, sifted
- 1 teaspoon vanilla extract
- 1–2 tablespoons heavy cream (optional, for consistency)
Optional for Decoration:
- Rainbow sprinkles
- Edible glitter
- Fresh berries
- White chocolate shavings
- Piped buttercream rosettes
Directions
- Preheat Oven: Adjust oven racks to upper and lower thirds. Preheat oven to 350°F (175°C). Grease and flour six 6-inch round cake pans or three 8-inch pans. Line bottoms with parchment paper.
- Dry Mix: In a bowl, whisk flour, baking powder, baking soda, and salt. Set aside.
- Cream Butter and Sugar: Using a stand mixer with paddle attachment, beat butter and sugar on medium-high until pale and fluffy (~5 minutes).
- Add Eggs and Vanilla: Add eggs one at a time, scraping bowl as needed. Mix in vanilla.
- Incorporate Dry and Wet Ingredients: On low speed, add 1/3 of flour mixture, then 1/2 of buttermilk. Repeat, ending with flour. Mix until just combined.
- Divide and Color: Transfer batter to a large bowl. Divide equally into 6 or 7 smaller bowls. Tint each with gel food coloring to achieve vibrant rainbow shades.
- Fill Pans: Pour each color into a prepared pan. Smooth tops gently. Tap pans on counter to release air bubbles.
- Bake: Place pans in oven (rotate halfway if needed). Bake 6-inch layers for 18–22 min, 8-inch for 22–26 min, until toothpick comes out clean.
- Cool: Cool in pans 10 minutes. Run knife around edges, invert onto cooling racks. Remove parchment. Cool completely.
- Make Filling: Beat cream cheese and butter until smooth. Gradually add powdered sugar and vanilla. Blend in cream if needed. Chill 15 minutes for easier spreading.
- Assemble: Level any domed layers. Place first layer on cake board. Spread 1/2–3/4 cup filling. Repeat stacking. Place final layer color-side up.
- Crumb Coat: Frost entire cake thinly with filling or extra frosting. Chill 20–30 minutes.
- Final Frosting: Apply second, thicker layer of frosting. Smooth sides and top with offset spatula.
- Decorate: Add sprinkles, piped designs, or berries. Refrigerate cake until serving.
- Serve: Let sit at room temperature 30–45 minutes before slicing for best texture.
FAQ
Q: Can I make the cake layers ahead of time?
A: Absolutely! Bake and cool layers up to 2 days in advance. Wrap tightly in plastic and refrigerate, or freeze for up to 1 month. Thaw in fridge before assembling.
Q: Why did my cake layers crack or dome?
A: Uneven heat or overfilling pans can cause doming. Ensure oven is preheated, fill pans only 2/3 full, and consider using bake-even strips.
Q: Can I use liquid food coloring?
A: Not recommended. Liquid coloring adds moisture and may weaken the batter, resulting in less vibrant colors and altered texture.
Q: How do I store the cake?
A: Store covered in the refrigerator for up to 5 days due to cream cheese. Bring to room temperature before serving.
Q: Can I freeze the assembled cake?
A: Yes. Freeze unfrosted or fully frosted cake on a tray until solid, then wrap in plastic and foil. Thaw in refrigerator overnight.
Q: Why is my filling too runny?
A: Ensure cream cheese and butter are softened but not melted. Use chilled cream cheese blocks and avoid adding too much liquid. Chill filling briefly before use.
Q: How many servings does this cake yield?
A: Approximately 10–12 generous slices, depending on layer size and cutting style.
Q: Can I make a two-layer rainbow cake?
A: Yes. Bake all batter in two pans, then slice each horizontally into 3–4 layers using a serrated knife or cake leveler.
Summary
The Rainbow Layer Cake with Cream Cheese Filling is a joyful masterpiece of vibrant colors, moist vanilla layers, and creamy tangy filling—perfect for celebrations of all kinds.
Bake it for birthdays, Pride, or just because; this show-stopping dessert delivers unforgettable flavor and unforgettable memories with every slice.