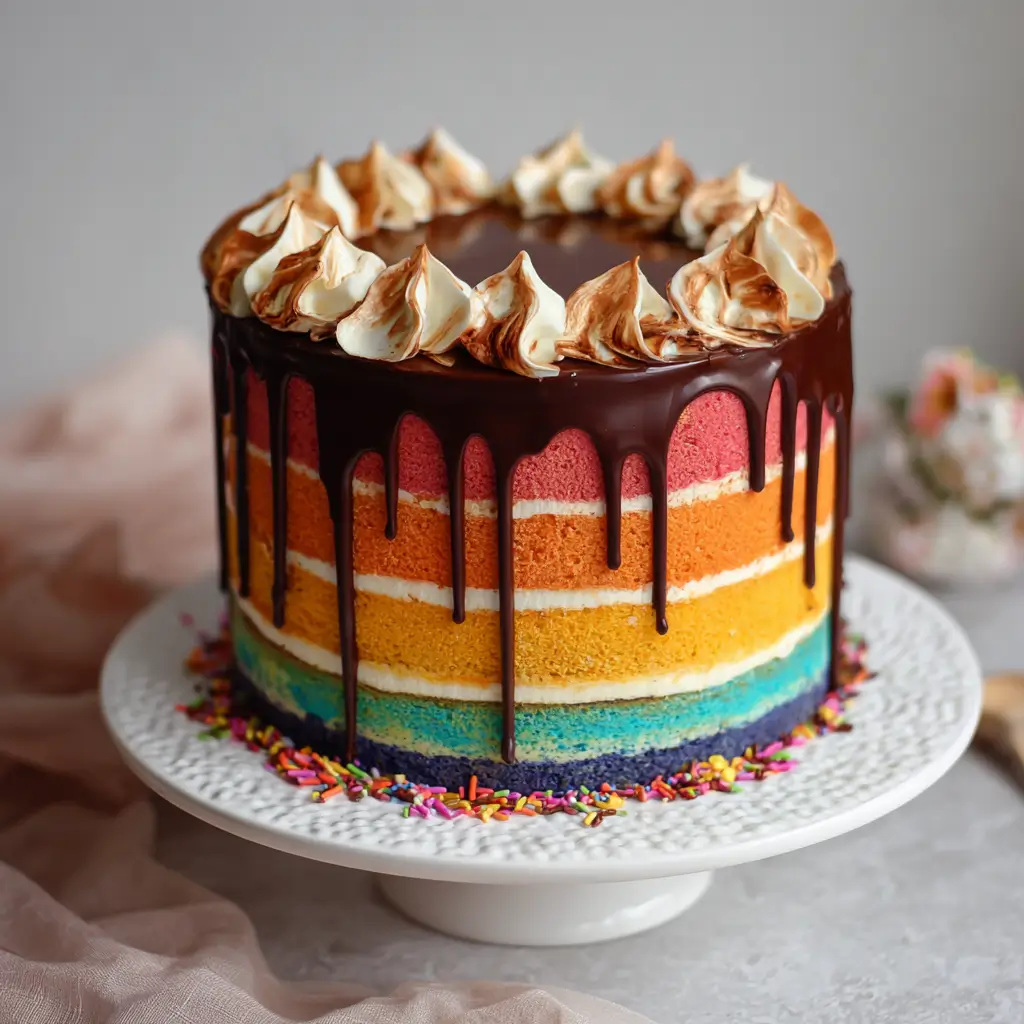
Rainbow Layer Cake with Chocolate Ganache Drip
Indulge in the ultimate celebration dessert: a vibrant, moist Rainbow Layer Cake crowned with a luxurious Chocolate Ganache Drip. This show-stopping cake is more than just eye candy—it’s a harmonious blend of fluffy vanilla sponge layers in a spectrum of colors, stacked high and finished with a glossy, rich chocolate drip that cascades down the sides. Whether you’re baking for a birthday, baby shower, or simply because you love decadent desserts, this rainbow cake promises to dazzle both the eyes and the taste buds.
The History of the Rainbow Layer Cake
The origins of the rainbow cake can be traced back to mid-20th century America, where pastel-colored layer cakes began appearing at celebratory events. Though some credit Jewish bakeries in New York City during the 1940s for popularizing colorful layer cakes, the modern version we know today—with its vivid rainbow hues—gained widespread popularity in the 1980s and 1990s. The cake evolved from simple pink-and-white layering to full-spectrum rainbow designs as food coloring became more accessible and vibrant.
The trend saw a massive resurgence in the 2010s thanks to social media platforms like Instagram and Pinterest, where visually stunning desserts went viral. Bakers around the world began experimenting with layer counts, flavor pairings, and decorative finishes—leading to creative combinations like pairing the cheerful rainbow interior with an elegant chocolate ganache drip. Today, the Rainbow Layer Cake with Chocolate Ganache Drip stands as a symbol of joy, inclusivity, and culinary artistry, often associated with pride celebrations, birthdays, and festive gatherings.
Ingredients Breakdown
To achieve the perfect texture, color, and flavor balance in your Rainbow Layer Cake with Chocolate Ganache Drip, it’s essential to understand the role of each ingredient. Here’s a detailed breakdown:
For the Vanilla Rainbow Cake Layers:
- All-Purpose Flour: Provides structure through gluten formation. Sifted to ensure lightness.
- Baking Powder & Baking Soda: Leavening agents that help the cake rise evenly and stay fluffy.
- Salt: Enhances flavor and balances sweetness.
- Unsalted Butter: Adds richness and moisture. Must be softened to room temperature for proper creaming.
- Granulated Sugar: Sweetens the cake and helps aerate the batter when creamed with butter.
- Eggs: Provide structure, moisture, and emulsification. Room temperature eggs blend more smoothly into the batter.
- Vanilla Extract: Pure extract enhances the vanilla flavor; imitation may alter taste.
- Buttermilk: Adds tenderness and slight tanginess while reacting with baking soda for lift.
- Whole Milk: Thins the batter slightly and contributes to soft crumb texture.
- Gel Food Coloring (Red, Orange, Yellow, Green, Blue, Indigo, Violet): Preferred over liquid for intense color without altering batter consistency.
For the Chocolate Ganache Drip:
- Heavy Cream: Heats to melt chocolate and create a smooth, pourable consistency.
- Dark Chocolate (60–70% Cacao): Offers depth of flavor and firm set when cooled. Can substitute semi-sweet if desired.
- Unsalted Butter (optional): Adds shine and silkiness to the ganache.
For the Vanilla Buttercream Frosting:
- Unsalted Butter: Should be at cool room temperature for optimal whipping.
- Powdered Sugar (Confectioners’ Sugar): Sweetens and thickens the frosting. Sifted to avoid lumps.
- Heavy Cream or Milk: Adjusts consistency for piping and spreading.
- Vanilla Extract: Reinforces the vanilla base note.
- Salt (pinch): Balances the sweetness.
Step-by-Step Recipe
Step 1: Prepare Your Equipment and Preheat Oven
Preheat your oven to 350°F (175°C). Line six 6-inch round cake pans (or three 8-inch pans with double layers) with parchment paper and lightly grease the sides. Having all pans ready ensures even baking and prevents batter from sitting too long before going into the oven.
Step 2: Make the Vanilla Cake Batter
- In a medium bowl, whisk together 2 ½ cups (315g) all-purpose flour, 2 ½ tsp baking powder, ½ tsp baking soda, and ½ tsp salt. Set aside.
- In a stand mixer fitted with the paddle attachment, beat 1 cup (2 sticks / 227g) softened unsalted butter and 2 cups (400g) granulated sugar on medium-high speed until light and fluffy (about 4–5 minutes).
- Add 4 large room-temperature eggs, one at a time, scraping down the bowl after each addition. Mix in 2 tsp pure vanilla extract.
- With mixer on low, alternate adding the dry ingredients and 1 cup (240ml) buttermilk + ½ cup (120ml) whole milk in three parts: start and end with dry ingredients. Mix just until combined—do not overmix.
Step 3: Divide and Color the Batter
Divide the batter evenly into 6 or 7 separate bowls (depending on how many colors you want). Use a kitchen scale for accuracy—each portion should weigh approximately 300–350g.
Add gel food coloring to each bowl to create red, orange, yellow, green, blue, indigo, and violet. Stir thoroughly until color is uniform. Pro tip: use toothpicks or skewers dipped in colorant to avoid over-dosing.
Step 4: Bake the Layers
Evenly distribute each colored batter into prepared pans, smoothing the tops with an offset spatula. Tap pans gently on counter to release air bubbles.
Bake for 18–22 minutes (for 6-inch pans) or 22–26 minutes (for 8-inch), rotating halfway through, until a toothpick inserted comes out clean.
Cool in pans for 10 minutes, then transfer to wire racks to cool completely. Chill layers in the freezer for 20–30 minutes before assembling to reduce crumbling.
Step 5: Prepare the Vanilla Buttercream Frosting
- In a stand mixer, beat 2 cups (4 sticks / 454g) softened unsalted butter on medium speed for 5 minutes until creamy.
- Gradually add 8 cups (960g) sifted powdered sugar, 1 cup at a time, mixing on low.
- Add 2–4 tbsp heavy cream, 2 tsp vanilla extract, and a pinch of salt. Whip on high for 3–4 minutes until fluffy and smooth.
Step 6: Assemble the Cake
- Place the first cake layer on a cardboard cake round or serving plate. Spread a thin layer of buttercream using an offset spatula.
- Repeat stacking with remaining layers in rainbow order: red, orange, yellow, green, blue, indigo, violet.
- Frost the entire cake with a thin crumb coat. Refrigerate for 20–30 minutes to set.
- Apply a final, thick layer of buttercream and smooth with a bench scraper or cake smoother. Chill again for 15 minutes.
Step 7: Make the Chocolate Ganache Drip
- Heat 1 cup (240ml) heavy cream in a saucepan until steaming (just before boiling).
- Pour over 8 oz (225g) chopped dark chocolate in a heatproof bowl. Let sit for 2–3 minutes, then stir gently until smooth.
- Stir in 1 tbsp unsalted butter (optional) for extra shine. Cool for 5–10 minutes until slightly thickened but still pourable.
- Transfer ganache to a piping bag or squeeze bottle. Pipe small drips around the top edge of the chilled cake, allowing them to run down gradually.
- Fill in the center with remaining ganache and spread gently with an offset spatula.
Step 8: Decorate and Serve
Once the ganache has set (about 15–20 minutes at room temperature or 5–10 in the fridge), decorate as desired. Add rainbow sprinkles, edible glitter, fresh berries, or piped buttercream rosettes. Store in the refrigerator and bring to room temperature before serving for best texture.
Tips for Success
- Use Gel Food Coloring: Liquid dyes dilute the batter and weaken structure. Gel provides bold color with minimal volume.
- Weigh Ingredients: Precision ensures consistent texture across all layers.
- Don’t Overmix After Adding Flour: Overmixing develops gluten, leading to tough cake layers.
- Chill Layers Before Assembly: Cold layers are less likely to tear or crumble during frosting.
- Level Layers If Needed: Use a serrated knife to trim domed tops for a flat stack.
- Adjust Ganache Thickness: Too runny? Let cool longer. Too thick? Reheat gently with a few seconds in the microwave.
- Work Quickly with Colored Batter: Colors can bleed if left sitting too long, especially green and blue into adjacent layers.
- Keep Cake Chilled During Decoration: Prevents buttercream from melting and ganache from sliding.
Variations and Customizations
This Rainbow Layer Cake is highly adaptable. Try these creative twists:
- Flavor Swaps: Replace vanilla with almond, lemon, or coconut extract for a unique twist.
- Chocolate Rainbow Cake: Add cocoa powder to the batter for a chocolate base with colorful layers.
- Gluten-Free Version: Use a 1:1 gluten-free flour blend and ensure other ingredients are GF-certified.
- Vegan Option: Substitute butter with plant-based sticks, eggs with flax eggs or commercial replacers, and dairy milk with oat or almond milk. Use vegan chocolate for ganache.
- Size Adjustments: For a taller cake, bake in 4-inch deep pans or increase recipe by 1.5x. For cupcakes, divide batter into liners and bake 18–22 minutes.
- Different Drip Options: Try white chocolate drip, mirror glaze, or colored cocoa butter drizzle.
- Theme Decorations: Top with rainbow macarons, candy pearls, or fondant clouds for a whimsical touch.
- Alcohol Infusion: Brush layers with limoncello, rum, or berry syrup for added moisture and sophistication.
Health Considerations and Nutritional Value
While undeniably indulgent, this Rainbow Layer Cake can be enjoyed mindfully. Here’s what you should know:
- Calorie Content: One slice (1/12 of an 8-inch cake) contains approximately 450–600 calories, depending on frosting and portion size.
- Sugar Levels: High due to both cake and frosting. A single slice may contain 50–70g of sugar. Consider reducing sugar in batter by 25% or using monk fruit-sweetened powdered sugar alternatives.
- Fat Content: Primarily from butter and chocolate. Opt for grass-fed butter and dark chocolate with higher cocoa content for better fat quality.
- Allergens: Contains dairy, eggs, wheat, and soy (in most chocolates). Always check labels if serving those with allergies.
- Portion Control: Slice thinly—this cake is rich! A little goes a long way.
- Storage: Keep refrigerated in an airtight container for up to 5 days. Freeze unfrosted layers for up to 3 months.
- Healthier Tweaks: Use Greek yogurt instead of some butter, applesauce to replace part of the oil, or whole wheat pastry flour for added fiber.
Ingredients
Vanilla Rainbow Cake Layers:
- 2 ½ cups (315g) all-purpose flour, sifted
- 2 ½ teaspoons baking powder
- ½ teaspoon baking soda
- ½ teaspoon salt
- 1 cup (2 sticks / 227g) unsalted butter, softened
- 2 cups (400g) granulated sugar
- 4 large eggs, room temperature
- 2 teaspoons pure vanilla extract
- 1 cup (240ml) buttermilk, room temperature
- ½ cup (120ml) whole milk, room temperature
- Gel food coloring in rainbow colors (red, orange, yellow, green, blue, indigo, violet)
Vanilla Buttercream Frosting:
- 2 cups (4 sticks / 454g) unsalted butter, softened
- 8 cups (960g) powdered sugar, sifted
- 2–4 tablespoons heavy cream or milk
- 2 teaspoons pure vanilla extract
- Pinch of salt
Chocolate Ganache Drip:
- 1 cup (240ml) heavy cream
- 8 oz (225g) high-quality dark chocolate, finely chopped
- 1 tablespoon unsalted butter (optional, for shine)
Directions
- Preheat & Prep: Preheat oven to 350°F (175°C). Grease and line six 6-inch or three 8-inch round cake pans with parchment.
- Mix Dry Ingredients: In a bowl, whisk flour, baking powder, baking soda, and salt. Set aside.
- Cream Butter & Sugar: Using a stand mixer, beat butter and sugar until pale and fluffy (~5 mins).
- Add Eggs & Vanilla: Incorporate eggs one at a time, then vanilla. Scrape bowl well.
- Combine Wet & Dry: On low speed, alternate adding dry mix and milk/buttermilk. Mix until just combined.
- Divide & Color: Split batter into 6–7 bowls. Tint each with gel food coloring.
- Bake Layers: Pour into pans, smooth tops, and bake 18–26 mins depending on pan size. Cool completely.
- Make Frosting: Beat butter until creamy. Gradually add powdered sugar, cream, vanilla, and salt. Whip until fluffy.
- Assemble Cake: Stack layers with buttercream, chill, apply crumb coat, then final frosting. Smooth sides.
- Prepare Ganache: Heat cream, pour over chocolate, let sit, then stir smooth. Add butter if using. Cool slightly.
- Apply Drip: Pipe ganache around top edge for drips, then fill center and spread.
- Decorate & Serve: Add sprinkles or decorations. Chill until set. Serve at room temperature.
FAQ
Can I make this cake ahead of time?
Yes! Bake and freeze cake layers up to 3 months in advance. Frost and decorate 1–2 days before serving. Store frosted cake covered in the fridge.
Why did my cake layers turn out dense?
Overmixing the batter or using cold ingredients can lead to dense texture. Always mix just until combined and use room-temperature eggs and dairy.
Can I use liquid food coloring?
Not recommended. Liquid coloring adds excess moisture and may affect texture. Gel or paste colors are concentrated and won’t alter consistency.
How do I prevent colors from bleeding?
Avoid overfilling pans, don’t let batters sit too long, and ensure layers are fully cooled before assembly. Chilling layers helps create a barrier.
Can I use a hand mixer?
Yes, though a stand mixer yields more consistent results, especially for buttercream. Just ensure ingredients are properly softened.
What if my ganache is too thick or too thin?
Too thick? Warm gently with 5-second microwave bursts. Too thin? Let it cool longer or add a bit more chopped chocolate.
How many servings does this cake yield?
An 8-inch 7-layer cake typically serves 12–16 people with standard slices. Cupcakes would yield about 24.
Summary
A dazzling Rainbow Layer Cake with Chocolate Ganache Drip combines vibrant, tender vanilla layers with a rich, velvety chocolate finish—perfect for celebrations of every kind.
This beloved dessert blends visual magic with irresistible flavor, making it a centerpiece that delights both the eyes and palate with every slice.