Pizza Skulls: A Spooky, Savory, and Surprisingly Delicious Halloween Treat
Looking for a way to make your Halloween menu truly stand out? Enter Pizza Skulls—a hauntingly creative twist on everyone’s favorite comfort food. These edible art pieces combine the gooey goodness of classic pizza with a spine-tingling skull shape that’s perfect for holiday parties, haunted house events, or just impressing your friends with culinary wizardry. More than just a gimmick, Pizza Skulls are packed with flavor, customizable to suit any palate, and surprisingly simple to make once you know the secrets. Whether you’re a seasoned home cook or a brave beginner, this guide will walk you through every step—from history and ingredients to variations and health considerations—to help you craft the most memorable (and delicious) spooky pizzas of the season.
The History of Pizza Skulls: When Culinary Art Meets Celebration
Pizza Skulls are a modern culinary creation rooted in the intersection of holiday tradition and edible artistry. While pizza itself dates back centuries—with origins in ancient flatbreads topped with olive oil and herbs in Mediterranean cultures—the idea of shaping pizza into skulls is a relatively recent innovation. It gained popularity in the early 2010s, fueled by social media platforms like Pinterest, Instagram, and TikTok, where food bloggers and Halloween enthusiasts began sharing photos of creatively shaped pizzas for seasonal festivities.
The skull motif has long been associated with themes of death and rebirth, particularly in cultures that celebrate Día de los Muertos (Day of the Dead). In Mexico, sugar skulls (calaveras) are used as symbolic offerings during this vibrant festival honoring deceased loved ones. Inspired by this tradition, some chefs and home cooks began incorporating skull shapes into savory dishes, including pizza, as a respectful yet festive nod to these cultural practices.
Over time, Pizza Skulls evolved from niche novelty items to mainstream Halloween staples. They’re now featured at themed restaurants, food festivals, and even cooking competitions. Their rise reflects a broader trend toward experiential dining—where presentation is just as important as taste. Today, Pizza Skulls represent not only a fun seasonal treat but also a celebration of creativity, culture, and community through food.
Ingredients Breakdown: What Goes Into a Perfect Pizza Skull?
Creating an authentic and flavorful Pizza Skull starts with selecting high-quality ingredients. Each component plays a crucial role in both structure and taste, so understanding what goes into the dish—and why—is essential for success.
- Pizza Dough: The foundation of any great pizza. You can use store-bought dough for convenience or make it from scratch using flour, yeast, water, salt, sugar, and olive oil. Homemade dough offers better control over texture and flavor.
- Tomato Sauce: A rich, seasoned tomato base made from crushed tomatoes, garlic, oregano, basil, salt, and a touch of sugar to balance acidity. Some recipes call for a smoky twist using fire-roasted tomatoes.
- Cheese Blend: Mozzarella is the star for its meltability, but adding provolone, cheddar, or Parmesan enhances flavor depth. For extra creaminess, ricotta or goat cheese can be dotted around the “eye sockets.”
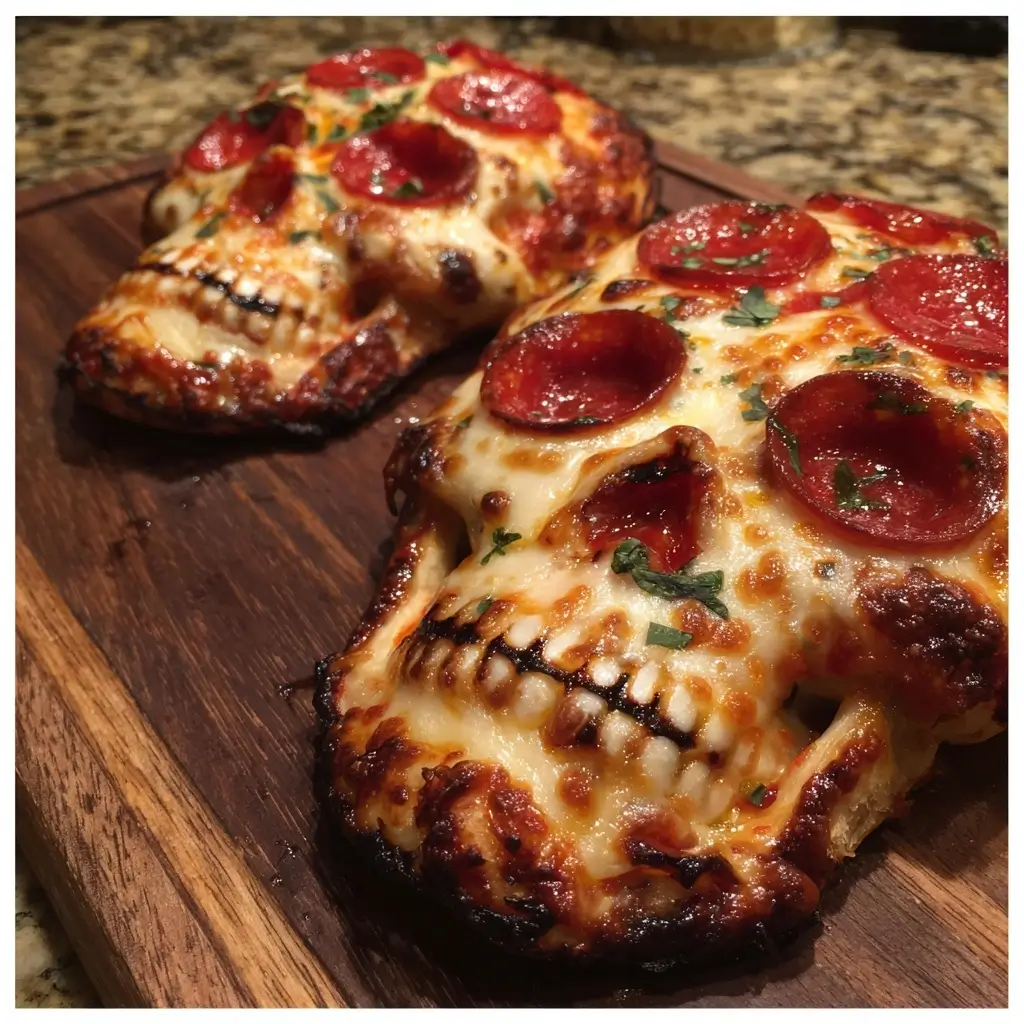
- Toppings: Pepperoni slices work perfectly for nostrils and teeth due to their round shape and bold color. Other options include black olives (for pupils), green peppers (jawbone accents), mushrooms, onions, or even jalapeños for heat.
- Optional Enhancements: Olive tapenade or pesto can outline features for dramatic contrast. Edible black food coloring (from activated charcoal or squid ink) may be used sparingly for darker details, though caution is advised for dietary restrictions.
- Egg Wash (for shine): A beaten egg brushed on the crust before baking gives it a golden, bakery-style finish.
All ingredients should be prepped ahead of time for smooth assembly. Keep cheeses shredded, sauces smooth, and toppings sliced uniformly to ensure even cooking and crisp definition in the final skull design.
Step-by-Step Recipe: How to Make Pizza Skulls Like a Pro
Follow this detailed guide to create show-stopping Pizza Skulls that are as tasty as they are terrifying.
- Prepare the Dough: If making homemade dough, combine 3½ cups all-purpose flour, 1 packet active dry yeast, 1 tsp sugar, 1 tsp salt, 1¼ cups warm water, and 2 tbsp olive oil. Knead for 8–10 minutes until smooth. Let rise in a greased bowl covered with a towel for 1–2 hours, or until doubled in size. (Skip to step 3 if using store-bought dough.)
- Preheat Oven: Set oven to 475°F (245°C). Place a pizza stone or inverted baking sheet inside to preheat—this ensures a crispy bottom crust.
- Roll Out the Base: Punch down risen dough and divide into two equal portions. On a floured surface, roll one portion into a large oval or rounded rectangle about ¼ inch thick. This will form the main skull face.
- Create the Jawbone: Take the second portion and roll it thinner. Use a knife or pizza cutter to cut a curved strip for the lower jaw. Optionally, cut small rectangular “teeth” into the top edge of the jawbone.
- Assemble the Skull Shape: Transfer the main face to a piece of parchment paper or a cornmeal-dusted pizza peel. Position the jawbone beneath it, slightly separated to mimic an open mouth. You can attach it with a bit of water or sauce to help it adhere during baking.
- Add Facial Features: Spread tomato sauce evenly over the face, avoiding the eye and mouth areas. Reserve some sauce for detailing later.
- Place Cheese: Sprinkle shredded mozzarella and blend generously over the sauced area. Leave the eyes, nose, and teeth zones bare for now.
- Design the Eyes: Use black olives or small circles of roasted red pepper to form pupils. Surround them with rings of white cheese (like mozzarella or feta) to create eyeballs. Alternatively, leave empty spaces for hollow, ghostly eyes.
- Shape the Nose: Cut a small triangle from pepperoni or bell pepper and place it centrally. Or leave a blank triangular space to suggest a nasal cavity.
- Build the Teeth: Line up small rectangles or circles of mozzarella, pepperoni, or even cauliflower florets along the upper and lower jaw to simulate teeth. For a gruesome effect, stagger them unevenly.
- Define the Brow & Cheekbones: Use thin strips of pepperoni, green pepper, or olive paste to accentuate bone structure. Pesto or tapenade works well for dark shadows under the eyes or along the jawline.
- Final Touches: Brush exposed crust edges with egg wash for golden browning. Use a squeeze bottle to add fine lines of sauce for cracks, stitches, or blood drips (optional).
- Bake: Slide the pizza (on parchment or peel) onto the preheated stone. Bake for 12–16 minutes, rotating halfway, until crust is golden and cheese is bubbly and slightly browned.
- Cool & Serve: Let rest for 3–5 minutes before slicing. Use kitchen shears or a sharp knife to refine shapes if needed. Serve immediately with garlic knots or marinara for dipping.
Pro Tips for Perfect Pizza Skulls Every Time
- Use Parchment Paper: It makes transferring the delicate skull shape to the oven much easier and prevents sticking.
- Keep Features Simple: Don’t overcrowd the face. Less is often more when it comes to visual clarity—especially in low lighting at parties.
- Chill Toppings Before Baking: Cold cheese and meats hold their shape better and won’t sink into the sauce.
- Work Quickly: Assembled pizza skulls should go into the oven soon after shaping to prevent dough from drying out or collapsing.
- Double the Batch: These disappear fast! Make two or three ahead of time and freeze unbaked versions for future fright nights.
- Lighting Matters: Display your Pizza Skull under colored LED lights (purple, green, or red) for maximum eerie impact.
- Kid-Friendly Version: Let children decorate their own mini pizza skulls using safe, non-sharp toppings and cookie cutters for stencils.
Variations and Customizations: Make Your Skull Uniquely Yours
Pizza Skulls are incredibly versatile. Here are some creative spins to match different tastes, diets, and occasions:
- Vegan Pizza Skulls: Use plant-based dough, dairy-free cheese (cashew or almond-based), and omit animal products. Top with marinated tofu “teeth” or jackfruit “flesh.”
- Gluten-Free Option: Substitute with a certified gluten-free pizza crust mix. Ensure all toppings are GF-certified to avoid cross-contamination.
- Sweet Dessert Skulls: Swap tomato sauce for chocolate hazelnut spread, cheese for marshmallows, and use candy eyes, gummy worms, or crushed cookies for features. Bake until gooey, then cool slightly.
- Meat Lover’s Nightmare: Load up with pepperoni, sausage crumbles, bacon bits, and ham chunks. Use grilled chicken strips for jaw muscles.
- Vegetarian Vision: Feature sun-dried tomatoes, artichokes, spinach, and colorful bell peppers arranged artistically across the skull face.
- Spicy Reaper Skull: Incorporate habanero-infused oil drizzle, pickled jalapeño eyes, and chili-flake “scars” for a fiery look and taste.
- Glow-in-the-Dark Effect: While not edible, placing UV-reactive decorations nearby and using tonic water (which glows under blacklight) as a serving base can enhance the spooky vibe.
- Mini Pizza Skull Bites: Use English muffins, bagels, or tortillas as individual bases. Perfect for party platters or school events.
Health Considerations and Nutritional Value
While Pizza Skulls are undeniably indulgent, they can be adapted to support various dietary goals. Here’s a general nutritional breakdown per average slice (1/8 of a 12-inch pizza):
- Calories: ~250–350 (varies with toppings and cheese amount)
- Carbohydrates: 30–40g (mainly from refined flour; whole wheat dough reduces glycemic load)
- Protein: 10–15g (from cheese and optional meat toppings)
- Fat: 10–18g (saturated fat depends on cheese and meats used)
- Sodium: 400–700mg (can be reduced with low-sodium sauce and cheeses)
- Fiber: 2–4g (increased significantly with veggie toppings and whole grain crusts)
Health Tips:
- Opt for whole wheat or cauliflower crust to boost fiber and reduce carbs.
- Use part-skim mozzarella and limit processed meats to lower saturated fat and sodium.
- Incorporate antioxidant-rich vegetables like spinach, tomatoes, and peppers for added nutrients.
- Control portion sizes—serve with a side salad to balance the meal.
- Avoid edible activated charcoal if you have digestive sensitivities or are on medication, as it can interfere with absorption.
- For kids, involve them in topping selection to encourage interest in healthy ingredients.
Full Ingredient List
- 1 lb (450g) pizza dough (homemade or store-bought)
- ¾ cup tomato pizza sauce (seasoned with garlic, oregano, salt, and basil)
- 2 cups shredded mozzarella cheese (or blend with provolone/cheddar)
- 8–12 pepperoni slices (for nose, teeth, or accents)
- 4 black olives (sliced, for pupils)
- ¼ green bell pepper (thin strips for cheekbones or brows)
- 1 small red bell pepper (optional, for contrasting eyes)
- 2 tbsp grated Parmesan (for detail or brow ridges)
- 1 egg (beaten, for egg wash)
- Olive oil (for brushing)
- Cornmeal or flour (for dusting)
- Optional: pesto, olive tapenade, activated charcoal paste, or hot sauce for detailing
Detailed Directions
- Make or Prepare Dough: If preparing from scratch, mix and knead dough, then allow to rise until doubled (~1.5 hours). Punch down and divide into two balls—one larger (¾ of dough), one smaller (¼).
- Preheat Oven and Surface: Heat oven to 475°F (245°C) with a pizza stone or heavy baking sheet inside.
- Shape the Face: Roll the larger dough ball into a 10×6 inch oval on a floured surface. Carefully transfer to parchment-lined peel or tray.
- Form the Jaw: Roll the smaller portion into a ½-inch thick strip. Curve it into a U-shape for the lower jaw. Attach gently beneath the face using a dab of water or sauce.
- Apply Sauce: Spread sauce over the upper portion (the “face”), leaving eye sockets, nose, and mouth areas clean.
- Add Cheese: Sprinkle cheese evenly over sauced area. Avoid covering feature zones.
- Design Eyes: Place black olive circles in upper corners for pupils. Surround with mozzarella rings or leave hollow.
- Create Nose: Insert a small pepperoni triangle or leave a blank triangle.
- Add Teeth: Line up pepperoni or cheese squares along upper and lower jaws. Stagger for realism.
- Enhance Structure: Use green pepper strips above eyes for brows. Add pesto lines along cheekbones or temples.
- Finish Crust: Brush outer edges with egg wash for golden color.
- Bake: Slide pizza onto hot stone. Bake 12–16 minutes until crust is crisp and cheese bubbles.
- Cool Slightly: Wait 3–5 minutes before cutting. Use scissors to adjust jaw or tooth placement if desired.
- Serve: Present whole or slice into wedges. Pair with dipping sauces like ranch, marinara, or garlic butter.
Frequently Asked Questions (FAQ)
Q: Can I make Pizza Skulls ahead of time?
A: Yes! Assemble unbaked Pizza Skulls, freeze on parchment, then bake straight from frozen—add 3–5 minutes to cooking time.
Q: Are Pizza Skulls kid-friendly?
A: Absolutely! Kids love helping design the faces. Use mild toppings and fun shapes to keep it playful rather than scary.
Q: Can I use gluten-free or keto crust?
A: Yes. Many brands offer ready-made alternatives. Just ensure the dough holds its shape during baking.
Q: How do I prevent the jaw from falling off?
A: Lightly score the connection point and use a dab of sauce or water as “glue.” Pre-baking the jaw for 2 minutes can also help stabilize it.
Q: What tools do I need?
A: Basic kitchen tools: rolling pin, pizza cutter, spatula, pastry brush, and parchment paper. Cookie cutters can help with uniform teeth.
Q: Can I make sweet Pizza Skulls?
A: Definitely! Use cinnamon dough, Nutella, mini marshmallows, and candy eyes for a dessert version.
Q: Are edible black dyes safe?
A: Food-grade activated charcoal is generally recognized as safe in small amounts, but consult a doctor if you have health concerns or are on medication.
Summary
Pizza Skulls are a thrilling fusion of flavor, creativity, and seasonal fun—perfect for Halloween gatherings, themed parties, or family cooking adventures. With customizable ingredients and endless design possibilities, they turn a classic dish into edible art that delights both the eyes and the palate.