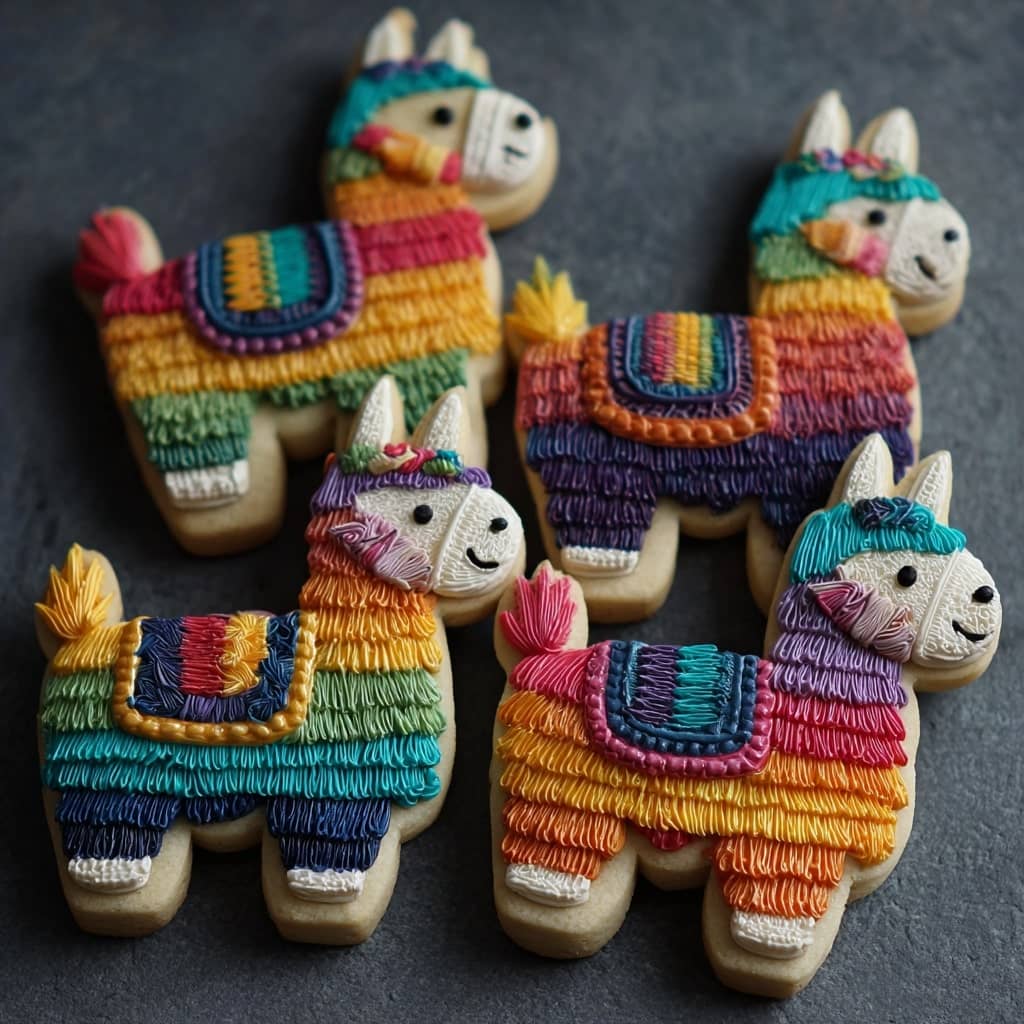
Introduction
Piñata Cookies are a festive and fun twist on traditional cookies, featuring a surprise candy-filled center that bursts open with colorful treats when you bite or break into them. These playful cookies are designed to mimic the excitement and joy of a traditional piñata, making them perfect for celebrations like birthdays, Cinco de Mayo, or any party where a little whimsy is welcome. With a crisp exterior and a soft, chewy interior, piñata cookies deliver a delightful contrast in texture alongside the surprise of hidden candy inside. Their colorful candy fillings—often mini M&Ms, sprinkles, or other small confections—make them visually appealing and fun to eat. These cookies bring together the elements of a classic sugar cookie or chocolate chip cookie dough, molded around a sweet treasure trove, creating an interactive dessert experience for kids and adults alike.
The History of Piñata Cookies
The concept of the piñata dates back to ancient China and later became a vibrant tradition in Mexico, where brightly decorated containers filled with candies and small toys are broken open at celebrations. Piñata Cookies are a modern culinary interpretation inspired by this festive tradition, translating the idea of a hidden surprise into a handheld dessert form. While traditional cookies have long been a staple in baking, the innovation of stuffing them with candies to replicate the piñata’s excitement reflects the creative trends in baking that focus on interactive, experiential treats. Piñata Cookies have gained popularity in recent years, fueled by social media and food blogs that showcase their colorful, eye-catching appeal and the playful moment when candy spills out, adding an element of surprise and delight to any occasion.
Ingredients Breakdown
- All-purpose flour: Forms the structure of the cookie dough, providing a soft but sturdy base to hold the filling.
- Butter: Adds richness, moisture, and tenderness to the cookies.
- Granulated sugar and brown sugar: Create sweetness and help achieve the perfect chewy texture.
- Eggs: Bind the ingredients and add moisture.
- Vanilla extract: Enhances flavor with a warm, sweet aroma.
- Baking soda or baking powder: Leavens the dough to create a light texture.
- Salt: Balances sweetness and enhances overall flavor.
- Mini candies or sprinkles: The essential “piñata” surprise inside each cookie, providing bursts of color and crunch.
- Optional mix-ins: Chocolate chips or nuts can add extra flavor and texture.
Step-by-Step Recipe
- Preheat your oven to 350°F (175°C) and line baking sheets with parchment paper.
- In a large bowl, cream together softened butter, granulated sugar, and brown sugar until light and fluffy.
- Beat in the eggs one at a time, then add vanilla extract.
- In a separate bowl, whisk together flour, baking soda (or powder), and salt. Gradually add the dry ingredients to the wet ingredients, mixing until just combined.
- Scoop a small portion of dough (about 1 tablespoon) and flatten it into a disc. Place a small handful of mini candies or sprinkles in the center.
- Cover the filling completely with another flattened dough portion, sealing the edges well to ensure the candies won’t leak out during baking.
- Roll the sealed dough into a smooth ball and place on the prepared baking sheet. Repeat for all cookies, leaving space between each.
- Bake for 10–12 minutes, or until the edges are golden and the cookies look set but still soft in the middle.
- Allow the cookies to cool on the baking sheet for a few minutes before transferring to a wire rack to cool completely.
- When ready to serve, bite or break open to reveal the hidden candy surprise inside.
Tips for the Perfect Piñata Cookies
Use small candies like mini M&Ms or tiny sprinkles for easy filling that won’t overpower the cookie dough. Make sure to seal the dough completely around the filling to avoid any leakage during baking. Chilling the dough before shaping can help reduce spreading and make it easier to handle. Use a cookie scoop to keep cookie sizes uniform and ensure even baking. Avoid overfilling the cookies, as too many candies can cause the dough to burst open prematurely. Bake just until the edges turn golden to maintain a soft and chewy texture inside. Cool the cookies thoroughly before handling to allow the centers to set properly.
Variations and Customizations
Customize your piñata cookies with different dough bases such as chocolate chip, sugar cookie, or peanut butter dough. Swap mini candies for chopped chocolates, gummy bears, or even crushed candy canes for holiday themes. For a healthier twist, fill with dried fruit pieces or nuts instead of candies. Add food coloring or flavored extracts to the dough for seasonal or themed variations. Turn these into festive gift treats by decorating the tops with icing or edible glitter. For a dairy-free version, substitute butter with a plant-based alternative and use dairy-free candies.
Health Considerations and Nutritional Value
Piñata Cookies are a fun, indulgent treat best enjoyed in moderation due to their sugar and fat content. Each cookie typically contains calories ranging from 150 to 200, depending on size and ingredients. The hidden candy center adds extra sugar and calories, so consider portion control if monitoring intake. For those with allergies, be mindful of common allergens such as nuts or dairy in mix-ins or candies. Gluten-free versions can be made using appropriate flour blends, and sugar substitutes may be used for lower sugar options, though these might affect texture and taste. Overall, these cookies are a celebratory treat rather than a daily snack.
FAQ
Can I use any type of candy inside? Yes, but smaller candies like mini M&Ms or sprinkles work best to avoid melting or leakage.
How do I prevent the cookies from leaking candy? Seal the dough edges tightly and avoid overfilling. Chilling the dough helps maintain structure.
Can I make these ahead of time? Yes, dough can be chilled overnight or frozen before baking.
Do I have to bake immediately after assembling? Baking soon after shaping is best, but dough can be refrigerated briefly before baking.
Can these cookies be frozen? Yes, both dough balls and baked cookies freeze well; thaw before serving.
Are there gluten-free options? Absolutely, substitute with gluten-free flour blends and ensure candies are gluten-free.

Piñata Cookies
Ingredients
- 3 rolls 16.5 oz each refrigerated Pillsbury™ Sugar Cookie Dough
- Red yellow, blue, and green food coloring
- 1 cup powdered sugar
- 3 teaspoons milk
- 2 teaspoons light corn syrup
- ½ teaspoon vanilla extract
- ¾ to 1 cup candy-coated milk chocolate candies such as mini M&M’s
Instructions
Step 1
- Open the three rolls of sugar cookie dough and divide the dough into four equal portions. Tint one portion red, one yellow, one orange (by combining red and yellow), and one turquoise (by combining blue and green).
Step 2
- Divide each colored dough portion into three smaller pieces. Measure the height of your burro-shaped cookie cutter (or another desired shape), then find a container that matches the cutter’s height to use as a mold. Layer the dough colors alternately in the container in your preferred order. Cover and refrigerate until the dough is firm.
Step 3
- Preheat your oven to 350°F (175°C) and line baking sheets with parchment paper. Remove the layered dough from the container and slice into ¼-inch thick pieces. Place slices on the prepared baking sheets, spacing them 2 inches apart.
Step 4
- Bake for 6 to 10 minutes, or until the cookies are set. While still warm, use your burro-shaped cookie cutter to cut out shapes from the baked slices. For 16 of the cookies, use a small round cutter to cut out the centers, creating windows for the candy filling. Carefully remove the center cutouts. Allow cookies to cool for 5 minutes on the baking sheet, then transfer to a wire rack to cool completely.
Step 5
- In a small bowl, whisk together the powdered sugar, milk, corn syrup, and vanilla until smooth. Add food coloring of your choice to tint the icing. Transfer the icing to a piping bag fitted with a small round tip or a resealable plastic bag with a small corner snipped off.
Step 6
- To assemble each piñata sandwich cookie, pipe a ring of icing around the edge of one whole burro-shaped cookie. Place a cutout cookie on top and pipe another ring of icing around the edge. Fill the hollow center with candy-coated chocolate candies. Finally, top with another whole burro cookie, pressing gently to seal.