Neon Paint Splatter Cake Art: A Vibrant, Edible Masterpiece
The History of Neon Paint Splatter Cake Art
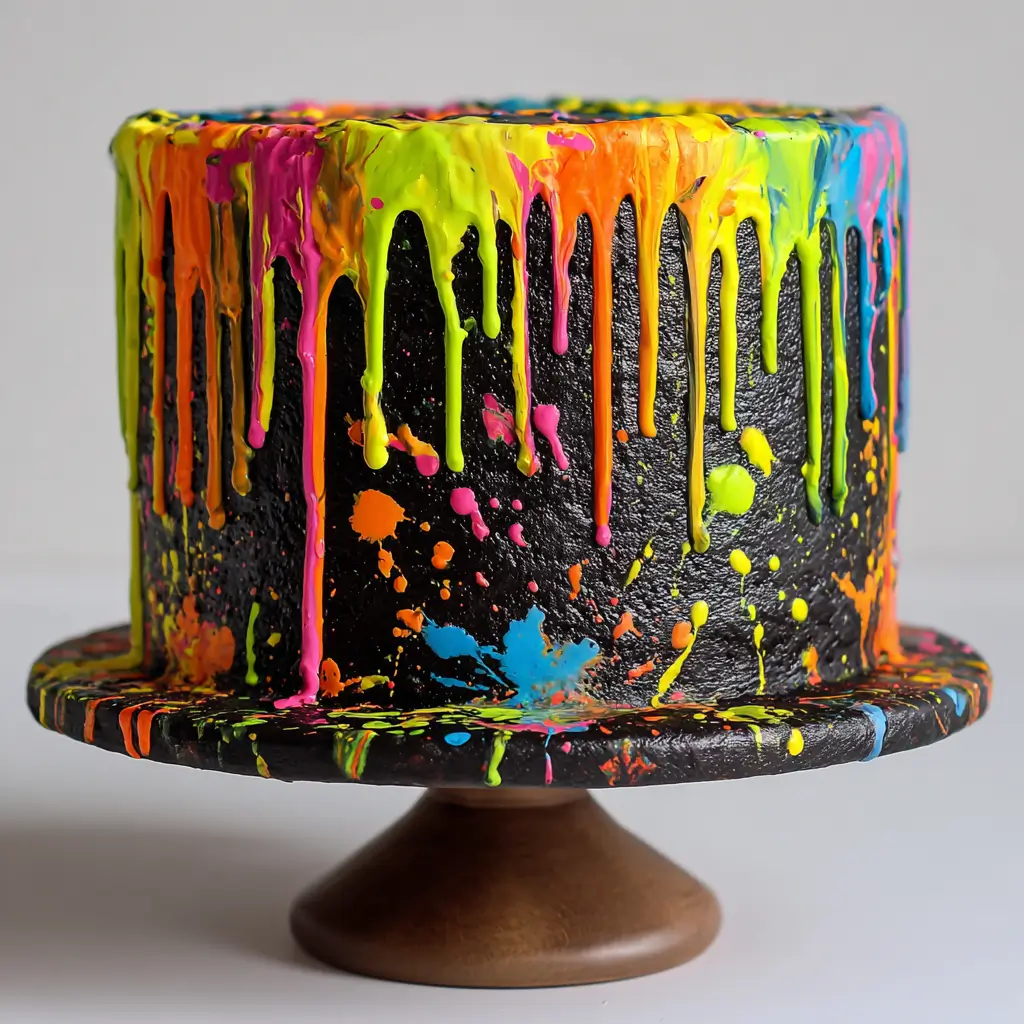
The concept of neon paint splatter cake art draws inspiration from the bold and dynamic visual language of abstract expressionism, particularly the iconic works of artist Jackson Pollock. Known for his revolutionary “drip technique,” Pollock flung, dripped, and splattered paint onto canvases laid on the floor, creating energetic compositions that captured movement and emotion. This artistic movement, once confined to galleries and studios, has now exploded into the world of culinary arts—specifically, cake decoration.
In the early 2010s, with the rise of social media platforms like Instagram and Pinterest, bakers and cake artists began experimenting with more avant-garde designs. The desire to create visually striking desserts led to the fusion of edible mediums with modern art aesthetics. Neon colors, already popular in rave culture, fashion, and street art, were a natural fit. The result? The neon paint splatter cake was born—a dessert that doesn’t just taste good but looks like it leapt off a contemporary art canvas.
Today, this trend is a staple at birthday parties, gender reveal celebrations, music festivals, and even high-end weddings where couples seek unique, personalized desserts. It represents not only a confectionery delight but also a form of self-expression, blending pop culture, art history, and gourmet baking into one dazzling creation.
Ingredients Breakdown: What Makes a Neon Paint Splatter Cake Pop?
The magic of a neon paint splatter cake lies in its contrast between a clean, often white or pastel base and the electrifying bursts of color that mimic paint splashes. To achieve this effect, you need both structural ingredients for the cake and specialized items for the decor. Below is a detailed breakdown:
Cake Base Ingredients:
- All-purpose flour – Provides structure and stability.
- Granulated sugar – Sweetness and moisture retention.
- Baking powder & baking soda – Leavening agents for rise and fluffiness.
- Salt – Enhances flavor and balances sweetness.
- Unsalted butter (room temperature) – Adds richness and contributes to a tender crumb.
- Eggs (room temperature) – Bind ingredients and add volume.
- Vanilla extract – Pure flavor enhancement.
- Whole milk or buttermilk – Moisture and soft texture.
Frosting Ingredients:
- Unsalted butter (softened) – Creamy base for frosting.
- Powdered sugar (sifted) – Sweetness and smooth consistency.
- Heavy cream or milk – Adjusts thickness for spreading or piping.
- Vanilla or almond extract – Flavor depth.
- Vegetable shortening (optional) – Prevents melting in warm environments and stabilizes color.
Neon “Paint” Ingredients:
- Edible food coloring gels (neon pink, electric blue, lime green, bright orange, sunny yellow) – Gel-based colors are highly pigmented and won’t thin out your frosting.
- Clear alcohol (like vodka or grain alcohol) or clear extract (e.g., lemon or glycerin) – Thins gel color into a paint-like consistency without altering opacity.
- Edible luster dust (optional) – For a glowing, metallic sheen under blacklight.
- Edible glitter or disco dust – Adds sparkle to simulate wet paint shimmer.
Tools You’ll Need:
- Piping bags (disposable or reusable)
- Tips #2, #3, or small round tips for controlled splatter lines
- Pastry brushes (dedicated to food use)
- Toothbrushes (new, unused—ideal for flicking “paint”)
- Squeeze bottles with fine tips
- Turntable for easy decorating
- Offset spatula for smooth frosting
- Plastic sheeting or parchment paper (to protect workspace)
Step-by-Step Recipe: How to Make a Neon Paint Splatter Cake
Step 1: Bake the Cake
- Preheat oven to 350°F (175°C). Grease and flour two 8-inch round cake pans, or line with parchment.
- In a medium bowl, whisk together 2 cups all-purpose flour, 1½ tsp baking powder, ½ tsp baking soda, and ¼ tsp salt. Set aside.
- In a large mixing bowl, beat 1 cup softened unsalted butter and 1¾ cups granulated sugar until light and fluffy (about 3–4 minutes).
- Add 4 room-temperature eggs, one at a time, beating well after each. Mix in 2 tsp vanilla extract.
- Alternately add the dry ingredients and 1 cup buttermilk, beginning and ending with dry mix. Mix until just combined—do not overmix.
- Pour batter evenly into pans. Bake 25–30 minutes or until a toothpick comes out clean.
- Cool in pans 10 minutes, then transfer to wire racks to cool completely.
Step 2: Prepare the Frosting
- In a large bowl, beat 1½ cups softened unsalted butter and ½ cup vegetable shortening until creamy (3 minutes).
- Gradually add 6–7 cups sifted powdered sugar, 1 cup at a time, on low speed.
- Add 2–3 tbsp heavy cream, 1 tsp vanilla, and a pinch of salt. Beat on high for 3–4 minutes until fluffy and spreadable.
- Divide frosting: Keep most plain white; set aside small portions for tinting.
Step 3: Crumb Coat and Final Frost
- Level cakes if needed. Place one layer on a cake board or plate. Add a dollop of frosting, spread evenly. Top with second layer.
- Cover entire cake with a thin crumb coat. Chill for 20–30 minutes to seal in crumbs.
- Apply final thick, smooth layer of white frosting. Use an offset spatula and turntable for a clean finish. Chill again for 15 minutes.
Step 4: Create the Neon Paint Splatter Effect
- Prepare neon paints: In small bowls, mix neon gel food coloring with ½ tsp clear alcohol or extract per color until fluid like ink.
- Transfer each color to separate piping bags fitted with tiny tips, squeeze bottles, or small condiment dispensers.
- For fine splatter lines: Hold piping bag vertically above cake and quickly pull up while squeezing to create upward flicks.
- For dramatic splashes: Dip a clean toothbrush into thinned color. Run your thumb over the bristles to flick paint onto cake.
- Vary angles, heights, and densities. Focus on edges and top center for a natural “thrown paint” look.
- Add dimension: Use a small brush to drag some lines slightly outward, mimicking drip effects.
- Optional: Dust with edible glitter or luster powder for glow-in-the-dark or UV-reactive shine.
Step 5: Chill and Serve
- Refrigerate the cake for at least 1 hour before slicing to set the design.
- Serve at room temperature for best texture. Use a hot knife for clean cuts.
Tips for Perfect Neon Paint Splatter Cake Art
- Use gel-based food coloring – Liquid dyes dilute frosting and cause bleeding. Gels offer intense color without affecting consistency.
- Test your splatter technique – Practice flicking or drizzling on parchment first to get the motion right.
- Work in layers – Start with lighter colors, then build up darker or brighter splashes on top for depth.
- Keep a steady hand – Support your wrist on the table when using squeeze bottles for precision.
- Chill the cake between steps – Cold frosting holds shape better and prevents smudging during painting.
- Protect your workspace – Cover surfaces with parchment or plastic—this “paint” can stain!
- Balance the design – Avoid overcrowding; asymmetry adds to the artistic feel, but leave breathing room.
- Add themed elements – Include edible paintbrushes, palette decorations, or musical notes for party-specific flair.
Variations and Customizations
The beauty of neon paint splatter cake art is its adaptability. Here are creative twists to personalize your masterpiece:
Flavor Variations:
- Funfetti – Add rainbow sprinkles to vanilla batter for extra whimsy.
- Chocolate base – Use chocolate cake with white frosting for high contrast.
- Lemon or red velvet – Pair tangy or rich flavors with neon accents for a flavor-art contrast.
- Gluten-free or vegan – Substitute with almond flour, oat flour, or plant-based butter and milk.
Color Themes:
- Rainbow explosion – All seven colors in vibrant splatters.
- Blacklight reactive – Use UV-reactive edible powders and serve under blacklight for a club-like glow.
- Duo-tone – Pick two complementary neons (e.g., pink and green) for a minimalist pop.
- Ombré splatter – Blend shades from dark to light within one color family.
Occasion-Based Designs:
- Birthday cakes – Add name plaques or age numerals in matching neon fonts.
- Gender reveal – Use only pink and blue splatters converging in the center.
- Music festivals or concerts – Incorporate band logos or lyrics in stencil-style paint.
- Art-themed parties – Decorate with edible paint tubes, canvas textures, or mini easels.
Advanced Techniques:
- Stencil splatter – Use cut-out shapes (stars, hearts) as masks for crisp painted silhouettes.
- Drip + splatter combo – Add colored ganache drips before splattering for layered effects.
- 3D paint blobs – Pipe small domes of stiff royal icing, tint them, and place strategically for realism.
- Edible image transfers – Print abstract art on rice paper and overlay subtly beneath splatters.
Health Considerations and Nutritional Value
While undeniably fun and eye-catching, neon paint splatter cakes are rich in sugar and fat. Here’s what to keep in mind:
Nutritional Profile (Per Slice, Approximate):
- Calories: 380–450
- Total Fat: 18–22g (mostly from butter and shortening)
- Saturated Fat: 10–12g
- Carbohydrates: 50–58g (mostly sugars)
- Protein: 4–5g
- Sodium: 200–250mg
Health Tips:
- Portion control: Cut smaller slices—this cake is rich and decorative, so a little goes a long way.
- Sugar substitutes: Use monk fruit-sweetened powdered sugar or erythritol blends for reduced sugar versions.
- Butter alternatives: Replace half the butter with applesauce or mashed banana in cake (not frosting).
- Food coloring safety: While FDA-approved, some artificial dyes (especially in neon gels) may affect hyperactivity in sensitive children. Opt for natural neon alternatives made from beet juice, turmeric, or spirulina if preferred.
- Allergens: Contains dairy, eggs, gluten, and potential soy (from shortening). Always label accordingly.
Full Ingredient List
Cake:
- 2 cups all-purpose flour
- 1¾ cups granulated sugar
- 1½ tsp baking powder
- ½ tsp baking soda
- ¼ tsp salt
- 1 cup unsalted butter, softened
- 4 large eggs, room temperature
- 2 tsp pure vanilla extract
- 1 cup buttermilk
Frosting:
- 1½ cups unsalted butter, softened
- ½ cup vegetable shortening
- 6–7 cups powdered sugar, sifted
- 2–3 tbsp heavy cream or whole milk
- 1 tsp vanilla extract
- Pinch of salt
Neon Paint:
- 1 tsp neon pink gel food coloring + ½ tsp clear alcohol
- 1 tsp electric blue gel food coloring + ½ tsp clear alcohol
- 1 tsp lime green gel food coloring + ½ tsp clear alcohol
- 1 tsp bright orange gel food coloring + ½ tsp clear alcohol
- 1 tsp sunny yellow gel food coloring + ½ tsp clear alcohol
- Edible glitter or luster dust (optional)
Directions Recap
- Bake vanilla cake layers and cool completely.
- Make smooth, stable buttercream frosting; chill briefly.
- Stack and crumb coat cake, then apply final smooth layer. Chill.
- Mix neon gel colors with alcohol to create paintable consistency.
- Use piping bags, squeeze bottles, or toothbrushes to splatter colors artistically.
- Add glitter or special effects if desired.
- Chill cake to set design. Serve cold or at room temperature.
Frequently Asked Questions (FAQ)
Can I make a neon splatter cake without alcohol?
Yes! Substitute clear alcohol with clear vanilla extract, lemon extract, or simple syrup. Just ensure the liquid is clear to preserve color vibrancy.
How far in advance can I make this cake?
The cake layers can be baked and wrapped in plastic 2 days ahead, frozen up to 1 month. Frosting can be refrigerated for 5 days or frozen. Assemble and decorate no more than 24 hours before serving for best appearance.
Will the colors bleed into the frosting?
Minimize bleeding by using gel colors, avoiding excess liquid, and chilling the cake between applications. If colors start to smear, return the cake to the fridge to firm up.
Is this cake safe for kids?
Yes, as long as non-toxic, food-grade ingredients are used. However, due to high sugar and artificial colors, moderation is advised. Consider natural dyes for younger children.
Can I use store-bought frosting?
You can, but homemade or stabilized frostings hold intricate details better. If using canned frosting, mix in powdered sugar and shortening to thicken.
How do I store leftover cake?
Store covered in the refrigerator for up to 5 days. Bring to room temperature before serving. Avoid direct sunlight to prevent color fading.
Can I make this cake gluten-free?
Absolutely! Use a 1:1 gluten-free flour blend and ensure all other ingredients are certified GF. Texture may be slightly denser but still delicious.
What if I don’t have a toothbrush for splattering?
Use a small pastry brush, pipette, or even a fork. Dip tines into paint and flick with your finger for similar results.
Summary
The neon paint splatter cake is a dazzling fusion of culinary skill and modern artistry, transforming a simple dessert into a vibrant, conversation-starting centerpiece. With bold colors, creative techniques, and endless customization, it’s more than a cake—it’s an edible masterpiece.