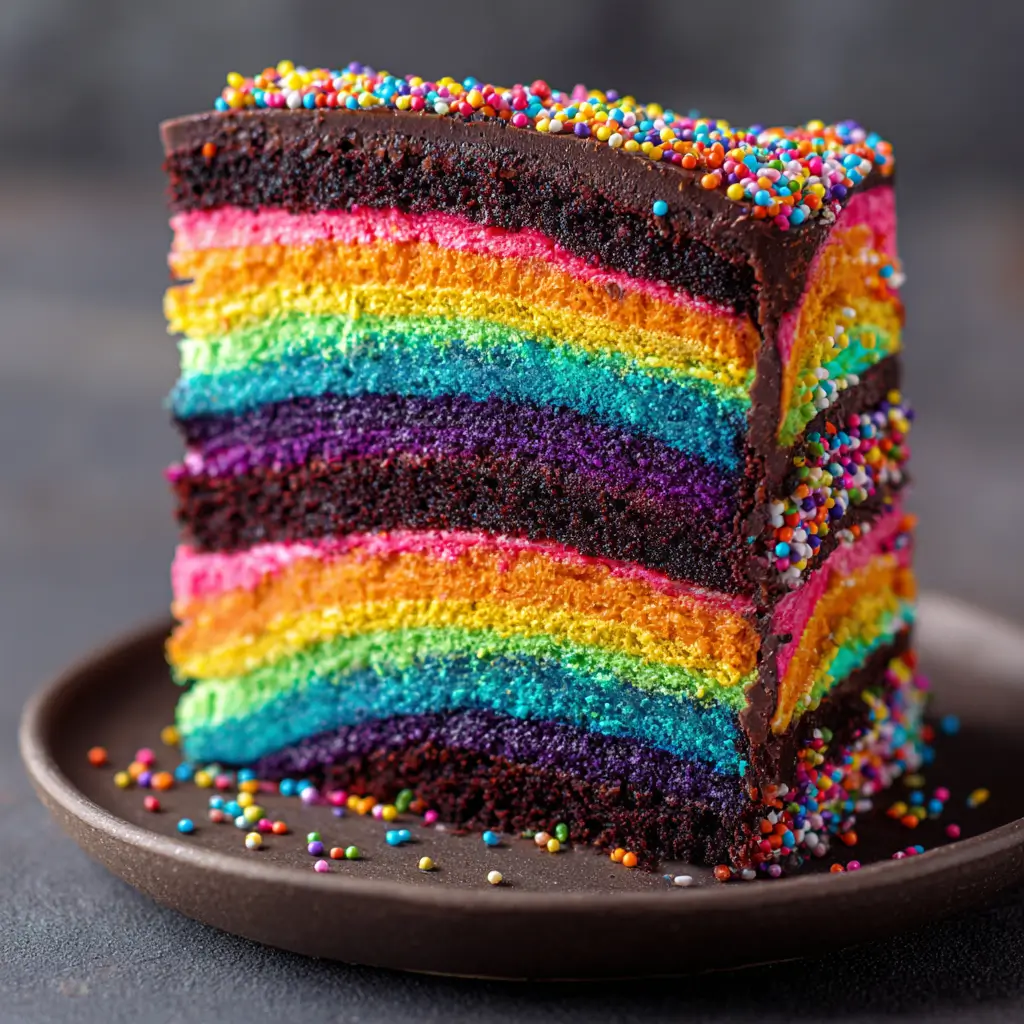
Neon Bright Rainbow Chocolate Cake: A Celebration of Color and Flavor
The Neon Bright Rainbow Chocolate Cake is more than just a dessert—it’s a sensory explosion, a vibrant masterpiece that turns any occasion into a celebration. This isn’t your average chocolate cake; it’s a fusion of rich cocoa decadence with the electrifying joy of rainbow hues, amplified by neon food coloring to create a confection so vivid, it practically glows. Whether you’re hosting a birthday party, Pride event, or simply indulging in creative baking, this cake delivers on both visual drama and flavor complexity.
The History: Where Did the Rainbow Chocolate Cake Come From?
The concept of rainbow cakes dates back to the mid-20th century, with roots often traced to the “Harlequin Cake” or “Pinwheel Cake,” popularized in American bakeries during the 1950s and 60s. These early versions featured layers of pastel-colored vanilla sponge stacked high to create a cheerful striped effect when sliced. Over time, bakers began experimenting with brighter colors and alternative bases—enter the chocolate twist.
The Neon Bright Rainbow Chocolate Cake is a modern evolution, born from the intersection of social media aesthetics, food artistry, and the growing availability of gel-based neon food dyes. Unlike traditional rainbow cakes that rely on vanilla batter, this version uses a deeply flavored chocolate base, allowing the bright colors to pop even more dramatically against the dark backdrop. The rise of Instagram-worthy desserts and viral baking trends has catapulted this cake into fame, making it a staple at themed parties, LGBTQ+ events, and artistic culinary showcases.
Ingredients Breakdown: What Makes This Cake So Special?
The magic of the Neon Bright Rainbow Chocolate Cake lies in its unique combination of classic baking ingredients and bold, modern enhancements. Let’s break down what goes into creating this dazzling dessert:
- High-Quality Cocoa Powder: Use natural or Dutch-process cocoa for a deep, rich chocolate flavor that forms the foundation of each layer.
- Neon Gel Food Coloring: Unlike liquid dyes, gel colors are highly concentrated and won’t alter the batter’s consistency. Look for electric pink, lime green, sky blue, tangerine orange, sunshine yellow, and vibrant purple.
- All-Purpose Flour: Provides structure while maintaining a soft crumb.
- Granulated Sugar: Sweetens the cake and helps with moisture retention.
- Baking Soda & Baking Powder: Leavening agents that ensure a light, fluffy texture across all layers.
- Buttermilk: Adds tenderness and a slight tang that balances the sweetness.
- Eggs: Bind the ingredients together and contribute to the cake’s rise.
- Vegetable Oil: Keeps the cake moist without overpowering the chocolate flavor.
- Vanilla Extract: Enhances overall flavor depth.
- Hot Coffee or Water: Helps bloom the cocoa, intensifying the chocolate taste without adding bitterness.
For the frosting, a smooth, creamy vanilla buttercream or cream cheese base works best to contrast the intense colors and chocolate richness. You can also add a touch of neon dye to the frosting for an even more dramatic effect.
Step-by-Step Recipe: How to Bake the Ultimate Neon Rainbow Chocolate Cake
Creating this show-stopping cake requires patience, precision, and a love for color. Follow these detailed steps to achieve bakery-quality results at home.
Preparation:
- Preheat your oven to 350°F (175°C).
- Grease and line six 6-inch round cake pans with parchment paper. Alternatively, use three pans and bake in batches.
- Set up your mise en place: measure all ingredients and prepare your food coloring.
Step 1: Make the Chocolate Batter
- In a large mixing bowl, sift together 1 ½ cups all-purpose flour, ¾ cup cocoa powder, 1 ½ tsp baking soda, 1 ½ tsp baking powder, and ½ tsp salt.
- In another bowl, whisk 1 ½ cups granulated sugar, 2 large eggs, ½ cup vegetable oil, 2 tsp vanilla extract, and 1 cup buttermilk until smooth.
- Gradually add the dry ingredients to the wet mixture, alternating with ½ cup hot coffee (or water), mixing until just combined. Do not overmix.
Step 2: Divide and Dye the Batter
- Divide the batter evenly into six separate bowls (approximately 1 cup per bowl).
- Add a different neon gel food color to each bowl—pink, orange, yellow, green, blue, and purple. Mix thoroughly until the color is uniform and vibrant.
- Pro Tip: Wear gloves to avoid staining your hands!
Step 3: Bake the Layers
- Pour each colored batter into its prepared pan, smoothing the tops with a spatula.
- Bake for 20–25 minutes, or until a toothpick inserted into the center comes out clean.
- Cool in the pans for 10 minutes, then transfer to wire racks to cool completely.
Step 4: Prepare the Frosting
- Beat 1 cup (2 sticks) unsalted butter until creamy.
- Add 4 cups powdered sugar, 1 tsp vanilla extract, and 2–3 tbsp heavy cream or milk. Whip for 3–5 minutes until light and fluffy.
- Optional: Divide frosting and tint with neon colors for a rainbow crumb coat or ombre effect.
Step 5: Assemble the Cake
- Place the first layer (e.g., purple) on a cake board or plate. Spread a thin layer of white frosting on top.
- Repeat with each layer in rainbow order: purple, blue, green, yellow, orange, pink.
- Once stacked, apply a thin crumb coat and chill for 20 minutes.
- Apply a final thick layer of frosting, smoothing the sides and top. Use an offset spatula or bench scraper for clean edges.
Step 6: Decorate and Serve
- Decorate with edible glitter, rainbow sprinkles, neon sugar pearls, or fondant accents.
- For extra drama, use glow-in-the-dark edible dust (under blacklight) or LED cake toppers.
- Slice and serve at room temperature for optimal texture.
Expert Tips for Success
- Use Gel Food Coloring: Liquid dyes dilute the batter and may affect texture. Gel colors are potent and won’t change the consistency.
- Don’t Overmix: Once flour is added, mix only until incorporated to prevent a dense cake.
- Even Layering: Use a kitchen scale to divide batter equally for uniform layers.
- Cool Completely: Warm layers will melt the frosting and cause sliding.
- Chill Before Slicing: Refrigerate the assembled cake for 30 minutes before cutting for cleaner slices.
- Work Quickly with Colors: Gel dyes stain easily—cover countertops and use silicone bowls if possible.
Variations and Customizations
The Neon Bright Rainbow Chocolate Cake is incredibly versatile. Here are some fun ways to make it your own:
- Gluten-Free Version: Substitute all-purpose flour with a 1:1 gluten-free baking blend.
- Dairy-Free Option: Use almond milk + vinegar instead of buttermilk, and vegan butter in the frosting.
- Flavor Infusions: Add orange zest, espresso powder, or chili flakes to the batter for gourmet twists.
- Theme-Based Designs: Customize for Pride Month, birthdays, unicorn parties, or retro neon 80s themes.
- Naked Cake Style: Skip the outer frosting and let the colorful layers peek through for a rustic-chic look.
- Cupcake Version: Bake as cupcakes with rainbow swirls or layered interiors—perfect for parties.
- Alcohol-Infused: Brush layers with Kahlua, Baileys, or amaretto syrup for an adult-only treat.
Health Considerations and Nutritional Value
While undeniably delicious, the Neon Bright Rainbow Chocolate Cake is a decadent dessert best enjoyed in moderation. Here’s a nutritional overview (per slice, based on 12 servings):
- Calories: ~450–550 kcal
- Fat: 20–25g (mostly from butter, oil, and egg yolks)
- Carbohydrates: 65–75g (primarily from sugar and flour)
- Protein: 5–7g
- Sodium: 200–300mg
- Sugar: 45–55g
Considerations:
- High sugar content may not be suitable for diabetics or low-sugar diets.
- Gel food dyes are generally recognized as safe (GRAS) by the FDA, but some individuals prefer natural alternatives like beet juice (pink), spirulina (blue/green), or turmeric (yellow). Note: natural dyes may not produce the same neon intensity.
- To reduce calories, consider using a sugar substitute like erythritol and applesauce instead of oil—but expect texture changes.
- This cake contains common allergens: eggs, dairy, wheat, and soy (depending on cocoa brand).
Full Ingredient List
For the Cake:
- 1 ½ cups (190g) all-purpose flour
- ¾ cup (75g) unsweetened cocoa powder (natural or Dutch-process)
- 1 ½ tsp baking soda
- 1 ½ tsp baking powder
- ½ tsp salt
- 1 ½ cups (300g) granulated sugar
- 2 large eggs, room temperature
- ½ cup (120ml) vegetable oil
- 2 tsp pure vanilla extract
- 1 cup (240ml) buttermilk
- ½ cup (120ml) hot coffee or hot water
- Neon gel food coloring (6 colors: red, orange, yellow, green, blue, purple)
For the Frosting:
- 1 cup (230g / 2 sticks) unsalted butter, softened
- 4 cups (480g) powdered sugar, sifted
- 1 tsp vanilla extract
- 2–3 tbsp heavy cream or milk
- Pinch of salt
- Optional: neon gel food coloring for tinted frosting
For Decoration:
- Rainbow sprinkles
- Edible glitter or luster dust
- Neon sugar pearls
- Blacklight-reactive edible dust (for glow effects)
- Cake sparklers or LED candles
Detailed Directions
Follow these comprehensive instructions for flawless results:
- Preheat & Prep: Preheat oven to 350°F (175°C). Grease and line six 6-inch cake pans with parchment paper. Wipe rims clean.
- Mix Dry Ingredients: In a large bowl, sift flour, cocoa powder, baking soda, baking powder, and salt. Whisk to combine.
- Cream Wet Ingredients: In a separate bowl, beat sugar, eggs, oil, and vanilla until pale and slightly fluffy (~2 minutes).
- Combine: Gradually add dry mix to wet mix in three parts, alternating with buttermilk. Finish by pouring in hot coffee and mixing until smooth.
- Divide & Color: Pour batter into six equal portions. Tint each with a different neon gel color. Stir thoroughly.
- Fill Pans: Distribute each colored batter into prepared pans. Tap gently to remove air bubbles.
- Bake: Place pans in the center of the oven. Bake 20–25 minutes. Rotate pans halfway for even baking. Test with a toothpick.
- Cool: Let sit in pans for 10 minutes. Run a knife around edges and invert onto cooling racks. Remove parchment and cool completely.
- Make Frosting: Beat butter until creamy. Gradually add powdered sugar, vanilla, cream, and salt. Whip 5 minutes until fluffy.
- Assemble: Place first layer on turntable. Spread ¼ cup frosting. Repeat stacking in ROYGBV order. Apply crumb coat, chill 20 mins.
- Final Frosting: Cover cake with remaining frosting. Smooth sides and top. Chill 30 minutes.
- Decorate: Add sprinkles, glitter, or hand-piped designs. Use tips like star or petal nozzles for flair.
- Serve: Bring to room temperature before slicing. Use a sharp knife dipped in hot water for clean cuts.
Frequently Asked Questions (FAQ)
Q: Can I make this cake ahead of time?
A: Yes! Bake layers up to 2 days in advance and store wrapped at room temperature. Frost the day of serving for best appearance.
Q: Why did my colors bleed?
A: Overmixing after adding color or using too much liquid dye can cause bleeding. Always use gel and fold gently.
Q: Can I use boxed cake mix?
A: While possible, homemade batter provides better control over texture and color vibrancy. Boxed mixes may not hold neon hues as well.
Q: How do I store leftovers?
A: Keep in an airtight container in the fridge for up to 5 days. Bring to room temperature before serving.
Q: Can I freeze the cake layers?
A: Absolutely! Wrap cooled layers tightly in plastic and foil. Freeze for up to 3 months. Thaw overnight in the fridge before frosting.
Q: Is this cake safe under blacklight?
A: Some neon dyes and edible glitters are UV-reactive. Check product labels or use specifically designed glow-in-the-dark decorations for a nightclub effect.
Q: Can I make a two-layer rainbow effect?
A: Yes! Pour multiple colors into one pan and gently swirl with a toothpick before baking for a marbled look.
Summary
The Neon Bright Rainbow Chocolate Cake is a breathtaking fusion of rich chocolate flavor and electrifying color, perfect for turning any event into a celebration. With careful layering, vibrant gel dyes, and a silky frosting finish, this cake is as unforgettable in taste as it is in appearance.