Introduction
The Layered Rainbow Jello Cake is a vibrant, nostalgic dessert that brings joy to any gathering. With its eye-catching swirls of color and wobbly texture, it’s more than just a treat—it’s an experience. Whether you’re planning a birthday party, a summer picnic, or simply looking for a fun way to impress your family, this cake delivers on both visual appeal and taste. The combination of creamy textures, sweet gelatin layers, and fluffy whipped topping creates a delightful contrast in every bite. It’s no wonder this dessert has remained popular across generations, often associated with childhood memories and festive celebrations.
Beyond its aesthetic charm, the Layered Rainbow Jello Cake is surprisingly simple to make, requiring minimal baking skills—perfect for novice bakers or anyone looking for a no-bake option. Its versatility allows for endless customization, making it suitable for themed parties, holidays, or even dietary preferences. From pastel hues for baby showers to bold neon tones for retro-themed events, this dessert adapts beautifully. In this comprehensive guide, we’ll dive into everything you need to know—from the origins of this colorful confection to step-by-step instructions, health considerations, and creative variations that will keep your guests asking for seconds.
The History
The roots of the Layered Rainbow Jello Cake trace back to the mid-20th century, during the rise of convenience foods in American households. Gelatin-based desserts gained immense popularity thanks to brands like Jell-O, which marketed flavored, powdered gelatin as quick, easy, and fun for families. Introduced in 1897 by Pearle Bixby Wait, Jell-O became a household name by the 1930s and exploded in popularity post-World War II, when processed foods symbolized modernity and efficiency in the kitchen.
Jell-O salads and molds were staples at potlucks, church suppers, and family dinners throughout the 1950s and 60s. Over time, creative home cooks began experimenting with layering different colors and flavors to create visually stunning centerpieces. The rainbow version emerged as a favorite, especially among children, due to its bright, cheerful appearance. As refrigeration became standard in homes, these chilled desserts flourished, paving the way for multi-layered creations like the Jello Cake.
The “cake” aspect evolved when people started incorporating whipped toppings, cream cheese, and sponge bases to elevate the texture and richness. Unlike traditional cakes, this version required no oven time, making it ideal for hot summer months. Today, the Layered Rainbow Jello Cake stands as a whimsical fusion of retro charm and modern creativity—a beloved icon of American dessert culture that continues to inspire new interpretations around the world.
Ingredients Breakdown
To craft the perfect Layered Rainbow Jello Cake, it’s essential to understand each ingredient’s role in creating both structure and flavor. This dessert typically combines gelatin, sweetened condensed milk, whipped topping, and a base such as a pre-made cake or cookies. Below is a detailed breakdown:
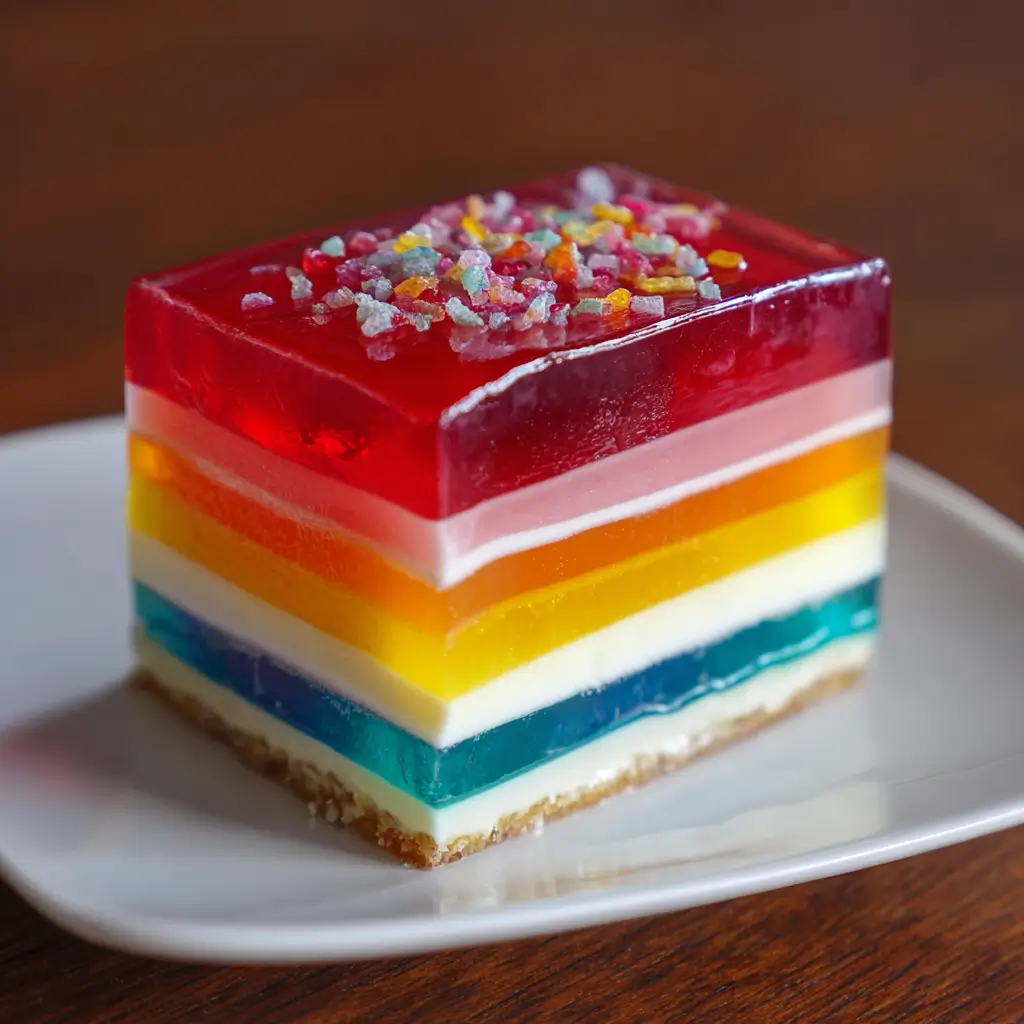
- Gelatin (Jell-O): The star of the show. Colored, flavored gelatin packets provide the signature hue and fruity taste. Common choices include strawberry (red), orange (orange), lemon (yellow), lime (green), blue raspberry (blue), and grape or raspberry (purple). Each packet usually yields about 1 cup of set gelatin when prepared.
- Boiling Water: Used to dissolve the powdered gelatin fully. The high temperature ensures the gelatin blooms properly, leading to a smooth, consistent texture without lumps.
- Cold Water: Added after dissolving in boiling water to cool the mixture before combining with other ingredients. Too much heat can melt dairy components, so cooling is crucial.
- Sweetened Condensed Milk: Adds creaminess, sweetness, and body. Unlike regular milk, it doesn’t curdle when mixed with acidic or warm gelatin, ensuring a silky consistency.
- Cream Cheese (optional but recommended): Enhances richness and helps stabilize layers. When softened and blended smoothly, it gives the filling a luxurious mouthfeel similar to cheesecake.
- Whipped Topping (e.g., Cool Whip): Provides lightness and volume. Thawed frozen whipped topping folds easily into the gelatin mixtures, creating airy layers that contrast with the firmness of set Jell-O.
- Cake Base (optional): Some recipes use a thin layer of yellow or vanilla sponge cake at the bottom for added texture and substance. Store-bought or homemade works equally well.
- Graham Cracker Crust (alternative base): For a pie-style presentation, crushed graham crackers mixed with butter form a crunchy foundation that pairs wonderfully with the sweet gelatin.
- Lemon Juice (in some variations): A small splash can brighten flavors and balance excessive sweetness, particularly in fruit-forward versions.
- Vanilla Extract (optional): Adds depth to the creamy layers, enhancing overall flavor complexity without overpowering the fruity notes.
- Food Coloring (if needed): While flavored Jell-O provides natural coloring, additional food dye may be used to intensify shades or achieve specific tones not available in commercial packets.
Each component plays a critical role: gelatin sets the structure, dairy enriches the texture, and the base supports the towering layers. Choosing quality ingredients ensures stability, vibrant color retention, and balanced flavor across all six rainbow tiers.
Step-by-Step Recipe
Creating a flawless Layered Rainbow Jello Cake requires patience and precision, but the results are worth every minute. Follow these detailed steps to build a stable, beautiful dessert that holds its shape when sliced.
- Prepare Your Pan: Use a 9×13-inch glass dish or a round springform pan for easy removal. Lightly grease the sides if using a non-glass container. If including a cake layer, cut a sheet cake to fit the bottom snugly. For a crust base, press graham cracker crumbs mixed with melted butter firmly into the bottom and chill for 20 minutes.
- Make the First Layer (Red – Strawberry): Dissolve one package of red Jell-O (strawberry) in 1 cup of boiling water, stirring for 2 minutes until fully dissolved. Add 1/2 cup cold water and stir again. In a separate bowl, beat 4 oz softened cream cheese with 1/2 cup sweetened condensed milk until smooth. Gently fold in 1 cup of thawed whipped topping. Slowly mix this creamy blend into the cooled Jell-O. Pour over the base and refrigerate for 1.5–2 hours, or until completely set (not jiggly).
- Second Layer (Orange – Orange Flavor): Repeat the process with orange Jell-O: dissolve in 1 cup boiling water, add 1/2 cup cold water, cool slightly. Mix with another 4 oz cream cheese, 1/2 cup sweetened condensed milk, and 1 cup whipped topping. Carefully pour over the first set layer. Return to the fridge for 1.5–2 hours.
- Third Layer (Yellow – Lemon Flavor): Prepare lemon Jell-O the same way. Blend with cream cheese, sweetened condensed milk, and whipped topping. Chill thoroughly between layers to prevent mixing.
- Fourth Layer (Green – Lime Flavor): Use lime Jell-O, following identical preparation. Ensure previous layer is fully firm before adding the next to maintain clean separation.
- Fifth Layer (Blue – Blue Raspberry): Dissolve blue raspberry Jell-O, cool, then combine with fresh batch of cream cheese mixture and whipped topping. Pour gently down the side of the pan to avoid disturbing lower layers.
- Sixth Layer (Purple – Raspberry or Grape): Complete the rainbow with purple Jell-O. After pouring, refrigerate the entire cake for at least 4 hours—or preferably overnight—to ensure all layers are fully stabilized.
- Final Touches: Once fully set, remove from the refrigerator. Top with remaining whipped topping, pipe decorative rosettes if desired, and sprinkle with rainbow sprinkles, edible glitter, or fresh fruit slices for garnish.
- Serving: Use a sharp knife dipped in hot water (wiped dry between cuts) to slice cleanly through the layers. Wipe the blade after each cut for neat edges.
Tips for Success:
- Always allow each layer to set completely before adding the next—rushing this step leads to bleeding colors.
- Use a dropper or spoon to slowly add each new layer along the edge of the pan to minimize disturbance.
- If layers aren’t setting quickly enough, place the pan on a flat surface in the coldest part of the fridge (usually the back, near the freezer compartment).
Tips
Perfecting the Layered Rainbow Jello Cake takes more than just following a recipe—it’s about technique, timing, and attention to detail. Here are expert tips to ensure success every time:
- Chill Bowls and Utensils: Before whipping or folding in toppings, chill mixing bowls and beaters in the freezer for 10–15 minutes. Cold tools help maintain the volume and stability of whipped cream or Cool Whip.
- Avoid Overmixing: When blending the cream cheese mixture with Jell-O, stir just until combined. Overmixing introduces air bubbles, which can affect clarity and texture.
- Check Gelatin Temperature: Never add warm gelatin directly to whipped topping—it will melt it. Always cool the dissolved Jell-O to room temperature (about 15–20 minutes) before mixing in dairy elements.
- Use Fresh Ingredients: Expired gelatin may not set properly. Similarly, ensure whipped topping is fully thawed but still cold—not watery or separated.
- Work in a Draft-Free Area: Avoid placing the pan near vents or open doors where airflow might cause uneven cooling or condensation.
- Add a Stabilizer (Optional): For extra firmness, especially in warm climates, consider adding unflavored gelatin to the cream mixture. Bloom 1/2 teaspoon in 1 tablespoon cold water, then dissolve in microwave (5–10 seconds), and mix into the sweetened condensed milk before folding in.
- Label Layers Mentally: Keep track of the order (Red, Orange, Yellow, Green, Blue, Purple) to maintain the true rainbow sequence. Mistaking the order breaks the visual impact.
- Photograph Before Serving: Capture the pristine cross-section before slicing. Natural light near a window shows off the colors best.
- Serve Chilled: Always serve straight from the refrigerator. Warm temperatures cause the layers to soften rapidly and lose definition.
- Freeze Leftovers (Carefully): While not ideal, leftover slices can be wrapped tightly and frozen for up to 2 weeks. Thaw in the fridge before serving to preserve texture.
Variations and Customizations
One of the greatest strengths of the Layered Rainbow Jello Cake is its adaptability. You can tailor it to suit seasonal themes, dietary needs, or personal taste preferences. Explore these exciting variations:
- Pastel Rainbow Cake: Use pastel-colored Jell-O or adjust intensity by reducing the amount of powder per packet. Perfect for baby showers, Easter, or spring brunches.
- Adult Version with Alcohol: Infuse each layer with complementary liqueurs—chambord in raspberry, triple sec in orange, Midori in lime, etc. Replace some cold water with alcohol (up to 1/4 cup per layer), but note that high alcohol content may inhibit setting; compensate with extra gelatin if needed.
- Sugar-Free Rainbow Cake: Substitute sugar-free Jell-O and use sugar-free sweetened condensed milk (available in health food stores or online) along with low-sugar whipped topping. Ideal for diabetics or those monitoring carbohydrate intake.
- Vegan Jello Cake: Replace animal-based gelatin with agar-agar (a seaweed-derived alternative). Note: Agar sets faster and firmer, so work quickly. Combine with coconut cream and maple syrup for the creamy layers. Flavor with natural fruit purees and plant-based colors.
- Fruit-Infused Layers: Add finely diced fruits like strawberries, kiwi, or mandarin oranges to individual layers before chilling. Ensure fruit is patted dry to prevent excess moisture.
- Chocolate Bottom Layer: Instead of starting with red, begin with a chocolate mousse or pudding layer for a surprise twist. Top with rainbow gelatin layers for contrast.
- Mini Jello Cups: Make individual servings in clear plastic cups or mason jars. Great for parties, school events, or portion control. Decorate with mini umbrellas or flags.
- Theme-Based Color Schemes: Customize colors for holidays—red and green for Christmas, pink and red for Valentine’s Day, orange and black for Halloween, or patriotic red, white, and blue for Independence Day.
- Gluten-Free Option: Most Jell-O brands are naturally gluten-free, but always verify labels. Pair with a gluten-free cake base or omit entirely for a safer choice.
- No-Cream Cheese Version: For a lighter texture, skip cream cheese and increase sweetened condensed milk slightly (to 3/4 cup per layer) while maintaining whipped topping proportions.
- Yogurt Twist: Swap whipped topping with plain Greek yogurt for a tangier, protein-rich alternative. Balance tartness with extra sweetened condensed milk.
- Edible Glitter & Sparkles: Dust each set layer lightly with edible glitter before adding the next, creating a shimmering effect throughout the cake.
Health Considerations and Nutritional Value
While undeniably delicious, the Layered Rainbow Jello Cake is a dessert best enjoyed in moderation due to its high sugar content and processed ingredients. Understanding its nutritional profile helps inform smarter choices, especially for those managing health conditions or seeking balanced diets.
A typical slice (1/12th of a 9×13-inch cake) contains approximately:
- Calories: 280–350 kcal
- Total Fat: 8–12g (mostly from cream cheese and whipped topping)
- Saturated Fat: 5–7g
- Cholesterol: 15–25mg
- Sodium: 200–300mg (from gelatin and dairy products)
- Total Carbohydrates: 50–60g
- Sugars: 45–55g (primarily from Jell-O and sweetened condensed milk)
- Protein: 4–6g
- Vitamins & Minerals: Minimal; lacks significant fiber, iron, or vitamins unless modified with real fruit or fortified alternatives.
Key Health Notes:
- High Sugar Content: One serving may exceed half the daily recommended added sugar limit for adults (per American Heart Association guidelines). Consider using reduced-sugar or sugar-free versions for better control.
- Artificial Ingredients: Many Jell-O products contain artificial flavors, colors (like Red 40, Blue 1), and preservatives. Opt for organic or naturally colored gelatins if avoiding synthetic additives.
- Digestive Sensitivity: Gelatin is derived from animal collagen and is generally safe, though some individuals may experience bloating or fullness. Agar-agar offers a plant-based alternative.
- Lactose Intolerance: Contains dairy (cream cheese, condensed milk, whipped topping). Substitute with lactose-free or plant-based analogs for sensitive individuals.
- Kosher/Halal Status: Check gelatin source—most conventional Jell-O uses pork or beef gelatin, which may not meet certain religious dietary standards. Look for certified kosher/halal gelatin products when necessary.
- Pregnancy Safety: Generally safe, provided ingredients are fresh and handled hygienically. Avoid alcohol-infused versions during pregnancy.
To improve nutritional value, incorporate real fruit purées, reduce added sugars, or boost protein with Greek yogurt. Serve smaller portions alongside fresh fruit platters to balance the meal.
Ingredients
- 6 packages (3 oz each) of colored Jell-O (Red – Strawberry, Orange – Orange, Yellow – Lemon, Green – Lime, Blue – Blue Raspberry, Purple – Raspberry or Grape)
- 6 cups boiling water (1 cup per Jell-O package)
- 3 cups cold water (1/2 cup per layer)
- 24 oz (6 containers) whipped topping (e.g., Cool Whip), thawed—reserve 1 cup for garnish
- 16 oz cream cheese, softened (2 standard blocks)
- 2 cups sweetened condensed milk
- 1 (9×13-inch) vanilla or yellow cake (store-bought or homemade), or 1½ cups graham cracker crumbs + 6 tbsp melted butter for crust
- Rainbow sprinkles, edible glitter, or fresh fruit (for decoration)
Directions
- Prepare the base: Either line the bottom of a 9×13-inch dish with a trimmed cake layer or press a graham cracker crust into the bottom and chill for 20 minutes.
- Begin with red Jell-O: Dissolve one package in 1 cup boiling water for 2 minutes. Stir in 1/2 cup cold water. Let cool to room temperature (about 15–20 minutes).
- In a medium bowl, beat cream cheese and 1/2 cup sweetened condensed milk until smooth. Fold in 1 cup whipped topping.
- Gently mix the cream mixture into the cooled Jell-O until uniform. Pour carefully over the base. Refrigerate for 1.5–2 hours until fully set.
- Repeat steps 2–4 with orange, yellow, green, blue, and purple Jell-O, allowing each layer to set completely before adding the next.
- After the final (purple) layer is poured, refrigerate the entire cake for at least 4 hours, preferably overnight.
- Before serving, spread or pipe the reserved 1 cup of whipped topping over the top. Decorate with rainbow sprinkles, edible glitter, or fruit slices.
- Use a hot knife (dipped in warm water and dried) to slice into portions. Wipe the blade between cuts for clean edges.
- Serve immediately and store leftovers covered in the refrigerator for up to 5 days.
FAQ
Can I make this cake ahead of time?
Yes! This cake actually improves with time. Making it 1–2 days in advance allows flavors to meld and layers to firm up, resulting in cleaner slices.
Why are my layers bleeding into each other?
This usually happens if the previous layer isn’t fully set before adding the next. Ensure each layer chills for at least 1.5–2 hours and feels firm to the touch.
Can I use fresh whipped cream instead of Cool Whip?
Absolutely. Whip 2 cups heavy cream with 2 tbsp powdered sugar until stiff peaks form. Use immediately and keep the cake refrigerated to prevent deflation.
How do I unmold the cake?
If using a springform pan, release the clamp and lift the ring. For glass dishes, dip the bottom briefly in warm water (5 seconds) to loosen edges, then slide onto a serving plate.
Can I freeze the Jello Cake?
It can be frozen for up to 2 weeks, but texture may change slightly—gelatin can become softer upon thawing. Wrap tightly in plastic and thaw overnight in the fridge.
Is Jell-O vegetarian?
Traditional Jell-O contains gelatin from animal sources, so it’s not vegetarian. Use agar-agar and plant-based colors for a vegan version.
What if my Jell-O won’t set?
Possible causes: too much liquid, fruit enzymes (avoid pineapple, kiwi, papaya unless cooked), or expired gelatin. Double-check measurements and use fresh ingredients.
Can I make only three layers?
Of course! Halve the recipe and use red, yellow, and blue for a simplified design. Adjust chilling time accordingly.
Can kids help make this cake?
Definitely! Measuring, stirring, and decorating are great kid-friendly tasks. Supervise near boiling water and refrigeration steps.
How long does it last in the fridge?
Up to 5 days when stored covered. Discard if it develops an off smell, slimy texture, or mold.
Summary
The Layered Rainbow Jello Cake is a dazzling, no-bake dessert that combines vibrant gelatin layers with creamy fillings for a nostalgic and visually stunning treat. Easy to customize and perfect for celebrations, it brings joy with every colorful slice.