
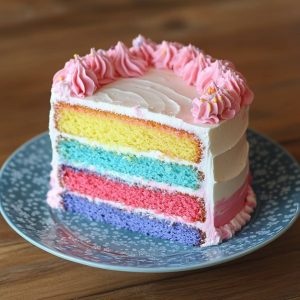
Introduction The Kool-Aid ombre cake is a playful and vibrant dessert that brings a burst of color and flavor to any occasion. The cake’s bold, layered hues are created using Kool-Aid powder, which not only provides vivid colors but also infuses the cake with fruity, tangy flavors that are sure to impress. With its striking ombre gradient effect, this cake is perfect for birthday parties, summer barbecues, or any celebration where you want to wow your guests. The combination of a soft, fluffy cake and the exciting, colorful layers makes it both a visual and a culinary treat. This dessert is simple to prepare, fun to make, and full of nostalgic flavors that will bring out the kid in everyone, making it a perfect option for anyone looking for a fun baking project.
The History of Kool-Aid Ombre Cake Kool-Aid, originally created in the 1920s by Edwin Perkins, has long been a beloved staple of American households, known for its sweet, fruity flavors and bright, eye-catching colors. While it’s most commonly enjoyed as a beverage, Kool-Aid has also made its way into the baking world as an easy and inexpensive way to add both color and flavor to cakes, cookies, and even frosting. The idea of using Kool-Aid to create an ombre cake is a relatively recent trend, with its rise in popularity coming from social media food bloggers and baking enthusiasts. Ombre cakes, which showcase a gradual color transition from light to dark shades, had already been a popular design technique in cakes for years, but when combined with the vibrant colors of Kool-Aid, it took on a new life. The result is a fun, visually stunning cake that’s also bursting with unique flavors, offering a modern twist on traditional baking.
Ingredients Breakdown For the cake itself, you’ll need a simple set of ingredients: cake mix, eggs, vegetable oil, and water. These ingredients form the base of the cake, allowing the Kool-Aid powder to shine as the main contributor to both the flavor and color. Kool-Aid, in a variety of flavors such as cherry, lemon, grape, and tropical punch, is what gives the cake its rainbow effect. You can choose your flavors based on the colors you want, or mix and match to create your own unique combination. For the frosting, a standard buttercream is the most common choice, though you can also experiment with cream cheese or whipped cream frosting depending on your preference. The frosting should complement the tangy, fruity notes of the Kool-Aid flavored cake while providing a rich and smooth contrast to the texture of the cake layers.
Step-by-Step Recipe 1. Preheat your oven to 350°F (175°C). Grease and flour three 8-inch round cake pans or line them with parchment paper for easy removal. 2. Prepare your cake mix according to the instructions on the box. Typically, this will involve mixing the cake mix with 3 large eggs, 1 cup of water, and ½ cup of vegetable oil. 3. Once the cake batter is ready, divide it evenly into three bowls. In each bowl, add a different Kool-Aid flavor to create your ombre effect. Start with one of the lighter colors for the bottom layer, then use a darker shade for the next layer and the darkest color for the top layer. Stir the Kool-Aid powder into the batter until it is fully incorporated. 4. Pour each colored batter into the prepared cake pans, one color per pan, smoothing out the top with a spatula to ensure even distribution. 5. Bake the cakes according to the instructions on the cake mix box, usually around 25-30 minutes. Test with a toothpick by inserting it into the center of each cake. If it comes out clean, the cakes are done. 6. Let the cakes cool in their pans for about 10 minutes before transferring them to wire racks to cool completely. 7. While the cakes are cooling, prepare the frosting. In a large mixing bowl, beat together 1 cup of softened butter, 4 cups of powdered sugar, and 1 teaspoon of vanilla extract until smooth and fluffy. If the frosting is too thick, add a tablespoon of milk or cream at a time until you achieve the desired consistency. 8. Once the cakes are completely cool, frost the first layer with a thin coating of frosting, then stack the second layer on top. Repeat this process with the third layer. Frost the top and sides of the cake with a generous layer of buttercream frosting. 9. Optionally, you can decorate the top with sprinkles or additional Kool-Aid powder for a pop of extra color and flavor.
Tips for the Perfect Kool-Aid Ombre Cake To get the most vibrant colors in your ombre cake, be sure to use Kool-Aid powder, not the liquid version. The powder is concentrated and will give you better color saturation without affecting the consistency of the cake batter. For a smooth and even ombre effect, divide your batter carefully, ensuring each layer has enough color to make a distinct visual difference. Avoid overmixing the cake batter after adding the Kool-Aid to maintain a fluffy texture. When frosting the cake, ensure the layers are completely cool before you start to avoid melting the frosting. If you’re looking to make the frosting easier to spread, you can chill it in the fridge for a bit before applying it to the cake. Finally, use a rotating cake stand to frost the sides of the cake evenly, allowing you to get that professional-looking finish.
Variations and Customizations While the Kool-Aid ombre cake is already fun and colorful, there are plenty of ways to make it your own. You can experiment with different Kool-Aid flavors to create unique flavor profiles, such as mixing tropical punch with lime for a refreshing citrusy twist or combining grape and blue raspberry for a vibrant, berry-inspired cake. For a more sophisticated taste, consider adding a layer of fruit preserves or jam between the cake layers to complement the fruity flavors of the Kool-Aid. If you’re aiming for an even bolder look, you can add edible glitter or color-coordinated sprinkles to the top of the cake, making it sparkle under the party lights. For an extra touch, try filling the center of the cake with whipped cream or frosting in the same colors as the layers.
Health Considerations and Nutritional Value Like most desserts, the Kool-Aid ombre cake is not the healthiest option, as it is rich in sugar, fats, and calories. The cake mix and frosting provide a significant amount of added sugar and fat, which may not make it ideal for those following a low-sugar or low-fat diet. Additionally, the use of Kool-Aid, which contains artificial flavors and coloring agents, may not be suitable for everyone. While Kool-Aid itself is not high in calories, it does add sugar to the cake, which could contribute to high sugar intake, especially for children. If you’re looking to make a healthier version, you could swap out the cake mix for a whole-grain or gluten-free version, use natural food coloring instead of Kool-Aid, or even try making a sugar-free frosting. However, when consumed in moderation as an occasional treat, this cake can still be enjoyed by most people without serious health concerns.
FAQ
- Can I use homemade cake batter instead of box cake mix? Yes, you can use homemade cake batter. Just ensure the recipe is light and fluffy to give the Kool-Aid powder a good base to color and flavor the cake.
- Can I use liquid Kool-Aid instead of powdered? It’s not recommended. The powdered version provides better color saturation without altering the cake’s consistency, whereas the liquid Kool-Aid might make the batter too runny.
- How long can I store this cake? The cake can be stored at room temperature in an airtight container for 3-4 days. If you need to store it longer, refrigerate the cake for up to a week.
- Can I freeze this cake? Yes, you can freeze the cake layers. Wrap them tightly in plastic wrap and aluminum foil, then freeze for up to 2-3 months. Let them thaw completely before frosting.
- Can I use different flavors of Kool-Aid? Absolutely! You can mix and match flavors based on your color preferences or create a more unique flavor combination that suits your taste.
Kool Aid Ombre Cake
Ingredients
For the Cake:
- 1 box of white cake mix
- 1 ¼ cups water
- ⅓ cup olive or vegetable oil
- 3 egg whites
For the Frosting:
- 1 cup unsalted butter softened to room temperature
- 3 cups powdered sugar
- 3 tablespoons heavy cream
- Additional Ingredients:
- Kool-Aid drink powder or liquid concentrate
Food coloring, as needed
Instructions
Make the Cake
- Preheat your oven to 350ºF.
- Grease 3 6-inch cake pans with oil and line the bottoms of each with parchment paper.
- In a medium bowl, mix together the cake mix, water, oil, and egg whites until the batter is smooth. Divide the batter evenly into 3 separate bowls.
- Add Kool-Aid powder or liquid concentrate to each bowl, using enough to create three distinct shades of cake batter. For some Kool-Aid flavors like grape, you might need to add food coloring to enhance the color intensity. If necessary, add food coloring to achieve brighter colors.
- Pour the colored batters into the prepared cake pans and bake until a toothpick inserted into the center comes out clean, about 25 minutes.
- Allow the cakes to cool completely on a cooling rack before frosting. Don’t start frosting until the cakes are fully cooled.
Make the Frosting
- To make the frosting, beat together the softened butter, powdered sugar, and heavy cream until smooth and fluffy.
- Stack the cakes on a cake stand, starting with the darkest layer on the bottom. Generously spread buttercream frosting between each cake layer.
- Frost the entire cake with buttercream, ensuring the top is generously covered. The sides don’t need to be fully covered—just apply a crumb coat.
- Divide the frosting into 3 bowls.
- Add Kool-Aid powder or liquid concentrate to each bowl, creating three distinct shades of colored frosting. As with the cake batter, food coloring might be needed to brighten the colors.
Assemble the Cake
- To apply the colored frosting, use a piping bag with a large round tip, a Ziploc bag with the corner clipped off, or an offset spatula.
- Starting from the bottom of the cake, pipe rings of the darkest frosting around the cake, covering about a third of the sides.
- Next, pipe rings of the second darkest frosting above the dark layer. Don’t worry about making the rings perfectly straight or even.
- Finish by piping the lightest color on the top, filling in the remaining space until you reach the top of the cake.
- Once all the colors are applied to the sides, it’s time to create the ombre effect.
- Use an offset spatula, holding it perpendicular to the table, to smooth the layers of frosting together. Remove any excess frosting as you go and clean the spatula between uses.
- Continue smoothing until you achieve the desired ombre effect.
For Cupcakes
- Each box of white cake mix typically yields about 24 cupcakes. To create the ombre effect for cupcakes, fill a large piping bag with stripes of each colored frosting, as described above. Gently press the bag flat to smooth out the frosting.
- Pipe the frosting onto the cupcakes using your desired frosting tip.
Notes
- The quantities of oil, water, and egg whites may vary depending on the brand of white cake mix you use. Adjust these ingredients accordingly.
- You can use either powdered or liquid Kool-Aid concentrate. The amount you use for both the cake batter and frosting will depend on your personal taste and how large the drops are that you squeeze out. Keep in mind that some Kool-Aid colors may not be as vibrant, so you may need to add a little food coloring to enhance the brightness.
- For cupcakes, if you prefer generous amounts of frosting like shown in the pictures, prepare the full batch of frosting. If you’d rather have less frosting, halving the recipe will be sufficient.
To Freeze: You can also freeze leftovers by wrapping them in foil, parchment paper, or plastic wrap. Freeze for up to 4 months.