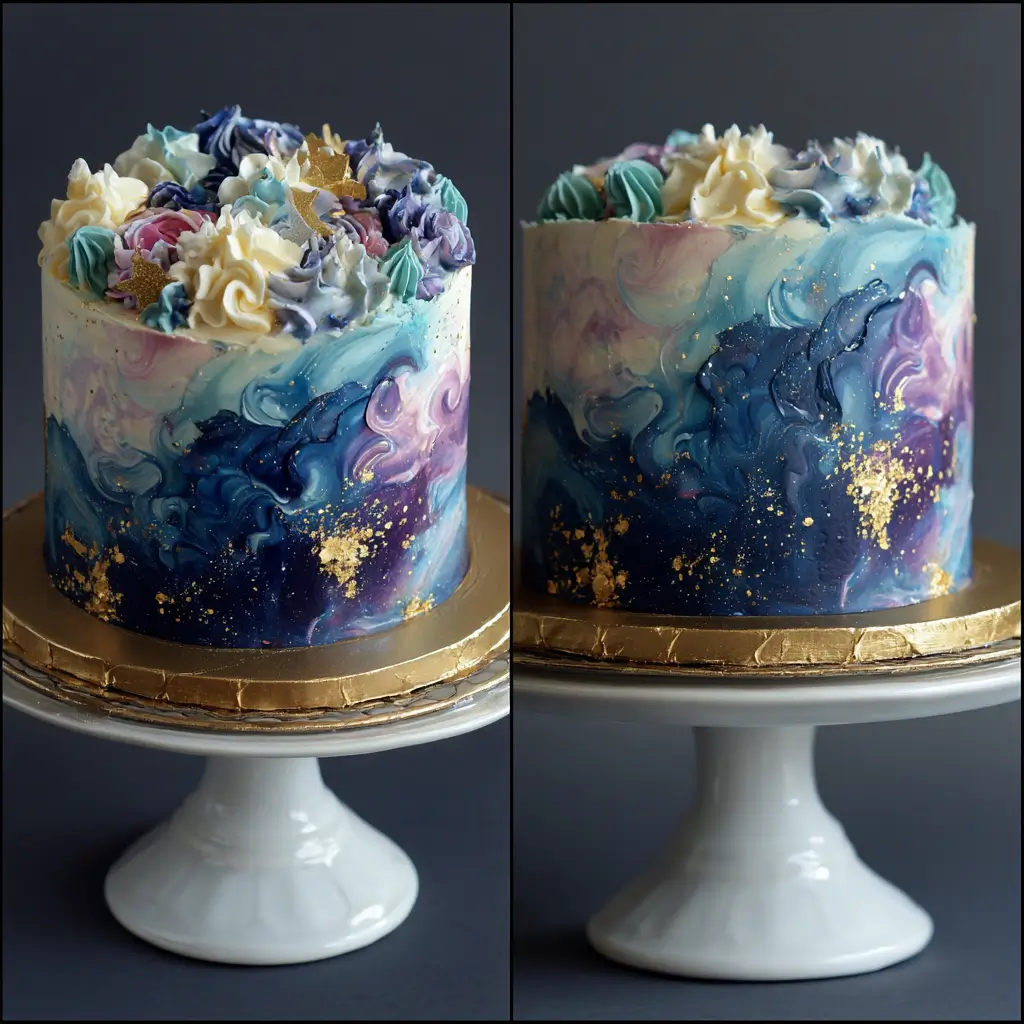
Galaxy Painted Buttercream Cake: A Cosmic Delight for Every Occasion
The Galaxy Painted Buttercream Cake is more than just a dessert—it’s an edible masterpiece that captures the swirling beauty of distant galaxies, nebulae, and star clusters. With vibrant hues blended seamlessly into silky buttercream, this cake transforms a simple celebration into an interstellar experience. Whether you’re celebrating a birthday, anniversary, or simply indulging in creative baking, this cake is guaranteed to dazzle both the eyes and the palate. From its artistic origins to its rich flavor profile, every element of this cake is designed to inspire wonder and delight.
The History of Galaxy-Inspired Cakes
The concept of galaxy-themed desserts emerged in the early 2010s, coinciding with a surge in interest in space exploration, astronomy, and cosmic aesthetics. As social media platforms like Instagram and Pinterest became visual playgrounds for food artistry, bakers began experimenting with color techniques to mimic the ethereal beauty of outer space. The Hubble Space Telescope’s iconic images of colorful nebulae served as direct inspiration for many early designs.
Buttercream painting—a technique where edible food colors are applied directly onto a smooth layer of buttercream using brushes or airbrushes—gained popularity around 2015. Pioneered by talented cake decorators such as Rosanna Pansino and Yolanda Gampp, this method allowed for unprecedented detail and realism in cake decoration. The Galaxy Painted Buttercream Cake quickly rose to fame due to its dramatic visuals and relatively accessible technique compared to fondant sculpting.
Originally reserved for high-end bakeries and professional decorators, tutorials and DIY kits soon made it possible for home bakers to recreate these celestial wonders. Today, the Galaxy Painted Buttercream Cake stands as a symbol of culinary creativity, blending science, art, and confectionery into one breathtaking treat.
Ingredients Breakdown: Crafting the Perfect Canvas
To achieve the stunning visual and taste experience of a Galaxy Painted Buttercream Cake, selecting high-quality ingredients is crucial. Each component plays a vital role—not only in flavor but also in texture, stability, and color absorption. Below is a detailed breakdown of all essential elements:
- For the Cake Base:
- All-Purpose Flour: Provides structure; sifted for a light, airy crumb.
- Granulated Sugar: Sweetens while contributing to moisture retention.
- Baking Powder & Baking Soda: Leavening agents that ensure proper rise and fluffiness.
- Salt: Balances sweetness and enhances overall flavor depth.
- Unsalted Butter (room temperature): Adds richness and helps create a tender texture.
- Eggs (room temperature): Bind ingredients and contribute to volume during creaming.
- Vanilla Extract: Pure extract adds warmth and complements other flavors.
- Whole Milk or Buttermilk: Moisture enhancer; buttermilk adds slight tang and tenderness.
- For the Buttercream Frosting:
- Unsalted Butter (softened): Forms the base of American buttercream; must be creamy but not greasy.
- Powdered Sugar (confectioners’ sugar): Sweetens and thickens; sifted to avoid lumps.
- Heavy Cream or Milk: Adjusts consistency for spreading and piping.
- Clear Vanilla Extract: Prevents discoloration when using bright or dark food colors.
- Edible Food Coloring Gels: Highly concentrated colors (purple, blue, black, pink, magenta, teal) for vibrant galaxy effects without altering texture.
- Cake White (Titanium Dioxide) or White Food Color: For creating contrast and bright highlights in the design.
- Optional Additions for Visual Impact:
- Edible Luster Dust (pearl, silver, deep blue): Brushed on for shimmering stars and cosmic glow.
- Edible Glitter or Sparkles: Adds sparkle like distant stars.
- Nonpareils or Star-Shaped Sprinkles: Represent constellations or meteor showers.
- Mirror Glaze Accents (optional): Can be used on dome cakes for a glass-like, deep-space effect.
Step-by-Step Recipe: Creating Your Own Galactic Masterpiece
Step 1: Bake the Cake Layers
- Preheat your oven to 350°F (175°C). Grease and flour two 8-inch round cake pans, line the bottoms with parchment paper, and set aside.
- In a medium bowl, whisk together 2 cups (250g) all-purpose flour, 1½ teaspoons baking powder, ½ teaspoon baking soda, and ¼ teaspoon salt. Set aside.
- In a large mixing bowl, beat ½ cup (1 stick / 113g) unsalted butter and 1½ cups (300g) granulated sugar on medium-high speed until light and fluffy (about 3–4 minutes).
- Add 3 room-temperature eggs, one at a time, beating well after each addition. Mix in 2 teaspoons pure vanilla extract.
- Gradually add the dry ingredients in three parts, alternating with ¾ cup (180ml) whole milk, starting and ending with dry ingredients. Mix just until combined—do not overmix.
- Divide the batter evenly between the prepared pans and smooth the tops with a spatula.
- Bake for 25–30 minutes, or until a toothpick inserted into the center comes out clean.
- Cool in pans for 10 minutes, then transfer to wire racks to cool completely.
Step 2: Prepare the Buttercream
- In a large bowl, beat 1½ cups (3 sticks / 340g) softened unsalted butter on medium speed for 5 minutes until creamy and pale.
- Sift in 6 cups (720g) powdered sugar, one cup at a time, mixing on low speed to avoid a sugar cloud.
- Add 2 tablespoons heavy cream, 1 teaspoon clear vanilla extract, and a pinch of salt. Beat on high for 3–4 minutes until light and fluffy.
- Remove about 1 cup of plain white buttercream and set aside for accents and touch-ups.
- Divide the remaining buttercream into 4–5 small bowls for coloring.
Step 3: Color the Buttercream
- Tint each portion with gel food colors:
- One bowl: Deep purple (mix red + blue)
- Second: Electric blue (add more blue if needed)
- Third: Magenta or hot pink
- Fourth: Teal or aqua
- Fifth (optional): Black or near-black (use activated charcoal or super-concentrated black gel sparingly)
- Mix thoroughly with a spoon or small spatula, wearing gloves to prevent stained hands.
Step 4: Crumb Coat and Chill
- Place one cooled cake layer on a turntable. Spread a layer of white buttercream on top, then place the second layer upside-down for a flat surface.
- Apply a thin crumb coat of white buttercream all over the cake. Use a bench scraper or offset spatula to smooth it evenly.
- Chill the cake for 20–30 minutes to lock in crumbs and firm up the frosting.
Step 5: Apply Colored Buttercream
- After chilling, apply a generous final layer of white buttercream and smooth again. Return to fridge for another 15 minutes.
- Once the base is firm, begin adding dollops of colored buttercreams randomly around the sides and top of the cake.
- Using a large offset spatula or bench scraper, gently pull the colors upward and outward to create swirls and streaks. Rotate the turntable slowly for even blending.
- Focus on mimicking natural galaxy patterns—avoid uniformity. Let colors bleed slightly into one another.
Step 6: Create the Galaxy Paint Effect
- Prepare a clean paintbrush (food-grade, never used for non-food purposes) or use disposable sponge brushes.
- Dip the brush into small amounts of gel color or mix a drop of gel with a bit of vodka or lemon extract to make a paintable liquid.
- Starting from the bottom, “paint” streaks and wisps of color upward, blending blues, purples, and pinks. Layer darker shades first, then highlight with brighter tones.
- Use a dry brush technique to feather edges and create soft gradients. You can also dab excess color off the brush for a misty effect.
- Add touches of black or deep navy to deepen shadows and give dimension.
Step 7: Add Stars and Sparkles
- Mix edible luster dust with a tiny amount of vodka or grain alcohol to create a paintable solution.
- Use a small brush to dot silver, white, and gold stars across the surface. Vary sizes for realism.
- Alternatively, flick a clean toothbrush loaded with luster dust mixture to create a splattered starfield effect.
- Sprinkle edible glitter or star-shaped sprinkles lightly over damp areas to catch the light.
- Highlight ridges and peaks with white buttercream or pearl luster for a glowing effect.
Step 8: Final Touches and Serving
- Refrigerate the finished cake for 15–20 minutes before slicing to set the design.
- Serve at room temperature for the best texture and flavor.
- Store leftovers covered in the refrigerator for up to 5 days; bring to room temperature before serving.
Pro Tips for Success
- Temperature Matters: Ensure butter is softened but not melted. Cold butter won’t cream properly; warm butter makes runny frosting.
- Use Gel Colors: Liquid food coloring will alter the consistency of buttercream and may cause it to weep or become too soft.
- Chill Between Steps: Cooling the cake after crumb coating prevents colors from muddying and ensures clean application.
- Work Quickly with Paint: Alcohol-based paints dry fast. Keep your brush moist and work section by section.
- Rotate the Turntable: Smooth buttercream and blend colors evenly by turning the cake stand slowly as you work.
- Less Is More: Start with small amounts of dark colors—especially black—which can overpower quickly.
- Practice First: Try the painting technique on a parchment-covered dummy cake or plate before working on the real thing.
- Invest in Tools: A cake smoother, angled spatulas, and silicone-edged scrapers help achieve a professional finish.
Variations and Customizations
The beauty of the Galaxy Painted Buttercream Cake lies in its adaptability. Here are some popular variations to suit different tastes and themes:
- Flavor Variations:
- Chocolate Galaxy Cake: Replace ½ cup flour with cocoa powder for a rich chocolate base.
- Red Velvet Version: Use red velvet batter and pair with deep blue and black buttercream for contrast.
- Lemon or Funfetti: Bright yellow or confetti-filled cake creates a fun twist under the cosmic frosting.
- Dietary Modifications:
- Gluten-Free: Substitute flour with a 1:1 gluten-free blend (like Bob’s Red Mill).
- Dairy-Free: Use vegan butter and plant-based milk in both cake and frosting.
- Reduced Sugar: Opt for monk fruit-sweetened powdered sugar alternatives (test texture carefully).
- Design Themes:
- Milky Way Style: Focus on soft whites, blues, and silvers with subtle sparkle.
- Nebula Explosion: Use bold magentas, oranges, and teals for a supernova effect.
- Black Hole Center: Create a dark vortex in the middle using black buttercream and gradient fade.
- Planet Accents: Add small fondant planets orbiting the top or side of the cake.
- Shape & Structure Ideas:
- Dome Cake: Freeze rounded layers and carve into a sphere for a 3D planet look.
- Naked Cake Version: Partially expose cake layers with minimal frosting between, focusing galaxy art on the exterior.
- Cupcake Galaxy: Make individual cupcakes and paint each with mini galaxy designs.
Health Considerations and Nutritional Value
While undeniably delicious, the Galaxy Painted Buttercream Cake is a decadent treat best enjoyed in moderation. Here’s a general nutritional estimate per slice (based on an 8-inch, 12-slice cake):
| Nutrient | Amount Per Slice (approx.) |
|---|---|
| Calories | 380–450 kcal |
| Total Fat | 20–25g |
| Saturated Fat | 12–15g |
| Cholesterol | 70–90mg |
| Sodium | 200–300mg |
| Total Carbohydrates | 45–55g |
| Sugars | 35–40g |
| Protein | 4–6g |
Health Notes:
- This cake is high in sugar and saturated fat primarily due to buttercream and refined sugars.
- Gel food colors are generally safe in small quantities, though some artificial dyes (like Red 40 or Blue 1) may affect sensitive individuals.
- For healthier swaps: consider using Greek yogurt or whipped cream stabilizers in frosting, reducing sugar content, or using natural colorants (such as spirulina for blue, beet juice for pink—though results vary).
- Portion control is key—serve smaller slices, perhaps paired with fresh berries to balance sweetness.
Complete Ingredients List
For the Cake:
- 2 cups (250g) all-purpose flour (or gluten-free substitute)
- 1½ cups (300g) granulated sugar
- 1½ tsp baking powder
- ½ tsp baking soda
- ¼ tsp salt
- ½ cup (1 stick / 113g) unsalted butter, softened
- 3 large eggs, room temperature
- 2 tsp pure vanilla extract
- ¾ cup (180ml) whole milk or buttermilk
For the Buttercream:
- 1½ cups (3 sticks / 340g) unsalted butter, softened
- 6 cups (720g) powdered sugar, sifted
- 2–4 tbsp heavy cream or whole milk
- 1 tsp clear vanilla extract
- Pinch of salt
- Gel food colors: Purple, Blue, Pink, Teal, Black, White
- Edible luster dust (silver, pearl, blue)
- Edible glitter or star sprinkles
- Optional: Vodka or lemon extract (for paint dilution)
Detailed Directions Recap
- Bake vanilla cake layers and cool completely.
- Make smooth American buttercream and divide for coloring.
- Crumb coat cake with white buttercream and chill.
- Apply final coat and chill again until firm.
- Add dollops of colored buttercreams and blend with spatula.
- Paint with gel colors diluted in alcohol for wispy galaxy effects.
- Dot stars with luster dust and sprinkle with edible glitter.
- Chill briefly, then serve at room temperature.
Frequently Asked Questions (FAQ)
Q: Can I make this cake ahead of time?
A: Yes! Bake the cake layers up to 2 days in advance and wrap tightly in plastic. Frost and decorate the day before serving for best appearance. Store refrigerated and bring to room temperature before serving.
Q: How do I store a painted buttercream cake?
A: Keep it covered in the refrigerator for up to 5 days. Place a cake dome or turned-over bowl over it to prevent drying. Avoid freezing, as condensation can ruin the painted finish.
Q: Why did my buttercream turn runny?
A: This usually happens if butter was too warm or too much liquid was added. Chill the buttercream for 10–15 minutes and re-whip. Always use gel colors instead of liquid.
Q: Can I use whipped cream instead of buttercream?
A: Whipped cream is less stable and harder to paint on. If desired, stabilize it with gelatin or use a Swiss meringue buttercream for better hold and color retention.
Q: Are the food colors safe?
A: High-quality gel colors from reputable brands (Wilton, Americolor, Chefmaster) are FDA-approved and safe in typical usage amounts. For natural options, research plant-based dyes, though vibrancy may be limited.
Q: How can I make the cake vegan?
A: Use plant-based butter, dairy-free milk, flax eggs (1 tbsp ground flax + 3 tbsp water per egg), and ensure powdered sugar is bone-char free.
Q: Can kids help decorate?
A: Absolutely! Let them add sprinkles, glitter, or help with safe painting using edible brushes. Supervise use of alcohol-based paints.
Summary
The Galaxy Painted Buttercream Cake is a mesmerizing fusion of art and flavor, transforming simple ingredients into a celestial showpiece perfect for birthdays, anniversaries, or any occasion that calls for wonder. With rich vanilla layers, silky buttercream, and vivid hand-painted details, this cake doesn’t just taste amazing—it tells a story written in stars and swirls across the universe of your imagination.