Fried Mac and Cheese Bites: The Ultimate Comfort Food Delight
There’s something undeniably comforting about mac and cheese. Creamy, cheesy, and rich—it’s a timeless classic that warms the soul with every bite. But what happens when you take that beloved dish, shape it into small morsels, coat them in a golden, crispy crust, and deep-fry them to perfection? You get Fried Mac and Cheese Bites: an irresistible appetizer, snack, or party favorite that combines the best of both worlds—gooey, cheesy center and crunchy exterior. Whether you’re serving them at a game day gathering, a holiday party, or simply indulging in a late-night craving, these bites are guaranteed to disappear fast.
The History of Fried Mac and Cheese Bites
The origins of mac and cheese trace back centuries, with variations appearing as early as the 14th century in Italian cookbooks. However, the American version we know and love today was popularized by Thomas Jefferson after he encountered “maccheroni” during his travels in Europe. Over time, macaroni and cheese became a staple in Southern cuisine and eventually a household favorite across the United States.
Fried mac and cheese bites, however, are a more modern twist on the classic dish. They emerged from the growing trend of reimagining comfort foods into handheld, shareable, and often fried versions—think mozzarella sticks, fried pickles, or stuffed jalapeños. Culinary innovators in diners, food trucks, and home kitchens began experimenting with chilled mac and cheese, shaping it into balls or logs, breading it, and frying it for a satisfying crunch. Today, fried mac and cheese bites are a menu staple in many gastropubs and Southern-style restaurants, celebrated for their playful texture contrast and bold flavor.
Ingredients Breakdown: What Makes These Bites So Irresistible?
The magic of fried mac and cheese bites lies in the balance between creamy interior and crispy coating. Each ingredient plays a vital role in creating that perfect bite:
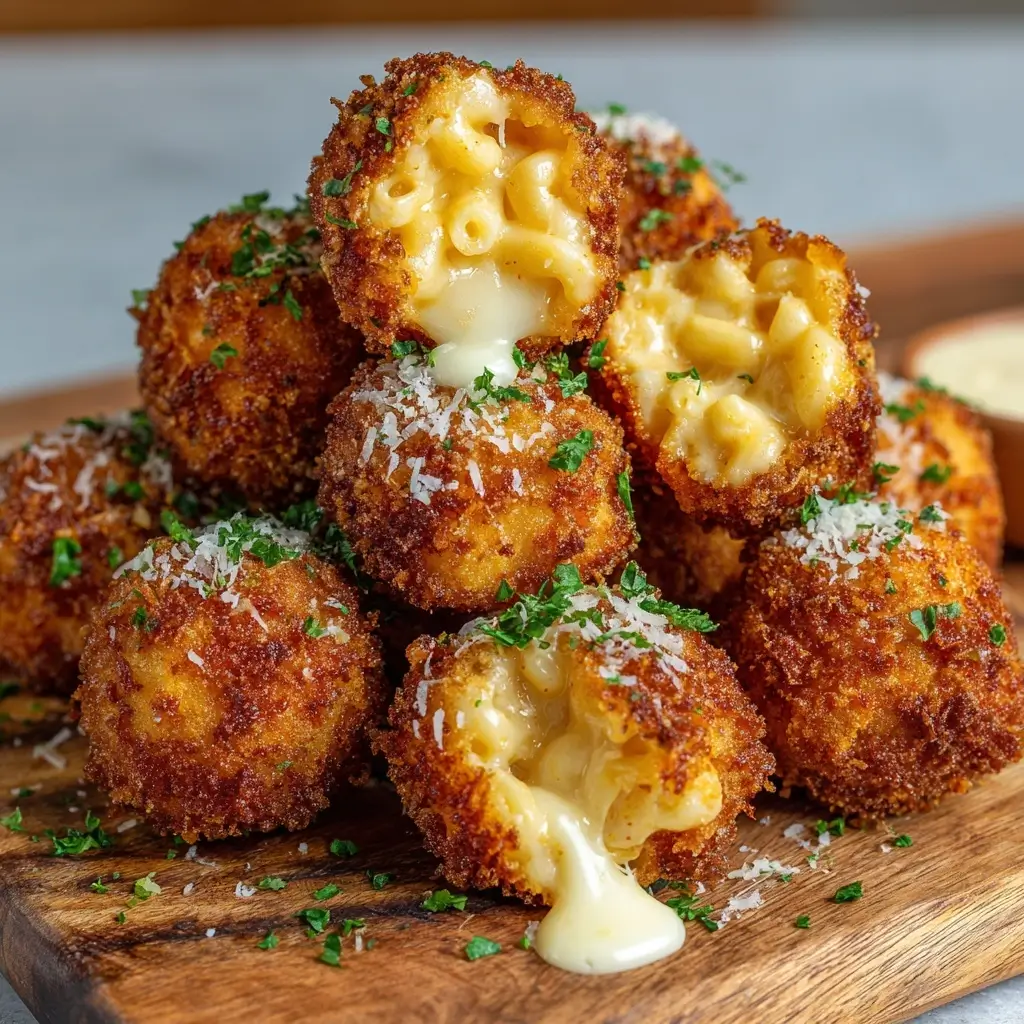
- Elbow Macaroni: The classic pasta choice for mac and cheese due to its ability to hold sauce. Its curved shape also helps trap cheese, creating a dense, cohesive mixture ideal for shaping.
- Butter: Adds richness and helps create a smooth roux when combined with flour, which thickens the cheese sauce.
- All-Purpose Flour: Acts as a thickening agent in the cheese sauce, ensuring it coats the pasta evenly and holds together when chilled.
- Milk: Whole milk is preferred for its fat content, contributing to a creamier sauce. It blends with the roux to form the base of the béchamel before cheese is added.
- Heavy Cream (optional): For extra decadence, heavy cream can be added to enhance silkiness and prevent the sauce from breaking when reheated or fried.
- Shredded Cheeses: A blend is key. Sharp cheddar provides tang and color, Monterey Jack adds meltability, and Gruyère or smoked gouda introduces depth and complexity. Pre-shredded cheese should be avoided as it contains anti-caking agents that can make the sauce grainy.
- Seasonings: Mustard powder enhances cheesiness, garlic powder and onion powder add savory notes, paprika gives a hint of warmth, and cayenne pepper offers a subtle kick.
- Salt and Black Pepper: Essential for balancing flavors.
- Eggs: Used as a binder in the breading process. They help the breadcrumbs adhere to the mac and cheese balls.
- Panko Breadcrumbs: Lighter and crispier than regular breadcrumbs, panko creates a delicate, golden crust. Some recipes use a double-coating for extra crunch.
- Optional Add-Ins: Diced cooked bacon, jalapeños, chopped green onions, or even pulled chicken can elevate the bites into a full-flavored appetizer.
- Frying Oil: Canola, vegetable, or peanut oil are ideal due to their high smoke points and neutral flavors.
Step-by-Step Recipe: How to Make Perfect Fried Mac and Cheese Bites
Follow this detailed guide to create restaurant-quality fried mac and cheese bites at home. Patience during the chilling step is crucial—don’t skip it!
Ingredients:
- 2 cups elbow macaroni
- 3 tablespoons unsalted butter
- 3 tablespoons all-purpose flour
- 2 cups whole milk
- 1/2 cup heavy cream (optional)
- 2 cups shredded sharp cheddar cheese
- 1 cup shredded Monterey Jack cheese
- 1/2 cup shredded Gruyère or smoked gouda
- 1/2 teaspoon dry mustard powder
- 1/2 teaspoon garlic powder
- 1/2 teaspoon onion powder
- 1/4 teaspoon smoked paprika
- Pinch of cayenne pepper (optional)
- Salt and freshly ground black pepper to taste
- 2 large eggs, beaten
- 1 1/2 cups panko breadcrumbs
- Vegetable oil, for frying (enough to fill 2–3 inches in a heavy pot)
- Optional: 1/2 cup cooked, crumbled bacon or 1 finely diced jalapeño
Directions:
- Cook the Pasta: Bring a large pot of salted water to a boil. Add the elbow macaroni and cook according to package instructions until al dente. Drain, rinse briefly with cold water, and set aside.
- Make the Cheese Sauce: In a medium saucepan over medium heat, melt the butter. Whisk in the flour and cook for 1–2 minutes to form a roux (do not let it brown). Gradually pour in the milk and cream, whisking constantly to prevent lumps. Continue cooking and stirring until the mixture thickens and begins to bubble gently, about 5–7 minutes.
- Add Cheese and Seasonings: Reduce heat to low. Gradually stir in the shredded cheeses, one handful at a time, allowing each addition to melt completely before adding the next. Stir in mustard powder, garlic powder, onion powder, paprika, cayenne (if using), salt, and pepper. Taste and adjust seasoning as needed.
- Combine with Pasta: Add the cooked macaroni to the cheese sauce, stirring until every piece is well-coated. If using optional add-ins like bacon or jalapeños, fold them in now. Remove from heat and let cool slightly.
- Chill the Mixture: Transfer the mac and cheese to a shallow dish or baking pan. Press it into an even layer about 1 inch thick. Cover with plastic wrap and refrigerate for at least 2 hours—or preferably overnight. This step is critical: it firms up the mixture so it can be shaped without falling apart.
- Shape the Bites: Once chilled, use a small scoop (about 1 tablespoon) or two spoons to portion the mac and cheese. Roll each portion into a ball or oval shape. Place on a parchment-lined tray. For uniformity, aim for 1-inch to 1.5-inch bites.
- Breading Station: Set up three bowls: one with flour, one with beaten eggs, and one with panko breadcrumbs. Roll each mac and cheese ball first in flour (this helps the egg stick), then dip in egg, and finally coat thoroughly with panko. Place breaded bites back on the tray. For extra crunch, repeat the egg and panko steps for a double coating.
- Freeze (Optional but Recommended): Place the breaded bites in the freezer for 15–20 minutes. This further firms them up and reduces the chance of bursting during frying.
- Heat the Oil: In a deep, heavy-bottomed pot or Dutch oven, heat 2–3 inches of oil to 350°F (175°C). Use a candy or deep-fry thermometer for accuracy.
- Fry the Bites: Carefully lower 4–6 bites into the hot oil using a slotted spoon or spider strainer. Do not overcrowd the pot. Fry for 2–3 minutes, turning occasionally, until golden brown and crispy. The internal temperature should reach at least 165°F (74°C) to ensure they’re heated through.
- Drain and Serve: Remove bites and place them on a wire rack set over a paper towel-lined tray to drain excess oil. Sprinkle lightly with flaky sea salt while still warm.
- Serve Immediately: Fried mac and cheese bites are best enjoyed fresh and hot, with your favorite dipping sauces such as ranch, honey mustard, marinara, or sriracha aioli.
Tips for Success
- Don’t Skip the Chill Time: Chilling (and optionally freezing) the mac and cheese mixture is essential. Warm mixtures will fall apart in the oil.
- Use Freshly Shredded Cheese: Pre-shredded cheese contains cellulose, which inhibits melting and can lead to a gritty sauce.
- Double Coating = Extra Crunch: For a thicker, crispier crust, repeat the egg and breadcrumb steps.
- Oil Temperature Matters: If the oil is too cool, the bites will absorb oil and become greasy. If too hot, the outside will burn before the inside heats through. Maintain 350°F throughout frying.
- Fry in Batches: Overcrowding lowers the oil temperature and results in soggy bites.
- Keep Them Warm: Use a preheated oven (200°F) to keep finished batches warm while frying others.
- Alternative Cooking Methods: For a lighter version, try air-frying at 400°F for 8–10 minutes, spraying lightly with oil. Or bake on a parchment-lined tray at 425°F for 15–20 minutes, flipping halfway.
Variations and Customizations
Fried mac and cheese bites are incredibly versatile. Here are some creative twists to suit different tastes:
- Buffalo Chicken Bites: Mix in shredded rotisserie chicken tossed with buffalo sauce. Serve with blue cheese dip.
- BBQ Pulled Pork: Fold in tender pulled pork and a touch of barbecue sauce for a Southern-inspired bite.
- Jalapeño Popper Style: Add diced jalapeños and cream cheese to the mac and cheese mixture. Top with crispy bacon bits.
- Lobster Mac Bites: Elevate the dish with chunks of cooked lobster meat and a touch of tarragon for a gourmet twist.
- Veggie-Packed: Stir in sautéed spinach, roasted red peppers, or caramelized onions for added nutrition and flavor.
- Truffle Mac Bites: Infuse the sauce with truffle oil and garnish with shaved Parmesan.
- Different Shapes: Instead of balls, press the mixture into a log, chill, slice into coins, and bread for “mac and cheese nuggets.”
- Gluten-Free Option: Use gluten-free pasta, gluten-free flour, and gluten-free panko breadcrumbs.
- Dairy-Free Version: Substitute plant-based butter, milk, and vegan cheeses. Note: texture may vary.
Health Considerations and Nutritional Value
While undeniably delicious, fried mac and cheese bites are a high-calorie, high-fat indulgence. Here’s a general nutritional breakdown per serving (approximately 3 bites):
- Calories: 350–450
- Total Fat: 20–30g (including saturated fat from cheese and butter)
- Carbohydrates: 30–40g (mostly from pasta and breadcrumbs)
- Protein: 12–18g (from cheese, eggs, and dairy)
- Sodium: 600–900mg (can be reduced by using low-sodium cheese and broth)
- Fiber: 1–2g
Health Tips:
- Bake or Air-Fry: Reduces fat content significantly while maintaining crispiness.
- Use Whole Grain Pasta: Increases fiber and nutrients.
- Increase Veggies: Adding pureed cauliflower, peas, or spinach boosts vitamins and fiber.
- Moderation is Key: Enjoy as an occasional treat rather than a regular meal.
- Portion Control: Serve 3–4 bites per person as an appetizer to manage calorie intake.
Frequently Asked Questions (FAQ)
Can I make fried mac and cheese bites ahead of time?
Yes! Prepare and bread the bites up to 2 days in advance. Store them covered in the refrigerator or freeze for up to 3 months. Fry straight from frozen, adding 1–2 minutes to frying time.
Why did my mac and cheese bites explode in the oil?
This usually happens if the mixture wasn’t chilled enough or if the oil is too hot. Ensure thorough chilling and maintain oil at 350°F.
Can I bake them instead of frying?
Absolutely. Preheat oven to 425°F, place bites on a greased or parchment-lined baking sheet, spray lightly with oil, and bake 15–20 minutes, flipping halfway, until golden and heated through.
What’s the best cheese blend for mac and cheese?
A combination of sharp cheddar (for flavor), Monterey Jack (for melt), and Gruyère or fontina (for complexity) works beautifully. Avoid only using pre-shredded cheese.
Can I use leftover mac and cheese?
Yes, as long as it’s thick and not soupy. Thin mac and cheese won’t hold its shape. You may need to chill it longer or add a bit of extra cheese to firm it up.
How do I reheat fried mac and cheese bites?
For best results, reheat in a 375°F oven or air fryer for 5–7 minutes. Avoid microwaving, as it makes the coating soggy.
Are they kid-friendly?
Absolutely! Kids love the fun size and cheesy center. You can make mini versions for little hands and customize with mild cheese and no spices.
Summary
Fried Mac and Cheese Bites are the ultimate fusion of creamy comfort and crispy indulgence—perfect for parties, snacks, or satisfying cravings. With endless customization options and a foolproof method, they’re destined to become a favorite in your recipe rotation.