Colorful Candy Bar Drip Cake: A Vibrant Celebration of Flavor and Fun
The Colorful Candy Bar Drip Cake is more than just a dessert—it’s a dazzling centerpiece, a sensory explosion, and a nostalgic journey wrapped into one delectable treat. Whether you’re celebrating a birthday, an anniversary, or simply the joy of baking, this cake turns any occasion into a festival of color, texture, and sweetness. With its rich chocolate sponge, glossy mirror-like drip glaze, layers of candy-coated surprises, and a crown of vibrant confections, it’s no wonder this cake has taken social media by storm. Let’s dive deep into the world of this whimsical masterpiece—its origins, ingredients, techniques, and all the delightful variations that make it as customizable as your imagination allows.
The History of the Candy Bar Drip Cake
The concept of the drip cake originated in European pastry kitchens, where ganache was artfully drizzled over cakes to create elegant, cascading effects. However, the modern “drip cake” trend surged in popularity during the mid-2010s with the rise of Instagram and Pinterest, where visually striking desserts gained viral status. The addition of candy bars to drip cakes can be traced back to American bakeries and home bakers who wanted to elevate classic chocolate cakes with nostalgic, fun-sized treats.
The Colorful Candy Bar Drip Cake evolved from this fusion of French patisserie technique and American pop culture indulgence. Inspired by childhood favorites like Snickers, Reese’s, M&Ms, and Skittles, bakers began embedding full-size or chopped candy bars into buttercream layers and using crushed candies for decoration. The result? A cake that not only looks like a rainbow exploded on top but also delivers a symphony of textures—creamy, crunchy, chewy, and smooth—all in one bite. Today, it’s a staple at kids’ parties, gender reveals, holiday gatherings, and even weddings (for the young-at-heart!).
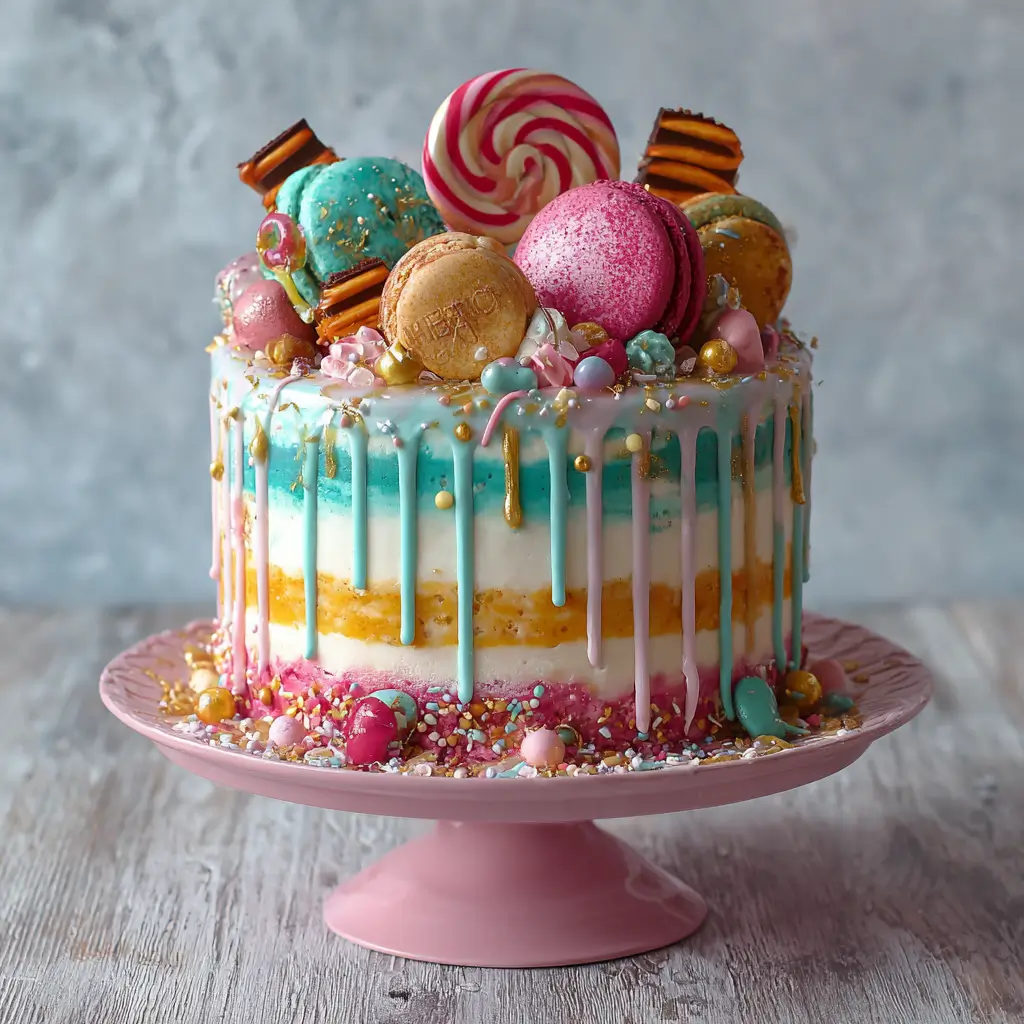
Ingredients Breakdown: What Makes This Cake So Special?
The magic of the Colorful Candy Bar Drip Cake lies in its layered complexity. Each component contributes to the overall flavor, texture, and visual impact. Here’s a detailed breakdown of the key ingredients:
- Chocolate Sponge Cake: Made with high-quality cocoa powder or melted dark chocolate, this base provides a rich, moist foundation. Eggs, sugar, flour, baking powder, and buttermilk ensure a tender crumb that holds up well under heavy fillings and frostings.
- Vanilla Buttercream: A silky-smooth blend of unsalted butter, powdered sugar, vanilla extract, and a splash of cream. It acts as both a crumb coat and a canvas for the colorful layers and candies.
- Candy Bars: The stars of the show! Common choices include:
- M&M’s: For color and crunch.
- Snickers: Adds caramel, nougat, and peanuts.
- Reese’s Peanut Butter Cups: Creamy peanut butter swirls.
- Skittles: Tart, fruity bursts and rainbow hues.
- Kit Kat: Crisp wafer layers.
- Twix: Caramel and shortbread goodness.
- Drip Glaze: Typically made from tempered chocolate or white chocolate mixed with heavy cream and food coloring. Some bakers use candy melts for brighter colors and easier handling.
- Food Coloring: Gel-based food dyes are preferred over liquid to avoid altering the consistency of the glaze while delivering bold, vivid shades.
- Edible Glitter or Sprinkles: Optional, but highly recommended for that extra sparkle and festive flair.
Each ingredient is chosen not just for taste, but for how it contributes to the overall aesthetic and experience—making every slice a surprise.
Step-by-Step Recipe: How to Make a Colorful Candy Bar Drip Cake
Creating this masterpiece is easier than it looks—if you take your time and follow these detailed steps.
- Bake the Chocolate Sponge: Preheat oven to 350°F (175°C). Grease and line two 8-inch round cake pans. In a large bowl, whisk together 1¾ cups all-purpose flour, ¾ cup cocoa powder, 1½ tsp baking powder, 1½ tsp baking soda, and 1 tsp salt. In another bowl, beat 2 large eggs, 1 cup oil, 1 cup buttermilk, and 2 tsp vanilla. Gradually add wet mixture to dry, alternating with 1 cup hot coffee (enhances chocolate flavor). Mix until smooth. Divide batter evenly and bake for 30–35 minutes. Cool completely.
- Prepare the Buttercream: Beat 1½ cups (3 sticks) softened unsalted butter for 5 minutes until fluffy. Gradually add 6 cups powdered sugar, ⅓ cup milk, 2 tsp vanilla, and a pinch of salt. Whip until light and creamy. Set aside 1 cup for final decorations.
- Assemble the Cake: Level the cooled cakes. Place one layer on a cake stand. Spread a thick layer of buttercream, then scatter chopped Snickers, Reese’s, Kit Kats, and Twix evenly over the top. Add a second dollop of buttercream to seal in the candy. Top with the second cake layer.
- Crumb Coat: Apply a thin layer of buttercream all over the cake to trap crumbs. Chill for 30 minutes to set.
- Final Frosting: Apply a thick, even layer of buttercream. Use a bench scraper or offset spatula for a smooth finish. Chill again for 20 minutes.
- Create the Drip Glaze: In a microwave-safe bowl, combine 1 cup white chocolate chips and ⅓ cup heavy cream. Heat in 20-second intervals, stirring until smooth. Divide into 4–6 portions and tint each with different gel food colors (pink, blue, green, yellow, purple, orange).
- Apply the Drip: Transfer each colored glaze to separate piping bags or squeeze bottles. Snip tiny tips. Pipe small drips around the edge of the chilled cake, allowing them to slowly run down the sides. Alternate colors for a rainbow effect. Work quickly before the glaze sets.
- Add Candies: While the drip is still slightly soft, press whole M&Ms, Reese’s cups, mini Snickers, and Skittles around the top edge. Fill the center with a colorful mound of assorted candies, sprinkles, and edible glitter.
- Final Touches: Use reserved buttercream in piping bags with star tips to add rosettes, swirls, or borders. Dust with edible gold or silver luster if desired.
Your Colorful Candy Bar Drip Cake is now ready to dazzle!
Tips for Success: Pro Secrets for a Perfect Cake
- Chill Between Steps: Always chill the cake after crumb coating and before applying the drip. A cold surface helps the glaze set faster and prevents melting into the frosting.
- Use Gel Food Coloring: Liquid dyes can thin out your glaze. Gel colors deliver intense pigments without altering consistency.
- Temper Chocolate Properly: If using real chocolate (not candy melts), temper it carefully to achieve a glossy, firm drip that sets beautifully.
- Work Quickly with Glaze: The drip mixture hardens fast. Have all colors ready and apply immediately after mixing.
- Choose Fresh Candy: Stale or overly soft candy bars can sink or lose shape. Use fresh, store-bought bars for best results.
- Balance Sweetness: Pair the cake with a slightly bitter coffee or cold milk to cut through the sweetness.
- Storage Tip: Keep the cake refrigerated, but serve at room temperature for optimal texture and flavor.
Variations and Customizations: Make It Your Own
The beauty of the Colorful Candy Bar Drip Cake is its versatility. Here are some creative twists to personalize your creation:
- Theme-Based Cakes: Use candies that match a theme—Halloween (Sour Patch Kids, Warheads), Christmas (peppermint bark, red/green M&Ms), or patriotic (red, white, blue sprinkles and candies).
- Flavor Swaps: Replace chocolate sponge with vanilla, red velvet, or confetti cake. Use peanut butter or cookies-and-cream flavored buttercream.
- Dietary Adaptations:
- Gluten-Free: Use GF flour blend and gluten-free candy bars.
- Dairy-Free: Substitute butter with vegan margarine, use dairy-free chocolate and milk alternatives.
- Low-Sugar: Opt for sugar-free chocolate and stevia-sweetened buttercream (though candy bars will still contain sugar).
- Mini Versions: Make cupcakes with the same drip technique and candy toppings for individual servings.
- Adult-Only Twist: Infuse the cake with a splash of Baileys, Kahlua, or bourbon in the buttercream or soak the layers with a flavored syrup.
- Nut-Free Version: Avoid peanut butter cups and Snickers; use jelly beans, gummy bears, or fruit chews instead.
Health Considerations and Nutritional Value
Let’s be honest—this cake is a treat, not a health food. But understanding its nutritional profile helps you enjoy it mindfully.
Estimated Per Slice (1/12 of cake):
- Calories: ~650–800 kcal
- Fat: 35–45g (mostly saturated from butter, chocolate, and candy)
- Sugar: 70–90g (well above daily recommended intake)
- Carbohydrates: 80–100g
- Protein: 6–8g
- Sodium: 300–400mg
Considerations:
- High sugar content may affect blood glucose levels—caution for diabetics.
- Limited fiber and essential nutrients; best enjoyed occasionally.
- Peanuts and tree nuts in many candy bars pose allergy risks—always label clearly.
- To balance, serve with fresh fruit salad or a light yogurt parfait on the side.
Enjoy in moderation, and remember: life is about joy as much as nutrition!
Full Ingredient List
For the Chocolate Cake:
- 1¾ cups (220g) all-purpose flour
- ¾ cup (75g) unsweetened cocoa powder
- 1½ tsp baking powder
- 1½ tsp baking soda
- 1 tsp salt
- 2 large eggs, room temperature
- 1 cup (200g) granulated sugar
- 1 cup (240ml) buttermilk
- ½ cup (120ml) vegetable oil
- 2 tsp pure vanilla extract
- 1 cup (240ml) hot brewed coffee
For the Vanilla Buttercream:
- 1½ cups (340g) unsalted butter, softened
- 6 cups (720g) powdered sugar
- ⅓ cup (80ml) whole milk or heavy cream
- 2 tsp vanilla extract
- Pinch of salt
For the Drip Glaze:
- 1 cup (175g) white chocolate chips or candy melts
- ⅓ cup (80ml) heavy cream
- Gel food coloring (assorted colors)
For the Candy Toppings:
- 1 pack M&M’s (rainbow or holiday-colored)
- 6–8 Reese’s Peanut Butter Cups, halved or quartered
- 1 Snickers bar, chopped
- 1 Kit Kat bar, broken into pieces
- 1 Twix bar, sliced
- Small handful of Skittles
- Edible glitter, sprinkles, or nonpareils (optional)
Directions Recap
Follow the step-by-step recipe above for complete instructions. Key highlights:
- Bake, cool, and level two chocolate cake layers.
- Make buttercream and use part to fill and frost the cake.
- Layer chopped candy bars between cake layers and on top.
- Chill after crumb coat and final frosting.
- Prepare colored drip glaze and apply around edges.
- Decorate with whole candies and sprinkles while glaze is wet.
- Finish with piped buttercream details.
- Chill 1 hour before serving.
Frequently Asked Questions (FAQ)
Can I make this cake ahead of time?
Yes! Bake the cake layers up to 2 days in advance and store wrapped at room temperature. Assemble and decorate the day before serving. Store refrigerated, covered.
How long does the drip cake last?
Up to 4 days in the refrigerator. Bring to room temperature before serving. Candies may soften over time.
Can I use store-bought cake and frosting?
Absolutely. Use a boxed chocolate cake mix and canned vanilla frosting to save time. Quality may vary, so consider upgrading with real butter and cocoa.
Why did my drip turn out too thick or too runny?
Too thick? Add a few drops of warm cream. Too runny? Chill the glaze slightly or add more melted chocolate. Temperature and ratios are key.
Can I freeze this cake?
Freeze the unfrosted cake layers for up to 2 months. Do not freeze fully decorated cakes—the candies and drip won’t hold up well.
How do I prevent colors from bleeding?
Use gel colors, don’t overmix, and avoid applying warm glaze to a warm cake. Chilling the cake first helps maintain color separation.
Can I make a vegan version?
Yes! Use flax eggs, plant-based milk, vegan butter, dairy-free chocolate, and check candy labels for animal-derived ingredients.
Summary
The Colorful Candy Bar Drip Cake is a joyful explosion of flavor, texture, and visual delight—perfect for celebrations big and small. From its rich chocolate base to the candy-studded crown and rainbow drip, every bite is a celebration of sweetness and nostalgia.