Introduction
Welcome to the enchanting world of French macarons — delicate, colorful, and utterly irresistible! Often mistaken for simple cookies, these elegant meringue-based confections are a true testament to precision, patience, and passion in baking. While they carry an air of sophistication (and sometimes intimidation!), French macarons are absolutely achievable for beginners — especially with the right guidance, clear explanations, and a gentle, supportive approach. This beginner-friendly guide walks you through every nuance — from demystifying why your batter might be too stiff or too runny, to troubleshooting cracked shells, hollow centers, or stubborn feet. Whether you’re baking for a special occasion, practicing a new skill, or simply craving something beautifully sweet and satisfying, this recipe is crafted with *you* in mind: no professional equipment required (a hand mixer works just fine!), no obscure ingredients, and no unnecessary jargon — just honest, step-by-step support that builds confidence with every batch.
The History
French macarons boast a rich, layered history that stretches back over four centuries — and surprisingly, they didn’t originate in Parisian patisseries! Their earliest ancestors trace to 8th-century Arab confections made with ground almonds and honey, later introduced to Italy by traders and refined during the Renaissance. When Catherine de’ Medici married France’s future King Henry II in 1533, she brought her Italian pastry chefs — and their almond-based “maccheroni” (from the Italian *ammaccare*, meaning “to crush”) — to the French court. These early versions were rustic, domed, and often sandwiched with fruit or jam.
It wasn’t until the 1700s that macarons evolved into the smooth, round, double-shelled treats we recognize today — thanks largely to two Benedictine nuns in Nancy, France, who baked and sold them to support themselves during the French Revolution. They became known as the “Macaron Sisters,” and their simple, elegant cookies gained regional fame.
The modern French macaron — with its signature “foot” (the ruffled base), glossy shell, and creamy filling — truly emerged in early 20th-century Paris. Pierre Desfontaines of the legendary Ladurée is widely credited (though debated by historians) with sandwiching two shells with ganache in the 1930s — transforming the macaron from a single cookie into the iconic filled confection we love today. Since then, macarons have become synonymous with French patisserie artistry — a symbol of balance, texture, and refined flavor — yet remain deeply rooted in humble, accessible ingredients: almond flour, egg whites, and sugar.
Ingredients Breakdown
Understanding *why* each ingredient matters — and how it behaves — is half the battle in mastering macarons. Let’s break them down, not just by name, but by function, common pitfalls, and beginner-friendly substitutions where appropriate:
- Almond Flour (Blanched, Superfine): The backbone of the shell. Must be *blanched* (skins removed) and *superfine* (not coarse or homemade-ground). Coarse almond flour creates gritty, porous, or cracked shells; unblanched flour adds bitterness and discoloration. We recommend sifting it *twice*: once before mixing, and again with powdered sugar. Store-bought “almond meal” is usually too coarse — avoid unless specifically labeled “superfine almond flour” or “for macarons.”
- Powdered Sugar (Confectioners’ Sugar): Provides sweetness, structure, and moisture control. Always use *united* (cornstarch-free) powdered sugar if possible — cornstarch can interfere with drying and cause dull shells. If only cornstarch-blended is available, sift it extra thoroughly to prevent lumps and ensure even incorporation.
- Egg Whites (Aged, at Room Temperature): The engine of your meringue. “Aged” means separated and left uncovered in the fridge for 24–48 hours — this reduces moisture, strengthens protein bonds, and yields a more stable, glossy meringue. Bring them to room temperature (about 68–72°F / 20–22°C) *before whipping*. Cold whites won’t whip properly; warm ones risk deflating. We do *not* recommend pasteurized liquid egg whites — their protein structure is altered and rarely achieves stiff, shiny peaks needed for macarons.
- Granulated Sugar: Used in the meringue to stabilize bubbles and add shine and crispness. Fine granulated works best — avoid coarse or raw sugars, which won’t fully dissolve and may grain the meringue.
- Cream of Tartar (Optional but Highly Recommended for Beginners): An acid that lowers the pH of egg whites, accelerating foam formation and dramatically improving stability — especially helpful if your kitchen is humid or your eggs are less fresh. A tiny ⅛ tsp per 2 large egg whites makes a noticeable difference in reliability.
- Food Coloring (Gel or Powder-Based): Liquid food coloring adds unwanted moisture — a cardinal sin in macaron making! Use highly concentrated gel (like Americolor or Wilton) or powdered color. Add *after* the meringue reaches soft peaks, then fold gently until evenly distributed. Start with a tiny dot — colors deepen as the batter rests!
- Filling (e.g., Buttercream, Ganache, Jam): While not part of the shell, the filling affects overall balance. Choose stable, not-too-wet fillings — overly moist fillings (like fresh fruit compotes without reduction) can seep into shells and make them soggy. For beginners, a simple Swiss meringue buttercream or dark chocolate ganache is forgiving, flavorful, and holds up beautifully.
Step-by-Step Recipe
This detailed, time-stamped method prioritizes clarity and success — with built-in checkpoints so you know *exactly* what to look and feel for at each stage.
Prep Work (Do This First! — ~30 minutes)
- Sift & Combine Dry Ingredients: Sift almond flour and powdered sugar together *twice* into a large bowl. Discard any larger particles left in the sieve (they’ll cause bumps or cracks). Whisk gently to blend — no need to overmix.
- Prepare Baking Sheets: Line two heavy-duty baking sheets with parchment paper. Using a pencil (or edible marker), trace 1.5-inch (3.8 cm) circles spaced 1 inch apart — you’ll pipe directly onto these guides. Flip the paper over so the markings are on the underside (prevents ink transfer). Alternatively, use a silicone mat with pre-printed macaron templates.
- Set Up Your Station: Place your stand mixer (or hand mixer + large heatproof bowl) near your stove. Have your granulated sugar, cream of tartar (if using), and food coloring within arm’s reach. Preheat oven to 300°F (150°C) — but *do not put trays in yet*. You’ll bake immediately after piping.
Make the Meringue (10–12 minutes)
- Place room-temp egg whites in the clean, grease-free bowl of your mixer. Add cream of tartar.
- Beat on medium-low (Speed 3–4 on stand mixer) until frothy — about 1 minute. No peaks yet — just airy foam.
- Increase to medium-high and beat until soft peaks form — about 2–3 minutes. Peaks should curl over when whisk is lifted.
- Gradually add granulated sugar, 1 tbsp at a time, waiting 10–15 seconds between additions. Beat continuously. Continue until mixture is *stiff, glossy, and holds sharp, upright peaks* — about 3–4 more minutes. Rub a bit between fingers: it should feel completely smooth — no graininess. Overbeating leads to dry, crumbly meringue; underbeating yields weak structure and flat feet.
Macaronage (The Folding Step — 45–90 seconds, CRITICAL)
This is where most beginners stumble — but don’t worry, we’ll walk you through the signs:
- Add about ⅓ of the dry mixture to the meringue. Using a flexible silicone spatula, cut down the center, sweep across the bottom, and fold up — rotating the bowl slightly with each stroke. Do this 10–15 times until mostly combined (no large dry pockets).
- Add another ⅓. Fold 10–12 times — the batter will thicken and look matte.
- Add remaining dry mix. Now begin counting folds *and watching consistency*. Fold 8–10 times — lift the spatula: batter should fall off in a thick, slow ribbon. Let it fall onto itself — it should slowly merge back into the batter within ~10 seconds (“the magma test”).
- If it falls too fast and flattens instantly → overmixed → shells will spread thin and crack. Stop immediately.
- If it holds a peak or doesn’t flow smoothly → undermixed → shells will be lumpy, peaked, or lack feet. Fold 2–3 more times and retest.
- Pro Tip for Beginners: Set a timer for 10 seconds after lifting the spatula. If the ribbon disappears into the batter within 8–12 seconds, you’re perfect. Err on the side of *slightly undermixed* — you can always fold 1–2 more strokes. It’s easier to fix than overmixing!
Piping & Resting (30–60 minutes)
- Transfer batter to a large piping bag fitted with a ½-inch (1.25 cm) round tip (Wilton #12 works great). Hold vertically ½ inch above the parchment and pipe straight down until the circle is filled — stop pressure, lift straight up. Tap each sheet firmly on the counter *twice* to release air bubbles. Pop any visible bubbles with a toothpick.
- Let piped shells rest at room temperature, uncovered, until a skin forms — 30–60 minutes depending on humidity. How to test: Gently touch the surface of a shell with your fingertip. If it feels completely dry and no wet batter sticks to your finger, it’s ready. If it leaves a sticky residue or dimple, rest longer. Skipping or shortening this step causes cracking and poor feet.
Baking (14–18 minutes)
- Place one tray on the middle rack of your preheated 300°F (150°C) oven. Set a timer for 14 minutes.
- At 14 minutes, open the door *just a crack* (use oven mitt + wooden spoon) and peek. Shells should be set, with well-defined feet and no wobble when gently shaken. If feet are still rising or tops jiggle, bake 1–2 more minutes.
- Remove tray. Let shells cool *completely* on the sheet — at least 15–20 minutes — before attempting to lift. Warm shells will stick and tear. Once cool, gently loosen edges with an offset spatula.
- Repeat with second tray. Never stack trays or bake more than one at a time — airflow is essential for even feet.
Maturing (The Secret Step! — 24 hours)
Yes — your macarons aren’t truly done until they’ve matured! Sandwich shells with your chosen filling, then place assembled macarons in an airtight container. Refrigerate for *at least 24 hours* (up to 48 is ideal). This allows the filling’s moisture to gently migrate into the shells, transforming them from crisp to tender-chewy with balanced sweetness — the hallmark of a professional macaron. Bring to room temperature for 20 minutes before serving.
Tips
- Weigh Everything: Macarons are 90% science — volume measurements vary wildly. Use a digital scale (accurate to 0.1g) for almond flour, powdered sugar, and egg whites. Even 2 grams off can throw off the ratio.
- Control Humidity: High humidity = sad macarons. Bake on dry days if possible. If it’s rainy or humid, extend resting time by 15–30 minutes — and consider running a dehumidifier in your kitchen.
- Room Temperature Is Non-Negotiable: Cold eggs? Your meringue will take forever and never get glossy. Too-warm eggs? Risk deflation. Keep whites at 68–72°F (20–22°C) — 30 minutes out of the fridge is usually enough.
- Grease-Free Bowls & Tools: Even a trace of oil or yolk prevents egg whites from whipping. Wash bowls/spatulas with vinegar or lemon juice before washing, then rinse thoroughly. Wipe with a paper towel dampened with vinegar for extra insurance.
- Consistent Piping Size = Consistent Baking: Use a template and practice steady pressure. Uneven sizes lead to uneven baking — some burnt, some underdone.
- Oven Thermometer Required: Most home ovens run hot or cold. An inexpensive oven thermometer ensures you’re truly at 300°F — 25°F variance can mean cracked shells or no feet.
- Don’t Open the Oven Early: Steam and heat loss during the first 12 minutes disrupt foot formation. Wait until at least minute 14.
- Patience With Maturing: Skipping maturation yields crunchy, disjointed macarons. That 24-hour chill is where magic happens — don’t rush it!
Variations and Customizations
Once you’ve nailed the classic vanilla or chocolate shell, the flavor possibilities are limitless — all while keeping the same reliable technique. Here’s how to adapt confidently:
Flavoring the Shells
- Vanilla Bean: Scrape seeds from ½ pod into dry ingredients before sifting.
- Cocoa Powder: Replace 15g of almond flour with unsweetened Dutch-process cocoa. Sift *with* dry ingredients.
- Matcha: Add 1–1.5 tsp high-quality culinary matcha to dry mix. Reduce food coloring — matcha gives natural vibrant green.
- Lavender: Infuse 2 tbsp granulated sugar with 1 tsp culinary lavender (crushed) for 1 hour, then strain and use in meringue.
- Spiced: Add ¼ tsp ground cinnamon + pinch of cardamom or nutmeg to dry ingredients.
Filling Ideas (Beginner-Approved)
- Classic Chocolate Ganache: Heat ½ cup heavy cream until steaming, pour over 4 oz finely chopped dark chocolate (60–70%), wait 2 minutes, stir until smooth. Chill 1 hour, then pipe.
- Vanilla Swiss Meringue Buttercream: Whip 2 egg whites + ½ cup sugar over simmering water until 160°F, then beat 7 mins until cool. Gradually add ¾ cup softened butter, 1 tbsp at a time. Finish with 1 tsp vanilla.
- Raspberry Coulis Buttercream: Fold 3 tbsp seedless raspberry coulis (simmered & strained) into basic buttercream — reduce coulis first to avoid excess moisture.
- Lemon Curd (Stabilized): Mix ¼ cup lemon curd + 1 tbsp powdered sugar + 1 tsp softened butter to thicken. Chill before piping.
- Coconut-Passionfruit: Blend ¼ cup toasted coconut + 2 tbsp passionfruit pulp + 1 tbsp powdered sugar into white chocolate ganache.
Dietary Adaptations
- Gluten-Free: Naturally gluten-free — just verify your powdered sugar and food coloring are GF-certified (most are).
- Nut-Free Alternative?: Not truly possible while retaining authentic texture — almond flour is structural. Sunflower seed flour *can* work but requires extensive testing and yields different color/taste. Not recommended for first attempts.
- Reduced-Sugar Option: You *cannot* reduce sugar in the shells — it’s essential for structure and safety (prevents bacterial growth in meringue). Focus reduction on the filling instead (e.g., sugar-free ganache with erythritol-based chocolate).
Health Considerations and Nutritional Value
Let’s talk honestly — French macarons are a celebration food, not a health staple. But understanding their composition helps you enjoy them mindfully:
Nutrition Snapshot (Per 2-Macaron Serving, ~30g each, filled with dark chocolate ganache)
- Calories: ~180–220 kcal
- Total Fat: 10–12g (mostly unsaturated from almond flour)
- Carbohydrates: 22–26g (including 18–22g sugars)
- Protein: 2–3g
- Fiber: 1g (from almond flour)
- Sodium: ~20–40mg
What’s Beneficial?
- Almond Flour: Rich in vitamin E (antioxidant), magnesium, healthy fats, and plant-based protein. Naturally low in sugar and gluten-free.
- No Artificial Preservatives: Homemade macarons contain no additives — just real food, made fresh.
- Portion-Controlled by Design: Their small size naturally limits intake — savor two, not twenty.
What to Be Mindful Of?
- Sugar Content: Both shell and filling contribute significantly. Granulated and powdered sugar provide structure — reducing them compromises texture and food safety (raw meringue requires sugar for microbial stability).
- Calorie Density: High in healthy fats and carbs — wonderful in moderation, but not “low-cal.”
- Allergens: Contains tree nuts (almonds) and eggs. Not suitable for those with these allergies.
- No Significant Vitamins/Minerals Beyond Almonds: While almonds offer nutrients, the quantities per serving are modest. Macarons shouldn’t be relied upon for nutrition.
A Balanced Perspective
Enjoy macarons as intended: a joyful, artisanal treat — not a snack or dessert replacement. Pair them with herbal tea or black coffee instead of sugary drinks. Share with loved ones — their beauty lies as much in the making and sharing as in the eating. For daily nutrition, prioritize whole foods: fruits, vegetables, lean proteins, and whole grains. But for birthdays, milestones, quiet Sunday mornings, or “just because” moments? A perfectly crisp-yet-chewy, vibrantly flavored macaron is pure, edible poetry.
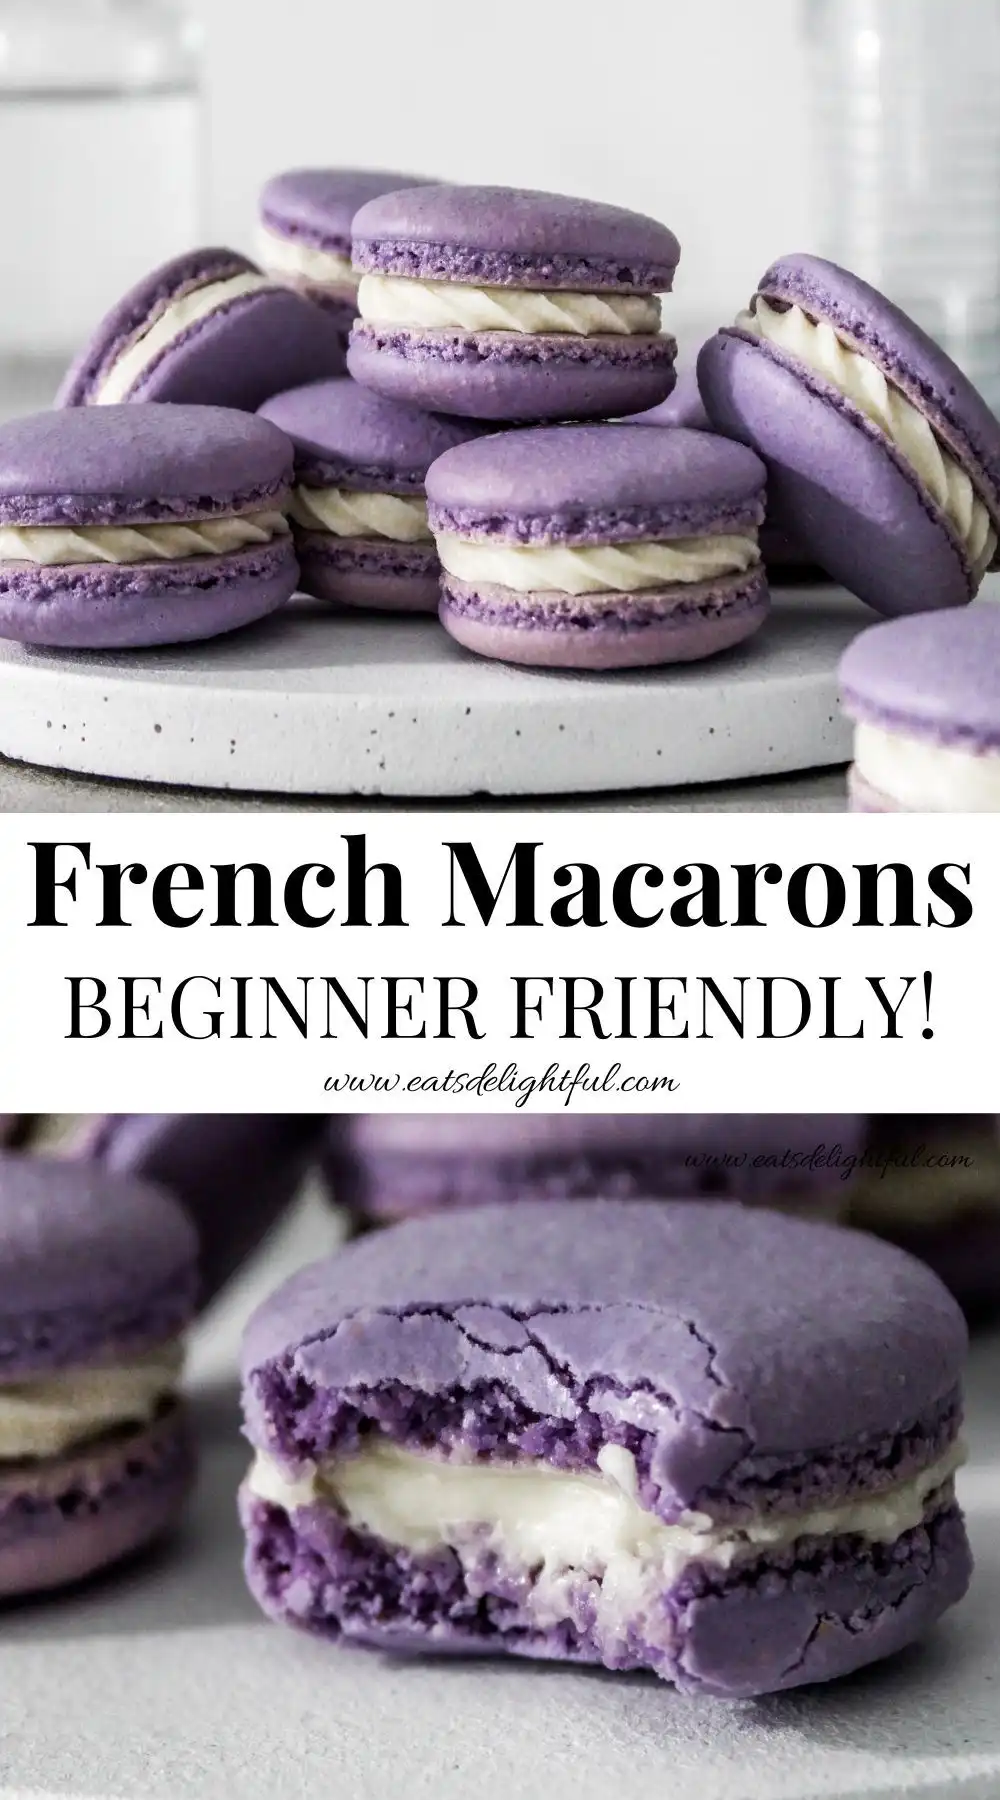
Ingredients
Makes approx. 20–22 sandwiched macarons (40–44 shells)
For the Shells
- 100 g (1 cup) blanched superfine almond flour (sifted twice)
- 200 g (1¾ cups) powdered sugar (confectioners’ sugar), sifted twice
- 100 g (about 3 large) aged egg whites (separated 24–48 hrs prior, brought to room temp)
- 100 g (½ cup) granulated sugar
- ⅛ tsp cream of tartar (optional but recommended)
- ¼ tsp gel food coloring (e.g., Americolor Soft Pink, Sky Blue, or Pure Yellow — adjust for desired hue)
For the Filling (Classic Dark Chocolate Ganache)
- 120 ml (½ cup) heavy cream (36% fat)
- 170 g (6 oz) high-quality dark chocolate (60–70% cacao), finely chopped
- Pinch of sea salt (optional, enhances flavor)
Directions
- Prepare Dry Mix: In a large bowl, sift together almond flour and powdered sugar *twice*. Whisk gently to combine. Set aside.
- Age & Warm Egg Whites: Ensure egg whites have been refrigerated uncovered for 24–48 hours, then sit at room temperature (68–72°F) for 30 minutes before use.
- Preheat & Prep: Preheat oven to 300°F (150°C). Line two baking sheets with parchment. Trace 1.5-inch circles spaced 1″ apart (or use silicone mat).
- Make Meringue: In a clean, grease-free bowl, combine egg whites and cream of tartar. Beat on medium-low until frothy (~1 min). Increase to medium-high; beat until soft peaks form (~2–3 min). Gradually add granulated sugar, 1 tbsp at a time, beating 10–15 sec between. Continue beating until stiff, glossy peaks form (~3–4 min more). Rub a bit: must feel completely smooth.
- Add Color: Add food coloring. Fold gently with spatula until uniform — avoid overmixing.
- Macaronage: Add ⅓ dry mix to meringue. Fold 10–15 times until mostly incorporated. Add next ⅓. Fold 10–12 times. Add remaining dry mix. Fold 8–10 times, then test consistency: lift spatula — batter should fall in a thick, slow ribbon that merges back into bowl within 10 seconds. Adjust with 1–2 more folds if needed.
- Pipe: Transfer to piping bag with ½” round tip. Pipe straight down onto circles until filled (approx. 1.5″ diameter). Tap sheet firmly twice. Pop air bubbles with toothpick.
- Rest: Let sit uncovered at room temperature until surface is dry to the touch and no batter sticks — 30–60 minutes. Test with fingertip.
- Bake: Place one sheet on center rack. Bake 14 minutes. At 14 min, check: shells should be set with risen feet and no jiggle. If needed, bake 1–2 more minutes. Remove. Cool shells *completely* on sheet (15–20 min).
- Make Ganache: Heat cream until steaming (not boiling). Pour over chopped chocolate + salt. Wait 2 min. Stir gently until smooth and glossy. Cool to room temp, then refrigerate 45–60 min until thick but pipeable.
- Assemble: Match shells by size. Pipe 1 tsp ganache onto flat side of half the shells. Gently press matching shell on top. Don’t twist — press straight down.
- Mature: Place assembled macarons in airtight container. Refrigerate 24–48 hours. Bring to room temperature 20 minutes before serving.
FAQ
Q: Why did my macarons crack?
A: Most commonly due to insufficient drying time — the skin wasn’t fully formed before baking. Also caused by too-high oven temperature, opening the oven too early, or overmixing the batter (which makes it too runny and spreads aggressively).
Q: Why no feet? Or tiny, weak feet?
A: Undermixed batter (too stiff), under-rested shells (no skin), oven too cool, or batter piped too small/thin. Also common if trays are placed too low in oven — feet need radiant heat from below.
Q: Why are my shells hollow?
A: Overmixed batter (loses air and structure), oven too hot (causes rapid rise then collapse), or underbaked (interior steam escapes before structure sets). Try lowering temp to 290°F and extending bake by 1–2 min.
Q: Why do my shells spread and look like pancakes?
A: Almost always overmixed batter. Also possible if egg whites were underwhipped (weak meringue) or if you skipped resting entirely.
Q: Can I make macarons without a scale?
A: Technically yes — but strongly discouraged. Volume measures for almond flour vary by 20–30% depending on scooping method. A $15 digital scale pays for itself in saved ingredients and frustration.
Q: Can I freeze macarons?
A: Yes! Unfilled shells freeze beautifully for up to 3 months in airtight containers. Thaw at room temp 30 min before filling. Assembled macarons (filled) freeze well for up to 2 weeks — thaw overnight in fridge, then bring to room temp before serving.