Introduction
The Oreo Dump Cake is the ultimate no-fuss, low-effort, high-reward dessert that has taken home bakers—and even novice cooks—by storm. With its irresistible combination of crunchy chocolate wafers, rich vanilla or chocolate cake flavor, and gooey, caramelized topping, this dessert delivers bakery-quality decadence without the need for mixing bowls, electric mixers, or precise measurements. Designed for maximum convenience and minimum cleanup, the Oreo Dump Cake epitomizes the “dump-and-bake” philosophy: simply layer ingredients in a baking dish, pour over a liquid component, and let the oven work its magic. Whether you’re hosting last-minute guests, craving a nostalgic childhood treat, or seeking a stress-free dessert after a long day, this 5-ingredient wonder delivers every time—no frosting, no folding, no fuss.
The History
Dump cakes have been a beloved American staple since the mid-20th century, gaining widespread popularity in the 1960s and 70s alongside the rise of convenience foods and boxed cake mixes. These desserts were born from practicality—housewives sought faster, simpler ways to create crowd-pleasing sweets using pantry staples and minimal technique. The concept was revolutionary: skip the labor-intensive steps of creaming butter and sugar, sifting dry ingredients, or folding in eggs—just “dump” layers into a pan and bake. While traditional dump cakes often featured fruit pie fillings and yellow cake mix, creative bakers soon began experimenting with cookies, candies, and flavored syrups. The Oreo variation emerged organically in the early 2000s on food blogs and Pinterest, fueled by the cult-like devotion to Oreos and the viral appeal of “only 3–5 ingredients!” recipes. Its meteoric rise reflects a broader cultural shift toward accessible, visually satisfying, and deeply nostalgic desserts—where brand-name familiarity (Oreos!) meets effortless execution. Today, it’s a mainstay at potlucks, school bake sales, holiday cookie exchanges, and TikTok recipe reels alike—proof that simplicity, when built on quality ingredients, never goes out of style.
Ingredients Breakdown
What makes this recipe extraordinary isn’t just its brevity—it’s how each of the five ingredients plays a distinct, irreplaceable role in building texture, structure, moisture, sweetness, and signature flavor:
- Oreo Cookies (regular, not Double Stuf or seasonal flavors): The foundation and star. Crushed Oreos provide both the base layer and the top crust—delivering unmistakable chocolatey, creamy, slightly salty-sweet notes. Their high fat and sugar content melt and caramelize during baking, forming a crisp, craggy, almost toffee-like surface while softening into a tender, pudding-like bottom layer.
- Yellow Cake Mix (standard 15.25 oz box, not gluten-free or reduced-sugar unless adapted): Acts as the structural binder and leavening engine. Its blend of enriched flour, sugar, leavening agents (baking soda & powder), and emulsifiers creates lift, tenderness, and subtle vanilla-caramel depth. It absorbs moisture and transforms into a moist, cakey crumb that bridges the gap between cookie and cake.
- Butter (unsalted, cold or slightly softened—NOT melted): Critical for richness, flakiness, and golden browning. Cold butter cut into small cubes ensures pockets of fat remain intact during initial baking, creating steam and separation—key to achieving the coveted layered, shattery texture. Salted butter can be used, but unsalted gives better control over sodium levels, especially important given Oreos’ inherent saltiness.
- Milk (whole milk preferred; 2% or full-fat canned coconut milk work well for dairy-free): The essential hydrator and reaction catalyst. Milk activates the cake mix’s leaveners and dissolves sugars, while its proteins and lactose contribute to browning and tenderness. Whole milk’s higher fat content yields a richer, more velvety crumb than skim or almond milk (which may result in drier or gummy textures).
- Vanilla Extract (pure, not imitation): The aromatic secret weapon. Though seemingly minor, real vanilla extract adds complex floral, woody, and sweet undertones that elevate the entire dessert—balancing the cocoa bitterness of the Oreos and rounding out the cake mix’s artificial notes. Imitation extract lacks depth and can taste harsh or chemical under high heat.
Notably absent? Eggs, oil, water, frosting, whipped cream, or any additional thickeners—this recipe relies entirely on synergy, not supplementation.
Step-by-Step Recipe
- Preheat & Prep: Position oven rack in the center. Preheat oven to 350°F (175°C). Generously grease a 9×13-inch glass or light-colored metal baking dish with butter or non-stick spray—do not use dark non-stick pans, which promote over-browning and burning.
- Crush the Oreos: Place 36 regular Oreos (about 12 oz or one standard family-size pack) in a large resealable plastic bag. Use a rolling pin, meat mallet, or heavy-bottomed skillet to crush them into coarse crumbs—aim for pea-sized shards and fine dust, but avoid turning them into powder. A few larger chunks are desirable for textural contrast. Transfer crushed Oreos to a medium bowl.
- Mix Dry Ingredients: Add the entire 15.25-oz box of yellow cake mix to the crushed Oreos. Stir gently with a spatula or fork until fully combined and uniformly speckled with chocolate. No sifting needed—just ensure no dry pockets remain.
- Layer the Base: Pour the Oreo–cake mix mixture evenly into the prepared baking dish. Use the back of a spoon or offset spatula to press it down lightly into an even, compact layer (~½ inch thick). This prevents uneven baking and ensures cohesive structure.
- Add Butter: Scatter ½ cup (1 stick / 113g) of cold, unsalted butter—cut into ½-inch cubes—over the entire surface. Distribute evenly; do not press in or melt beforehand. The cold temperature is vital for proper layer formation.
- Pour Milk: Slowly pour 1 cup (240ml) of whole milk over the butter in a steady, circular motion, ensuring coverage across all areas. Avoid pouring directly onto one spot—let it seep naturally through the cracks.
- Finish with Vanilla: Drizzle 2 teaspoons of pure vanilla extract evenly over the milk layer. This ensures aromatic distribution without disrupting the delicate balance.
- Bake with Precision: Place dish on center rack. Bake uncovered for 45–55 minutes. Begin checking at 45 minutes: the top should be deeply golden brown with visible bubbling edges and a matte, set surface (no wet sheen). A toothpick inserted into the center should come out with moist crumbs—not wet batter—but may have a slight oily residue from the Oreos (normal!). If the top browns too quickly, tent loosely with aluminum foil for the final 10–15 minutes.
- Cool & Set: Remove from oven and place on a wire rack. Let cool undisturbed for at least 45 minutes—this is non-negotiable. The cake continues to set as it cools; cutting too soon yields a soupy, unstructured mess. For clean slices and optimal texture, allow cooling to room temperature (1.5–2 hours).
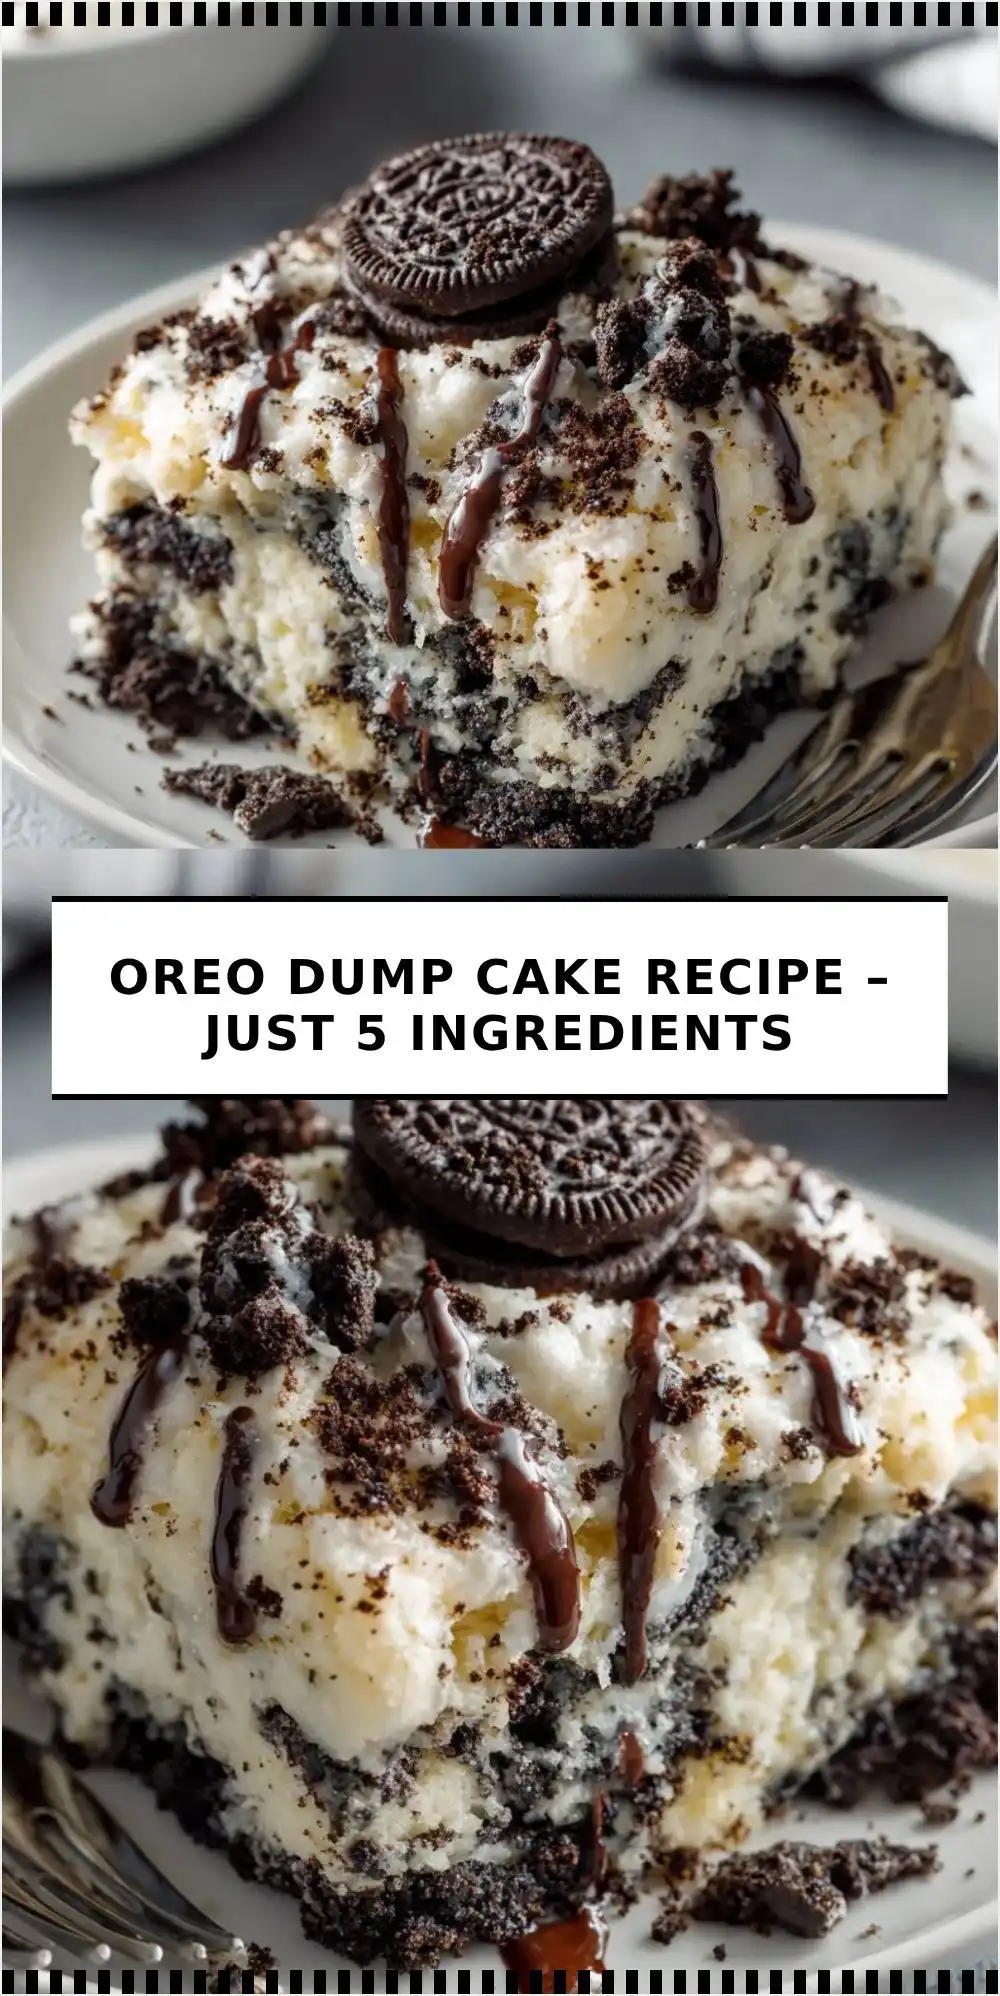
- Serve: Cut into 12–16 generous squares. Serve warm or at room temperature. Optional—but highly recommended—top with a scoop of premium vanilla bean ice cream, a drizzle of hot fudge, or a dollop of freshly whipped cream.
Tips
- Crushing Consistency Matters: Over-crushing Oreos into fine dust eliminates textural interest and increases risk of greasiness. Aim for 60% coarse crumbs (¼–½ inch) and 40% fine dust for ideal crunch-to-tenderness ratio.
- Cold Butter Is Non-Negotiable: Melting butter beforehand creates a dense, greasy, pancake-like layer instead of the desired flaky, crisp-topped crumble. Refrigerate butter for 15 minutes before cubing if room temperature.
- Don’t Skip the Grease: Even “non-stick” dishes require thorough greasing—especially around corners and edges—due to the high sugar content, which caramelizes and sticks aggressively.
- Watch the Oven Like a Hawk: Oven temperatures vary widely. Use an oven thermometer for accuracy. If your oven runs hot, reduce temp to 340°F and extend time by 5–8 minutes.
- Resting Time = Texture Time: Cutting before 45 minutes results in structural collapse. The residual heat and starch gelatinization during cooling solidify the crumb. Patience rewards you with sliceable, restaurant-worthy portions.
- Use Glass Dishes When Possible: Pyrex or other clear glass bakeware allows visual monitoring of bubbling and browning—critical for judging doneness without opening the oven door prematurely.
- No Substituting Evaporated Milk or Half-and-Half: Their higher fat/sugar content causes excessive browning and curdling. Stick to whole milk for balanced hydration and browning.
- Double Batch? Not Recommended: This recipe does not scale linearly. For larger crowds, make two separate 9×13 batches—stacking or doubling alters heat distribution and leads to undercooked centers or burnt edges.
- Storage Tip: Store leftovers covered at room temperature for up to 2 days, or refrigerate for up to 5 days. Reheat individual squares in the microwave for 15–20 seconds for fresh-from-the-oven warmth.
- Revive Stale Slices: Leftovers often firm up overnight. Gently rewarm in a 325°F oven for 8–10 minutes on parchment-lined sheet—restores moisture and re-crisps the top.
Variations and Customizations
While the classic 5-ingredient version is revered for its purity, thoughtful variations preserve ease while expanding flavor horizons—always maintaining the core “dump-and-bake” method and ingredient count (or adding only optional garnishes):
- Double Chocolate Oreo Dump Cake: Swap yellow cake mix for chocolate cake mix. Keep all else identical. Result: Intense cocoa depth, richer crumb, and intensified Oreo harmony.
- Funfetti Oreo Twist: Replace yellow cake mix with funfetti cake mix (ensure sprinkles are heat-stable). Adds playful color and subtle vanilla-candy sweetness without extra steps.
- Golden Oreo Edition: Use Golden Oreos (vanilla creme + golden wafers) with yellow cake mix and 1 tsp almond extract instead of vanilla. Creates a buttery, shortbread-like profile with elegant nuttiness.
- Peppermint Crunch: Add ½ tsp peppermint extract with the vanilla, and top cooled cake with crushed candy canes before serving. Festive, refreshing, and still 5-ingredient core.
- Espresso Kick: Whisk 1 tbsp instant espresso powder into the milk before pouring. Enhances chocolate notes and adds sophisticated bitterness—ideal for adult palates.
- Gluten-Free Friendly: Use certified GF yellow cake mix and GF Oreos (e.g., Kinnikinnick or Glutino brands). Verify all labels—cross-contamination matters for sensitive individuals.
- Dairy-Free Adaptation: Substitute whole milk with full-fat canned coconut milk (shake well first) and use plant-based butter (e.g., Miyoko’s or Earth Balance). Flavor becomes subtly tropical—complements Oreos beautifully.
- Mini Mason Jar Version: Layer ingredients in 4-oz wide-mouth mason jars (½ cup crushed Oreos + ⅓ cup cake mix + 1 tbsp cold butter + 2 tbsp milk + ¼ tsp vanilla). Bake at 350°F for 28–32 minutes. Perfect for portion control or gifting.
- Streusel Upgrade (Optional 6th Ingredient): Before baking, sprinkle ¼ cup chopped toasted pecans or walnuts over the butter layer. Adds crunch, protein, and gourmet flair—still qualifies as “minimal effort.”
- Icing Drizzle (Post-Bake Only): After full cooling, whisk ½ cup powdered sugar + 1 tbsp milk + ½ tsp vanilla into a thin glaze. Drizzle artfully over top. Adds polish—not part of the dump process, so doesn’t violate the 5-ingredient rule.
Health Considerations and Nutritional Value
This dessert is intentionally indulgent—not a health food—but understanding its composition supports mindful enjoyment:
- Caloric Density: One standard 12-serving slice contains approximately 320–360 calories, primarily from refined carbohydrates (Oreo wafers, cake mix) and saturated fat (butter, Oreo creme). Portion control remains key.
- Sugar Content: A single serving delivers ~28–32g of added sugar—well above the American Heart Association’s recommended daily limit of 25g for women and 36g for men. The Oreos alone contribute ~21g per serving; cake mix adds ~7g more.
- Sodium Note: Oreos contain 135mg sodium per 3-cookie serving—so a slice averages ~220–250mg. Combined with cake mix (~300mg/serving) and butter (~90mg), total sodium reaches ~600–650mg per slice. Moderate intake is advised for those managing hypertension.
- Minimal Protein & Fiber: At just 2–3g protein and <1g dietary fiber per slice, this cake offers little satiety support. Pairing with Greek yogurt or a side of berries helps balance macros.
- No Artificial Colors or Trans Fats: Regular Oreos and standard cake mixes contain no partially hydrogenated oils (trans fats banned in US since 2018), though they do include artificial flavors and preservatives like BHT. “Clean label” alternatives exist but may compromise texture.
- Allergen Alert: Contains wheat (gluten), dairy (milk, butter), soy (in most cake mixes and Oreos), and eggs (in Oreos and cake mix). Always verify labels for specific sensitivities.
- Occasional Indulgence Framework: Registered dietitians emphasize that desserts like this fit within a balanced diet when consumed mindfully—e.g., sharing a slice, savoring slowly, or reserving for special occasions. Its lack of frosting or heavy cream actually makes it *less* caloric than many layered cakes or frosted cupcakes.
- Lower-Sugar Experimentation: While not traditional, some bakers substitute half the Oreos with high-cocoa dark chocolate chunks (70%+) and use sugar-free cake mix—but results vary significantly in texture and browning. Not recommended for first-time bakers.
Ingredients
- 36 regular Oreo cookies (12 oz / ~340g family-size pack)
- 1 box (15.25 oz / 432g) classic yellow cake mix (e.g., Betty Crocker or Duncan Hines)
- ½ cup (1 stick / 113g) unsalted butter, cold and cut into ½-inch cubes
- 1 cup (240ml) whole milk
- 2 teaspoons pure vanilla extract
Directions
- Preheat oven to 350°F (175°C). Grease a 9×13-inch baking dish thoroughly with butter or non-stick spray.
- In a large resealable bag, crush Oreos until mostly coarse crumbs with some small chunks remain. Transfer to a bowl.
- Add cake mix and stir until fully combined and evenly mixed.
- Press mixture firmly and evenly into the bottom of the prepared baking dish.
- Scatter cold butter cubes evenly over the surface.
- Pour milk slowly and evenly over the butter, covering all areas.
- Drizzle vanilla extract over the top.
- Bake for 45–55 minutes, until top is deeply golden brown and edges are bubbling vigorously.
- Remove from oven and cool on a wire rack for at least 45 minutes—do not cut early.
- Cut into squares and serve warm or at room temperature. Optional: top with vanilla ice cream or whipped cream.
FAQ
- Can I use Double Stuf Oreos?
- No—Double Stuf has higher moisture and fat content, leading to greasiness, poor layering, and a soggy, unstable crumb. Stick to original regular Oreos for reliable structure and caramelization.
- Why can’t I use melted butter?
- Melted butter saturates the dry layer too quickly, preventing steam formation and eliminating the flaky, crisp-topped texture. Cold butter melts gradually in the oven, creating pockets of air and separation—essential for the signature dump cake mouthfeel.
- Can I make this ahead of time?
- Absolutely. Assemble up to 24 hours in advance (without baking), cover tightly with plastic wrap, and refrigerate. Let sit at room temperature for 20 minutes before baking—cold batter may require +5 minutes baking time.
- My cake sank in the center—what went wrong?
- Sinking usually indicates underbaking or premature removal from oven. Ensure internal temperature reaches at least 205°F (96°C) when tested with an instant-read thermometer, and confirm visual cues (dry, matte top; bubbling edges) before removing. Also check expiration dates—old cake mix leaveners lose potency.
- Can I freeze leftovers?
- Yes! Wrap cooled, uncut cake tightly in plastic wrap, then aluminum foil. Freeze up to 3 months. Thaw overnight in fridge, then reheat covered at 325°F for 15–20 minutes until warmed through.
- Is there a way to make it vegan?
- Yes—with modifications: Use vegan Oreos (check label—some contain whey), vegan yellow cake mix, plant-based butter, and full-fat canned coconut milk. Results are delicious but slightly denser and more caramel-forward. Still qualifies as 5-ingredient core.
- Can I add fruit?
- Technically yes—but it violates the 5-ingredient purity and changes the chemistry. Adding fruit introduces excess moisture, requiring adjustments to baking time, temperature, and possibly thickener. Best reserved for dedicated fruit dump cake recipes.
- Why does my top look greasy?
- Over-crushing Oreos or using stale/low-quality butter causes fat separation. Also, opening the oven too early (before 35 minutes) disrupts steam development. Next time, crush less aggressively and avoid peeking!
- What’s the best way to store uneaten portions?
- Cover tightly with plastic wrap or transfer to an airtight container. Room temperature is fine for 48 hours due to high sugar content acting as a preservative. Refrigeration extends freshness to 5 days but may dry out edges—lightly cover with damp paper towel before sealing.
- Can kids help make this?
- Perfect for young chefs! Crushing Oreos (with supervision), pouring milk, and sprinkling butter are safe, engaging tasks. They’ll love seeing the transformation from simple layers to golden dessert—building confidence and kitchen curiosity.
Summary
The Oreo Dump Cake is a brilliantly minimalist, five-ingredient marvel that transforms pantry staples into a decadent, layered dessert with zero mixing, no frosting, and barely any cleanup—delivering nostalgic Oreo crunch, tender cakey crumb, and buttery caramelization in under an hour.
By honoring precise techniques—cold butter, coarse Oreo crumbs, proper cooling, and attentive baking—you unlock restaurant-worthy texture and depth from just Oreos, yellow cake mix, butter, milk, and vanilla, proving that extraordinary flavor needs no complexity—just intention, quality ingredients, and the joyful alchemy of the oven.