Introduction
Cookies and Cream Cookies are a beloved American classic—rich, nostalgic, and irresistibly indulgent. These soft-baked delights capture the magic of everyone’s favorite Oreo®-inspired treat: creamy vanilla cookie dough studded with generous chunks of chocolate sandwich cookies. With their signature contrast of tender crumb and crunchy, bittersweet cookie bits, they evoke childhood lunchboxes, ice cream parlor sundaes, and late-night dessert cravings—all in one perfectly portioned, golden-edged bite. Whether you’re baking for a school bake sale, a holiday cookie exchange, or simply to brighten an ordinary Tuesday, Cookies and Cream Cookies deliver consistent joy, crowd-pleasing flavor, and that unmistakable “crunch-and-chew” texture that keeps people reaching for just one more.
The History
The origin of Cookies and Cream as a flavor concept traces back to the early 1970s at South Dakota State University, where dairy science students Jerry Shultz and Joe Haines are widely credited with inventing Cookies and Cream ice cream in 1977—using crushed Oreo® cookies blended into sweet cream base. The innovation was so successful it quickly spread to commercial dairies, including Blue Bell and later Ben & Jerry’s, cementing its status as a top-tier American frozen dessert. But it wasn’t until the 1990s—amid a broader wave of “ice cream-inspired” baked goods—that home bakers and professional pastry chefs began translating the flavor profile into cookie form. Early iterations appeared in regional bakery catalogs and midwestern church cookbooks, often labeled “Oreo Cookies” or “Cream-Filled Chocolate Chip Cookies,” but lacked standardized technique. The modern Cookies and Cream Cookie truly evolved alongside the rise of food blogs (circa 2008–2012), when recipe developers like Sally’s Baking Addiction and Brown Eyed Baker refined the formula: emphasizing cold butter, proper creaming technique, high-ratio brown sugar for chew, and—critically—the right type and size of cookie pieces to prevent bleeding, sogginess, or structural collapse. Today, it’s a staple on bakery menus from Portland to Miami and a frequent finalist in national cookie competitions—including the Pillsbury Bake-Off®, where a 2021 finalist version used browned butter and toasted white chocolate for elevated depth. Its enduring popularity speaks to its emotional resonance: a universally understood, comfort-driven flavor that balances familiarity with playful decadence.
Ingredients Breakdown
Every exceptional Cookies and Cream Cookie begins with intentionality—not just measurement, but understanding *why* each component matters:
- Unsalted Butter (1 cup / 2 sticks / 227g): Must be softened to cool room temperature (65°F/18°C)—not melted, not greasy. Butter carries flavor, creates tenderness via fat crystals during creaming, and contributes to both spread and lift through steam release in the oven. Unsalted allows precise sodium control.
- Granulated Sugar (¾ cup / 150g): Provides sweetness, aids in crispness and caramelization at the edges, and helps aerate the batter during creaming. A small amount is essential for structure—too little leads to overly soft, puffy cookies.
- Brown Sugar (¾ cup packed / 150g): Light or dark—dark adds molasses depth and extra moisture for chewiness; light yields milder flavor and slightly crisper texture. The molasses also reacts with baking soda for optimal rise and browning.
- Large Eggs (2, room temperature): Act as emulsifiers and binders. Room temperature ensures even incorporation and prevents seizing the butter-sugar mixture. Egg whites add structure; yolks lend richness and tenderness.
- Pure Vanilla Extract (2 tsp): Non-negotiable for aromatic complexity. Imitation extract lacks nuance and can taste medicinal when baked. For premium versions, add ¼ tsp vanilla bean paste or seeds scraped from ½ pod.
- All-Purpose Flour (2 ¼ cups / 280g, spooned & leveled): The structural backbone. Too much = dry, cakey cookies; too little = flat, greasy puddles. Always measure by weight or use the spoon-and-level method—never scoop directly from the bag.
- Baking Soda (1 tsp): Not baking powder! Soda reacts with acidic components (brown sugar molasses, yogurt if added) to create carbon dioxide bubbles—giving lift, spread control, and golden-brown color via Maillard reaction. Freshness is critical; test by mixing ¼ tsp with 2 tsp vinegar—if no vigorous fizz, replace.
- Fine Sea Salt (1 tsp): Enhances all other flavors, balances sweetness, and strengthens gluten for better chew. Kosher salt is acceptable but use 1¼ tsp due to lower density.
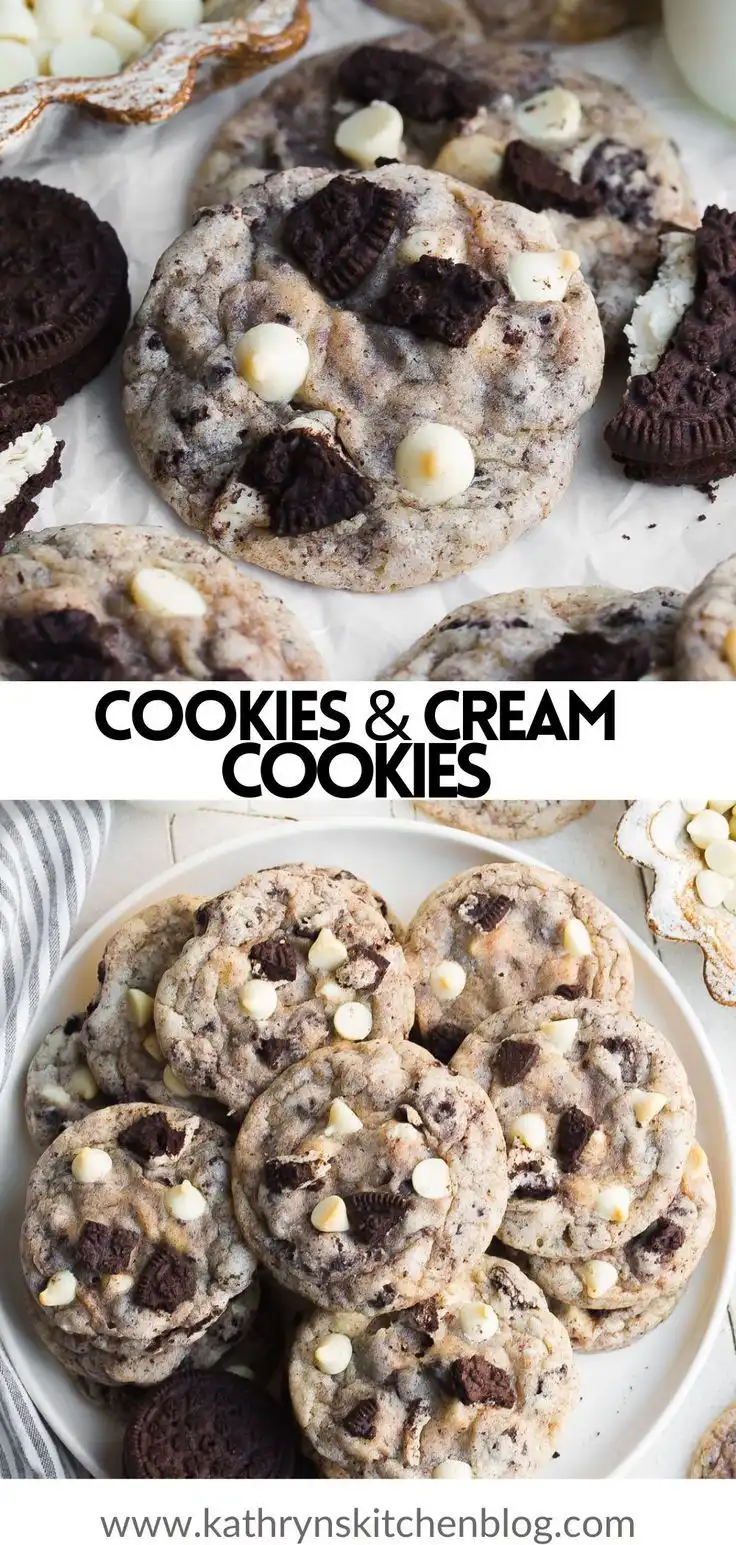
- High-Quality Chocolate Sandwich Cookies (1 ½ cups / ~150g crushed): This is the star—and the most variable element. Use original Oreos® or store-brand equivalents (Keebler, Great Value, Target Favorite Day). Avoid “double-stuffed” or “mint” varieties unless intentionally customizing. Crush cookies *just before mixing*: place in a zip-top bag and pulse with a rolling pin or pulse 5–6 times in a food processor. Aim for pea-sized to ¼-inch shards—no fine dust (causes gray streaks and bitterness) and no large hunks (won’t distribute evenly or may sink).
- Optional Additions: ½ cup white chocolate chips (for creamy contrast), ¼ tsp espresso powder (enhances chocolate notes without adding coffee flavor), or 1 tbsp cornstarch (for ultra-soft, bakery-style centers).
Step-by-Step Recipe
- Prep & Chill (30 min): Line two large baking sheets with parchment paper or silicone mats. Place 1 ½ cups of chocolate sandwich cookies in a heavy-duty zip-top bag. Seal tightly and crush using a rolling pin or meat mallet until pieces range from coarse crumbs to ¼-inch shards. Set aside. Chill crushed cookies in the freezer for 10 minutes—this prevents melting into the dough and preserves distinct texture.
- Cream Butter & Sugars (3–4 min): In a large stand mixer fitted with the paddle attachment, beat softened unsalted butter, granulated sugar, and brown sugar on medium speed until light, fluffy, and pale—about 3–4 minutes. Scrape down bowl thoroughly halfway. Over-creaming causes excessive spread; under-creaming yields dense cookies. The mixture should hold soft peaks when the paddle is lifted.
- Add Wet Ingredients (2 min): Beat in eggs one at a time, waiting until fully incorporated before adding the next. Add vanilla and mix just until combined—about 30 seconds. Do not overmix.
- Dry Ingredients (1 min): In a separate medium bowl, whisk together flour, baking soda, and salt until fully homogenous. Sift once for insurance against lumps or clumped soda.
- Combine Dry & Wet (1–2 min): Reduce mixer speed to low. Gradually add dry ingredients in three additions, mixing only until *no dry streaks remain*. Stop immediately—overmixing develops gluten, resulting in tough, rubbery cookies. The dough will be thick, glossy, and slightly sticky.
- Fold in Cookies (1 min): Using a silicone spatula, gently fold in the chilled cookie pieces just until evenly distributed—about 15–20 folds. Avoid overworking; some pockets of dough clinging to larger shards is ideal.
- Chill Dough (Minimum 2 hours, ideally overnight): Cover bowl tightly with plastic wrap and refrigerate for at least 2 hours—or up to 72 hours. Chilling solidifies butter, slows spread, enhances flavor development (sugars caramelize slowly), and improves texture (more chew, less greasiness). For best results, portion *before* chilling: use a 2-tablespoon cookie scoop (≈40g per dough ball), roll into smooth spheres, and place 2 inches apart on parchment-lined trays. Freeze unbaked dough balls for 1 hour, then transfer to airtight freezer bags for up to 3 months. Bake straight from frozen—add 1–2 minutes to bake time.
- Preheat & Prep (15 min before baking): Position oven racks in upper and lower thirds. Preheat oven to 350°F (177°C) for at least 15 minutes—use an oven thermometer for accuracy. Rotate pans halfway through baking for even browning.
- Bake (11–13 min): Place 6–8 dough balls per lined baking sheet (do not overcrowd). Bake for 11 minutes for soft, gooey centers with crisp edges; 12 minutes for balanced chew-crisp; 13 minutes for firmer, more golden cookies. They will look underdone and soft in the center—that’s correct! Edges should be set and lightly golden; centers will appear puffed and slightly shiny.
- Cool (Critical Step): Let cookies rest on baking sheets for exactly 5 minutes—this allows residual heat to finish setting structure and prevents breakage. Then, carefully transfer with a thin spatula to wire cooling racks. Cool completely (20–25 minutes) before storing or serving. Warm cookies are fragile and overly soft; fully cooled ones reveal their ideal texture: tender yet substantial, with audible crunch from cookie shards.
Tips
- Butter Temperature Is Everything: If your butter is too warm (>70°F), chill the entire dough for 15 minutes before scooping. If too cold (<60°F), let sit at room temp for 5–7 minutes—never microwave.
- Don’t Skip the Chill: Skipping refrigeration almost guarantees flat, greasy, overly browned cookies. Even a 30-minute chill helps—but 2+ hours transforms them.
- Crush Smart: Pulse cookies in short bursts. Shake bag between pulses. Remove any fine dust by sifting crushed pieces through a coarse mesh strainer—discard dust or save for cookie crusts.
- Portion Consistently: Use a spring-loaded 2-tbsp scoop for uniform size and even baking. Level off excess with a knife. Irregular sizing causes uneven doneness.
- Oven Thermometer Required: Most home ovens run hot or cold. An inaccurate temperature is the #1 cause of burnt bottoms or raw centers.
- Rotate & Swap Pans: Halfway through baking, rotate each pan ½ turn *and* swap top/bottom rack positions. Convection ovens? Reduce temp by 25°F and check 1 minute earlier.
- Underbake Slightly: Pull cookies when edges are golden and centers still look soft and puffed—they’ll firm up as they cool. Overbaked Cookies and Cream Cookies lose their signature melt-in-the-mouth quality.
- Cool on Racks, Not Countertops: Trapped steam on a solid surface makes bottoms soggy. Wire racks ensure airflow and preserve crisp edges.
- Storage Matters: Store cooled cookies in an airtight container with a slice of plain white bread—its moisture migrates to keep cookies soft for 4–5 days. Replace bread every 2 days.
- Revive Stale Cookies: Place in a 300°F oven for 3–4 minutes—steam rehydrates starches and restores chew.
Variations and Customizations
Once you’ve mastered the classic, explore these chef-tested twists—each designed to elevate without compromising integrity:
- Browned Butter Cookies and Cream: Melt 1 cup butter in a light saucepan over medium-low heat, swirling constantly until golden-brown with nutty aroma (≈6–8 min). Cool completely to room temperature before creaming. Adds deep, toasty complexity that pairs beautifully with vanilla and chocolate.
- Double-Chocolate Cookies and Cream: Replace ¼ cup of flour with unsweetened cocoa powder (Dutch-process preferred). Fold in ½ cup mini semi-sweet chocolate chips along with the cookie pieces for triple chocolate intensity.
- Sea Salt & Caramel Cookies and Cream: Sprinkle each dough ball with flaky sea salt *before* baking. After cooling, drizzle with homemade salted caramel (simmer ½ cup heavy cream, ½ cup brown sugar, 2 tbsp butter, ½ tsp salt until thickened—cool 10 min before drizzling).
- Gluten-Free Cookies and Cream: Substitute 2 ¼ cups certified gluten-free 1:1 baking flour blend (like King Arthur or Bob’s Red Mill). Ensure cookies are GF-certified (e.g., Kinnikinnick or Glutino). Add 1 tsp xanthan gum if blend doesn’t include it.
- Vegan Cookies and Cream: Use vegan butter (Miyoko’s or Earth Balance), flax eggs (2 tbsp ground flax + 5 tbsp water, rested 10 min), and dairy-free chocolate sandwich cookies (e.g., Nabisco’s certified vegan Oreos® or Newman’s Own). Increase baking soda to 1¼ tsp to compensate for lack of acid from dairy.
- Protein-Powered Cookies and Cream: Add ¼ cup unflavored or vanilla whey or plant-based protein powder. Reduce flour by 2 tbsp to maintain hydration balance. Chill dough 3+ hours—protein absorbs moisture slowly.
- Mini Cookies and Cream: Use a 1-tsp scoop for bite-sized versions. Bake at 350°F for 7–9 minutes. Perfect for parties, lunchboxes, or portion-controlled snacking.
- Stuffed Cookies and Cream: Flatten a 2-tbsp dough ball, place 1 tsp cream cheese frosting (full-fat, room temp) or Nutella in center, wrap dough around, and seal. Chill 20 min before baking. Yields molten, luxurious centers.
- Spiced Cookies and Cream: Add ½ tsp ground cinnamon, ¼ tsp ground ginger, and a pinch of black pepper to dry ingredients. Complements molasses notes in brown sugar and adds warmth.
- Espresso-Dusted Cookies and Cream: Dissolve 1 tsp instant espresso powder in vanilla extract before adding. Finish cooled cookies with a light dusting of powdered sugar mixed with ½ tsp espresso.
Health Considerations and Nutritional Value
While Cookies and Cream Cookies are undeniably a treat—not a health food—they can be contextualized responsibly within a balanced diet. A standard 3-inch cookie (≈40g dough, baked) contains approximately:
- Calories: 180–210 kcal
- Total Fat: 10–12g (6–7g saturated)
- Carbohydrates: 22–26g (14–17g sugars)
- Protein: 2–3g
- Sodium: 130–160mg
- Fiber: <1g (unless whole wheat flour or added oats are used)
Key Considerations:
- Sugar Content: Primarily from added sucrose and molasses. While not “empty calories” in the strictest sense (brown sugar offers trace minerals like calcium and potassium), moderation remains vital—especially for those managing blood glucose, PCOS, or insulin resistance. Substituting up to 25% of granulated sugar with coconut sugar lowers glycemic impact slightly but does not reduce total carbohydrate load.
- Saturated Fat: Comes largely from butter and chocolate cookie filling. Current dietary guidelines (2020–2025 USDA) recommend limiting saturated fat to <10% of daily calories (~22g for a 2,000-calorie diet). One cookie fits comfortably within this—two still do, but frequency matters.
- Fortification Factor: Standard Oreos® and similar cookies contain added iron, thiamin, riboflavin, and folic acid—so while not nutrient-dense, they’re not nutritionally void either. Choosing whole-grain or high-fiber cookie alternatives boosts micronutrient yield meaningfully.
- Allergens & Sensitivities: Contains wheat (gluten), dairy (butter, milk solids in cookies), eggs, and soy (lecithin in chocolate wafers). Vegan/GF versions address these—but always verify labels, as formulations change.
- Portion Awareness: The psychological “just one more” effect is real—these cookies are hyper-palatable due to fat-sugar-salt synergy and textural contrast. Pre-portioning dough, freezing extras, and using smaller scoops support intuitive eating habits.
- Functional Upgrades: Boost nutritional value without sacrificing appeal: stir in 2 tbsp ground flaxseed (omega-3s, fiber), ¼ cup chopped walnuts (vitamin E, magnesium), or 1 tbsp chia seeds (fiber, calcium). Reduce sugar by 1–2 tbsp if using naturally sweetened cookie alternatives.
- For Diabetics: Consult a registered dietitian before regular consumption. Lower-carb options exist (almond flour base, erythritol/stevia blends, keto-friendly cookies), but texture and browning behavior differ significantly—and artificial sweeteners may cause GI distress in sensitive individuals.
Ultimately, Cookies and Cream Cookies belong to the joyful category of *intentional indulgence*—best enjoyed mindfully, shared generously, and never guiltily. Their nutritional role is emotional nourishment: comfort, celebration, connection, and nostalgia—valid and vital dimensions of holistic well-being.
Ingredients
- 1 cup (227g / 2 sticks) unsalted butter, softened to 65°F (18°C)
- ¾ cup (150g) granulated sugar
- ¾ cup (150g) packed light or dark brown sugar
- 2 large eggs, room temperature
- 2 teaspoons pure vanilla extract
- 2 ¼ cups (280g) all-purpose flour, spooned and leveled (or weighed)
- 1 teaspoon baking soda
- 1 teaspoon fine sea salt
- 1 ½ cups (150g) crushed original chocolate sandwich cookies (e.g., Oreos®), chilled
Directions
- Line two large baking sheets with parchment paper or silicone baking mats. Place cookies in a heavy-duty zip-top bag and crush with a rolling pin until pieces range from coarse crumbs to ¼-inch shards. Transfer to a small bowl, cover, and freeze for 10 minutes.
- In the bowl of a stand mixer fitted with the paddle attachment, beat softened butter, granulated sugar, and brown sugar on medium speed for 3–4 minutes, until light, fluffy, and pale. Scrape down sides and bottom of bowl halfway through.
- Add eggs one at a time, beating on medium-low for 30 seconds after each addition until fully incorporated. Add vanilla and mix just until combined.
- In a separate medium bowl, whisk together flour, baking soda, and salt until no streaks remain. Sift once for best results.
- Reduce mixer speed to low. Gradually add dry ingredients in three additions, mixing only until no dry flour is visible—about 1 minute total. Do not overmix.
- Using a silicone spatula, gently fold in the chilled crushed cookies until evenly distributed—about 15–20 folds.
- Cover bowl tightly with plastic wrap and refrigerate for at least 2 hours—or up to 72 hours. For longer storage, portion dough into 40g (2-tbsp) balls, freeze on a tray for 1 hour, then transfer to freezer bags for up to 3 months.
- When ready to bake, preheat oven to 350°F (177°C) with racks in upper and lower thirds. Position one prepared baking sheet on each rack.
- Place 6–8 dough balls per sheet, spaced at least 2 inches apart. Bake for 11–13 minutes, rotating pans top-to-bottom and turning each ½ turn halfway through, until edges are golden and set and centers appear soft, puffed, and slightly shiny.
- Let cookies cool on baking sheets for exactly 5 minutes. Then, carefully transfer to wire racks to cool completely—20–25 minutes—before serving or storing.
FAQ
- Can I use melted butter instead of softened?
- No—melted butter produces flatter, greasier, less structured cookies with diminished chew. Softened butter is essential for proper creaming and aeration. If you accidentally melt it, chill the mixture for 20 minutes, then re-beat until creamy before proceeding.
- Why do my cookies spread too much?
- Most common causes: butter too warm, insufficient chilling, too little flour (scooping error), expired baking soda, or baking on warm/unlined sheets. Always chill dough ≥2 hours, use an oven thermometer, and line pans with parchment—not greased foil.
- Can I make these gluten-free?
- Yes—with caveats. Use a certified gluten-free 1:1 baking flour blend (e.g., King Arthur Measure for Measure or Bob’s Red Mill GF All-Purpose) and GF-certified chocolate sandwich cookies (e.g., Kinnikinnick or Nabisco’s GF Oreos®). Add 1 tsp xanthan gum if your blend doesn’t include it. Expect slightly more delicate, less chewy texture.
- How do I keep them soft for days?
- Store cooled cookies in an airtight container with a slice of plain white bread. Replace the bread every 48 hours. The cookies absorb ambient moisture from the bread, staying tender without becoming soggy. Avoid refrigeration—it accelerates staling.
- Can I substitute oil for butter?
- Not recommended. Oil lacks the emulsifying properties and water content of butter needed for proper structure, browning, and flavor development. Results will be greasy, cakey, and lacking in richness.
- Why are my cookie pieces turning green or gray?
- This is harmless oxidation of the cocoa in crushed cookies, accelerated by alkaline baking soda and moisture. It’s safe to eat but visually unappealing. Prevent it by chilling cookie pieces before folding in, avoiding overmixing, and ensuring your baking soda is fresh (test with vinegar).
- Can I add chocolate chips too?
- Absolutely! Fold in ½ cup mini semi-sweet or white chocolate chips along with the crushed cookies. Just reduce cookie pieces to 1 ¼ cups to maintain balance and prevent overcrowding.
- My dough is too crumbly—what went wrong?
- Most likely: too much flour (scooped vs. spooned), eggs too cold, or overmixed dry ingredients. Fix by adding 1 tsp room-temperature milk or cream and gently kneading by hand until cohesive. Chill 15 minutes before scooping.
- Can I bake from frozen dough?
- Yes! Place frozen dough balls on parchment-lined sheets and bake at 350°F for 12–14 minutes—no thawing needed. They’ll spread slightly less and have a denser, fudgier center.
- What’s the best way to crush cookies evenly?
- Use a food processor: pulse 5–6 times on low, shaking bowl between pulses. Or, place cookies in a double-layered zip-top bag and roll firmly with a rolling pin, lifting and rotating bag frequently. Stop when 80% of pieces are pea-sized to ¼-inch; sift out excess dust.
Summary
Cookies and Cream Cookies are a masterclass in joyful simplicity—where high-quality ingredients, precise technique, and patient chilling converge to create irresistibly soft, chewy, and crunchy treats bursting with nostalgic flavor. From their ice cream origins to modern bakery status, they remain a timeless canvas for creativity, comfort, and connection.
Whether you stick to the classic, explore browned butter elegance, go gluten-free, or stuff them with molten centers, every batch celebrates the magic of balance: sweet and salty, tender and crisp, familiar and extraordinary—all in one perfect, shareable bite.