Gluten-Free Pumpkin Cheesecake: A Decadent Fall Dessert for Everyone
There’s something undeniably magical about the rich, creamy texture of cheesecake combined with the warm, spiced essence of pumpkin. When you make it gluten-free, you open up this beloved dessert to a whole new audience—those with celiac disease, gluten sensitivity, or anyone simply choosing to reduce their gluten intake without sacrificing flavor. This Gluten-Free Pumpkin Cheesecake is not just a treat; it’s a celebration of seasonal flavors, dietary inclusivity, and culinary craftsmanship.
The History of Cheesecake and the Rise of Gluten-Free Baking
Cheesecake has ancient roots, dating back to Greece around 2000 BCE, where it was served to athletes during the first Olympic Games. Over centuries, the recipe traveled through Rome, Europe, and eventually evolved into the New York-style cheesecake we know today—a dense, velvety confection often baked in a springform pan with a graham cracker crust.
Pumpkin cheesecake emerged as a modern twist, particularly popular in North America during the autumn months. With the rise of gluten-related health concerns in the late 20th and early 21st centuries, demand for gluten-free alternatives surged. What began as a niche market has now blossomed into a full-fledged movement, with innovative bakers crafting recipes that rival—or even surpass—their traditional counterparts in taste and texture. This Gluten-Free Pumpkin Cheesecake stands proudly at the intersection of tradition and innovation.
Ingredients Breakdown: Why Each One Matters
Every ingredient in this recipe plays a crucial role in achieving the perfect balance of flavor, texture, and structure—all while remaining entirely gluten-free.
- Cream Cheese (Full-Fat): The star of any cheesecake, full-fat cream cheese ensures a rich, smooth consistency. Make sure it’s softened to room temperature to avoid lumps.
- Pumpkin Puree (Not Pumpkin Pie Filling): Use 100% pure canned pumpkin or homemade roasted pumpkin. Avoid pie filling, which contains added sugars and thickeners.
- Eggs: Act as a binder and help give the cheesecake its signature custard-like texture. Add them one at a time to prevent curdling.
- Granulated Sugar: Provides sweetness and helps with browning and texture. You can adjust the amount based on your preference or use coconut sugar for a lower glycemic option.
- Sour Cream or Heavy Cream: Adds moisture and tang, balancing the sweetness and enhancing creaminess.
- Vanilla Extract: Deepens the flavor profile and rounds out the spices.
- Pumpkin Pie Spice: A blend of cinnamon, nutmeg, ginger, cloves, and allspice—this is what gives the dessert its warm, autumnal character.
- Gluten-Free Graham Cracker Crumbs: For the crust, use certified gluten-free graham crackers or a blend of gluten-free oats, almond flour, and spices to mimic the traditional base.
- Butter (Unsalted): Binds the crust together and adds richness. Melted and mixed thoroughly with crumbs for even distribution.
- Almond Flour or Gluten-Free All-Purpose Flour (for crust variation): Helps stabilize the crust and prevent crumbling, especially if using alternative bases.
- Pinch of Salt: Enhances all other flavors and prevents the dessert from tasting flat.
Optional additions include a swirl of caramel, a dusting of powdered sugar, or a dollop of whipped cream made from coconut milk for a fully dairy-free version.
Step-by-Step Recipe: Crafting the Perfect Gluten-Free Pumpkin Cheesecake
Follow these detailed steps to create a flawless, restaurant-quality dessert that will impress guests and satisfy cravings.
Ingredients
For the Crust:
- 1 ½ cups gluten-free graham cracker crumbs (about 9–10 crackers)
- ¼ cup almond flour (optional, for added structure)
- ¼ cup granulated sugar
- ½ teaspoon ground cinnamon
- Pinch of salt
- 6 tablespoons unsalted butter, melted
For the Filling:
- 4 (8 oz) packages full-fat cream cheese, softened
- 1 cup granulated sugar
- 1 cup pure pumpkin puree (not pie filling)
- 4 large eggs, at room temperature
- 1 teaspoon vanilla extract
- 1 tablespoon cornstarch or arrowroot powder (helps prevent cracking)
- 1 ½ teaspoons pumpkin pie spice
- ¼ teaspoon salt
- ½ cup sour cream or heavy cream
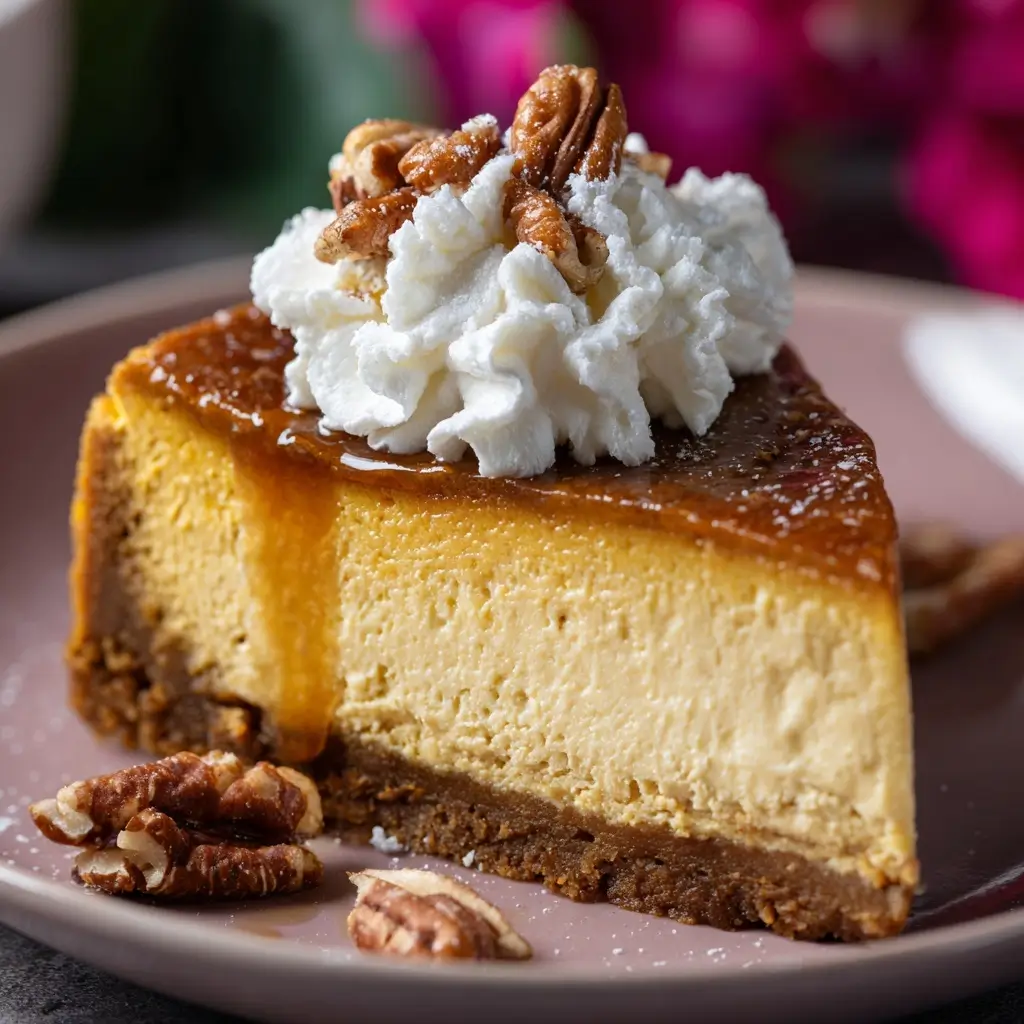
Optional Toppings:
- Whipped cream (dairy or coconut-based)
- Pecans or walnuts, toasted
- Caramel drizzle
- Dash of extra pumpkin pie spice
Directions
- Preheat Oven & Prepare Pan: Preheat your oven to 325°F (163°C). Grease a 9-inch springform pan thoroughly with butter or non-stick spray. For extra protection against leaks, wrap the outside bottom and sides of the pan with aluminum foil—this is especially important if using a water bath.
- Make the Crust: In a medium bowl, combine the gluten-free graham cracker crumbs, almond flour (if using), sugar, cinnamon, and salt. Pour in the melted butter and stir until the mixture resembles wet sand. Press firmly and evenly into the bottom of the prepared pan using the back of a spoon or a flat-bottomed glass. Bake for 10 minutes, then remove and let cool while you prepare the filling. Reduce oven temperature to 325°F if needed.
- Prepare Water Bath (Recommended): Fill a large roasting pan with about 1 inch of hot water. This creates steam and regulates temperature, preventing cracks. Place it on the lowest rack of your oven.
- Beat Cream Cheese: In a large mixing bowl or stand mixer fitted with a paddle attachment, beat the softened cream cheese on medium speed until smooth and creamy, about 2–3 minutes. Scrape down the sides frequently.
- Add Sugar and Mix: Gradually add the sugar and continue beating until well incorporated and fluffy, another 2 minutes.
- Incorporate Pumpkin and Wet Ingredients: Add the pumpkin puree, sour cream (or heavy cream), and vanilla extract. Mix on low until combined. Do not overmix at this stage.
- Add Spices and Cornstarch: Stir in the pumpkin pie spice, salt, and cornstarch. Mix just until uniform.
- Add Eggs One at a Time: Crack each egg into a separate small bowl (to avoid shell fragments), then add one at a time, mixing on low speed just until blended. Overmixing introduces air, which can lead to cracks. Stop as soon as each egg is incorporated.
- Pour Into Crust: Carefully pour the filling over the cooled crust. Tap the pan gently on the counter a few times to release any trapped air bubbles.
- Bake in Water Bath: Place the springform pan inside the roasting pan with hot water. The water should come about halfway up the sides of the springform. Carefully transfer to the oven.
- Bake for 70–85 Minutes: The cheesecake is done when the edges are set but the center still jiggles slightly when gently shaken. It will firm up as it cools. Avoid opening the oven door during baking to prevent temperature shock.
- Turn Off Oven & Cool Gradually: Once baked, turn off the oven and crack the door open with a wooden spoon. Let the cheesecake sit inside for 1 hour. This slow cooling process minimizes cracking.
- Chill Thoroughly: Remove from oven and water bath. Run a thin knife around the edge to loosen (prevents cracking as it contracts). Cool completely at room temperature, then refrigerate for at least 6 hours—preferably overnight—for optimal texture and clean slices.
- Serve: Carefully release the springform clamp. Transfer to a serving plate if desired. Top with whipped cream, nuts, or caramel before slicing with a hot, clean knife for smooth edges.
Tips for Success
- Room Temperature Ingredients: Cold cream cheese or eggs can cause lumps and uneven mixing. Take everything out 1–2 hours before baking.
- Avoid Overmixing: Mix only until ingredients are incorporated. Excess air leads to rising and cracking.
- Use a Water Bath: It’s the best way to ensure even heat distribution and a creamy texture. If you skip it, monitor closely and expect a slightly higher risk of cracks.
- Don’t Rush Cooling: Sudden temperature changes cause cracks. Let it cool slowly in the oven, then chill long enough in the fridge.
- Sharp Knife for Slicing: Dip a thin knife in hot water and wipe dry between cuts for clean, beautiful slices.
- Check Your Gluten-Free Crumbs: Not all “graham-style” crackers are gluten-free. Look for certified labels to ensure safety.
- Prevent Sticking: Lining the bottom with parchment paper makes removal easier and prevents sticking.
Variations and Customizations
This recipe is highly adaptable. Here are some creative twists:
- Dairy-Free Version: Use vegan cream cheese (like Kite Hill or Miyoko’s), coconut cream instead of sour cream, and plant-based butter. Ensure all ingredients are certified gluten-free.
- Low-Sugar or Keto Option: Replace sugar with erythritol or monk fruit sweetener. Use a keto-friendly crust made from almond flour, crushed pecans, and stevia.
- Chocolate Swirl: Melt ¼ cup dark chocolate and swirl into the batter before baking for a marbled effect.
- Nutty Crust: Replace graham crumbs with a mix of finely ground pecans, walnuts, and dates for a paleo-friendly base.
- Maple Infusion: Swap sugar for pure maple syrup and add an extra teaspoon of vanilla for deeper warmth.
- Mini Cheesecakes: Make individual servings in muffin tins lined with cupcake liners. Adjust baking time to 25–35 minutes.
- Spice Variations: Add cardamom, allspice, or orange zest for a unique aromatic profile.
Health Considerations and Nutritional Value
While this dessert is indulgent, it can be enjoyed mindfully. Here’s a breakdown per slice (assuming 12 servings):
- Calories: ~380–420
- Fat: 28–32g (mostly from cream cheese and butter)
- Saturated Fat: 16–18g
- Carbohydrates: 28–32g
- Sugars: 20–24g (natural and added)
- Protein: 7–9g
- Fiber: 1–2g (can increase with nut-based crusts)
- Sodium: ~380mg
Gluten-Free Benefits: Safe for individuals with celiac disease or gluten intolerance when using certified gluten-free ingredients.
Considerations:
- High in saturated fat and sugar—best enjoyed in moderation.
- Can be adapted for diabetic diets using sugar substitutes and monitoring portion size.
- Risk of cross-contamination if not using dedicated gluten-free tools and surfaces.
- Pumpkin adds vitamin A (beta-carotene), fiber, and antioxidants, boosting nutritional value slightly.
Frequently Asked Questions (FAQ)
Can I make this cheesecake ahead of time?
Yes! This cheesecake actually tastes better after chilling overnight. It can be stored in the refrigerator for up to 5 days.
Can I freeze gluten-free pumpkin cheesecake?
Absolutely. Wrap tightly in plastic and foil, then freeze for up to 2 months. Thaw in the refrigerator overnight before serving.
Why did my cheesecake crack?
Cracks are usually caused by overmixing, rapid temperature changes, or underbaking. Using a water bath and cooling slowly helps prevent this. If cracks occur, cover with whipped cream or caramel!
Can I use a different pan?
A 9-inch springform pan is ideal. If using a regular cake pan, line with parchment for easier removal. Avoid smaller pans—they’ll require longer baking and may not cook evenly.
Is pumpkin pie filling okay to use?
No. Pumpkin pie filling contains added sugar, spices, and thickeners that will throw off the recipe’s balance. Always use pure pumpkin puree.
How do I know when it’s done baking?
The edges should be set, and the center should jiggle slightly like Jell-O when gently shaken. It will firm up as it cools.
Can I make it without a water bath?
You can, but the risk of cracking increases. If skipping, place a pan of water on the rack below to add moisture to the oven.
Are there egg substitutes?
Eggs are essential for structure. Some have had limited success with flax eggs or commercial replacers, but texture may suffer. Not recommended for best results.
Summary
This Gluten-Free Pumpkin Cheesecake delivers all the creamy richness and spiced warmth of a classic dessert, now accessible to those avoiding gluten. With careful technique and quality ingredients, it’s a show-stopping centerpiece perfect for Thanksgiving, fall gatherings, or cozy nights in.