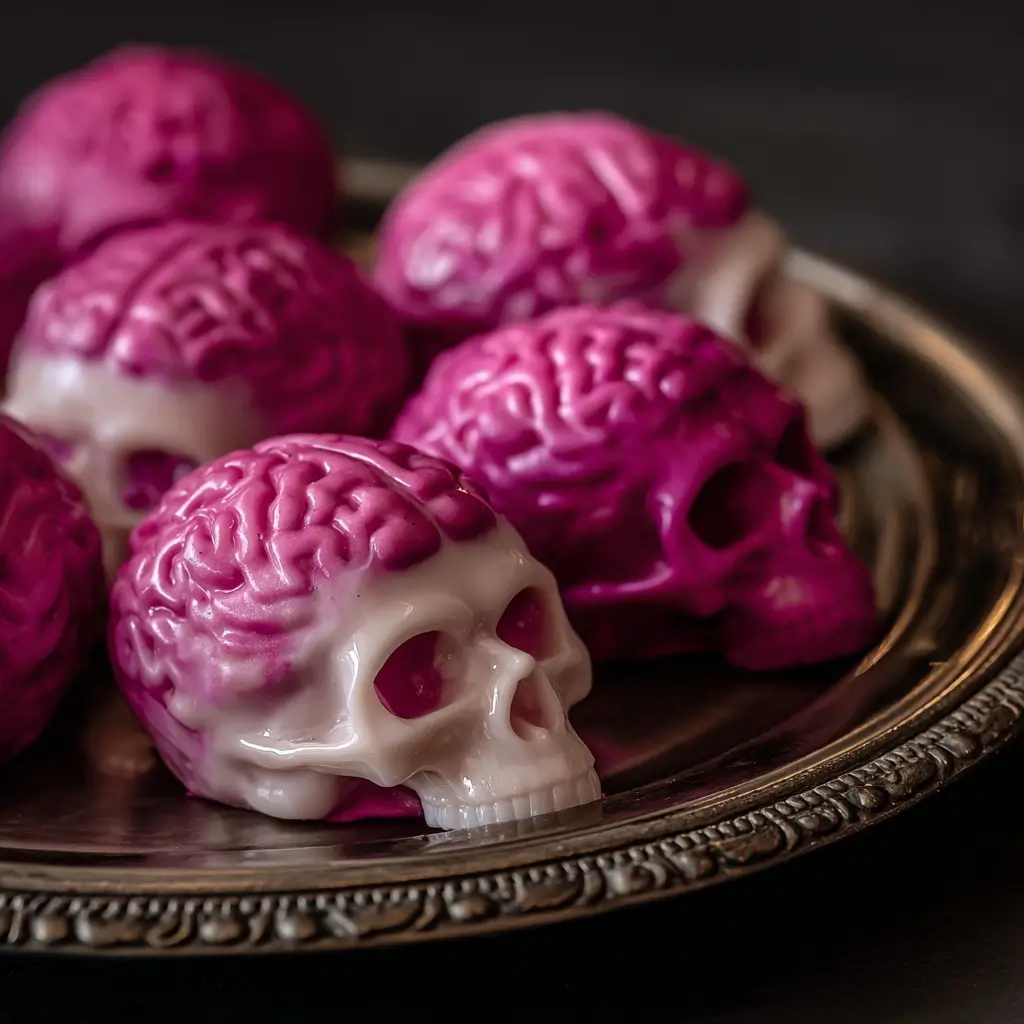
Pink Brain Mousse in White Chocolate Skulls is a hauntingly delicious dessert that combines macabre aesthetics with rich, creamy indulgence. Perfect for Halloween parties, themed events, or just a quirky culinary adventure, this dessert turns the gruesome into gourmet. With its vibrant pink mousse shaped like brains and encased in smooth white chocolate skulls, it’s as much a feast for the eyes as it is for the palate. In this comprehensive guide, we’ll dive deep into every aspect of creating this eerie yet elegant treat—from its fascinating origins to detailed preparation methods, variations, health considerations, and more.
The History
While there’s no ancient scroll documenting the first brain-shaped dessert, the concept of food mimicking human anatomy has roots in medieval European banquet culture, where illusion foods were popular among the nobility. These elaborate dishes aimed to astonish guests with unexpected forms—like pies that appeared to contain live birds or meats carved to resemble fantastical creatures. Fast forward to modern times, and the fusion of gothic themes with confectionery artistry reached new heights during the rise of Halloween as a global celebration. The idea of “brain” desserts emerged in the late 20th century, often made from molded gelatin or jellied meats at spooky dinner parties.
The Pink Brain Mousse in White Chocolate Skulls is a contemporary evolution of these traditions, blending avant-garde pastry techniques with seasonal festivity. Inspired by horror films, anatomical models, and the resurgence of molecular gastronomy, chefs and home bakers began experimenting with textures and molds to create realistic brain shapes using mousses and custards. The use of white chocolate skulls adds an extra layer of theatricality, turning each serving into a miniature work of edible art. Today, this dessert stands at the intersection of culinary skill, visual storytelling, and playful morbidity—a true hallmark of modern dessert innovation.
Ingredients Breakdown
To craft the perfect Pink Brain Mousse in White Chocolate Skulls, you’ll need two primary components: the white chocolate skull casing and the silky pink mousse filling. Each ingredient plays a crucial role in texture, flavor, stability, and appearance.
For the White Chocolate Skulls:
- White Chocolate (High-Quality): 500g – Must be couverture-grade for optimal shine, snap, and moldability. Contains cocoa butter, sugar, milk solids, and lecithin. Avoid brands with hydrogenated oils.
- Coconut Oil (Refined): 1–2 teaspoons – Enhances fluidity during molding and helps prevent blooming (white streaks) after setting.
- Edible Luster Dust (Optional): Silver or pearl finish – For a ghostly sheen on the finished skulls.
- Skull Silicone Mold: Food-grade, brain-sized cavities (approx. 3–4 inches). Flexible molds ensure clean release.
For the Pink Brain Mousse:
- Heavy Cream (Cold): 2 cups – Provides richness and volume when whipped. Should have at least 36% fat content.
- Sweetened Condensed Milk: 1 can (14 oz) – Adds sweetness, body, and stabilizes the mousse without requiring eggs.
- Gelatin Sheets or Powder: 2¼ teaspoons (1 packet) – Essential for structure and hold, especially important since the mousse must maintain shape inside the skull.
- Water (for Blooming Gelatin): ¼ cup – Used to activate powdered gelatin before mixing.
- Vanilla Extract: 1 teaspoon – Balances the sweetness and enhances overall flavor depth.
- Pink Food Coloring (Gel-Based): 4–6 drops – Gel colors are more concentrated and won’t dilute the mixture. Choose natural options if desired (e.g., beetroot powder).
- Fresh Berries (Pureed Optional): ½ cup strawberries or raspberries – Can be used to naturally tint and flavor the mousse.
- Lemon Juice (Optional): ½ teaspoon – Brightens the flavor and prevents oxidation if using fruit puree.
For Garnish & Presentation:
- Edible Glitter or Gold Leaf: For dramatic effect.
- Dry Ice (Used Safely): To create fog effects when serving.
- Black Velvet Tray or Coffin Box: Elevates presentation for themed events.
Step-by-Step Recipe
- Prepare the Skull Molds: Begin by cleaning and thoroughly drying your silicone skull molds. Wipe them with a lint-free cloth to avoid imperfections. Lightly coat the interior of each cavity with a thin layer of refined coconut oil using a small brush—this aids in demolding later.
- Melt the White Chocolate: Chop the white chocolate into uniform pieces for even melting. Use a double boiler: place a heatproof bowl over a saucepan with simmering (not boiling) water, ensuring the bottom of the bowl doesn’t touch the water. Add the chocolate and stir continuously until fully melted and smooth. Remove from heat and stir in 1–2 teaspoons of coconut oil to improve gloss and flexibility.
- Temper the Chocolate (Optional but Recommended): For professional results, temper the chocolate by cooling it to 82°F (28°C), then reheating to 86–88°F (30–31°C). This ensures a glossy finish and crisp snap. If not tempering, work quickly and chill immediately after pouring.
- Pour Into Molds: Carefully ladle the melted chocolate into each skull mold, filling about halfway. Tilt the mold gently to coat all inner surfaces evenly. Tap lightly on the counter to remove air bubbles. Allow to set at room temperature for 10 minutes, then refrigerate for 20 minutes until firm.
- Create Hollow Cavities: After the first layer hardens, repeat the process: pour another thin layer of chocolate to reinforce the shell. Chill again. Once fully set, carefully peel back the silicone mold to reveal delicate white chocolate skulls. Trim any excess edges with a sharp knife for a clean look.
- Bloom the Gelatin: In a small bowl, sprinkle gelatin over cold water and let sit for 5–7 minutes until it becomes spongy. Then, gently heat in the microwave for 10–15 seconds until completely liquefied. Set aside to cool slightly.
- Prepare the Mousse Base: In a large mixing bowl, combine sweetened condensed milk, vanilla extract, lemon juice (if using), and the dissolved gelatin. Whisk vigorously until smooth and well blended. Add pink food coloring drop by drop until the desired hue is achieved—aim for a vivid coral or magenta tone reminiscent of brain tissue.
- Incorporate Fruit Puree (Optional): If using berries, blend them into a smooth puree and strain through a fine sieve to remove seeds. Fold ¼ to ½ cup into the mousse base for natural color and subtle tartness.
- Whip the Cream: In a separate chilled bowl, whip the heavy cream until soft peaks form. Do not over-whip, or the mousse will become grainy.
- Fold Together: Gently fold the whipped cream into the pink mousse base in three additions, using a spatula with slow, sweeping motions to preserve airiness. The final mixture should be light, fluffy, and hold its shape.
- Fill the Skulls: Spoon the pink mousse into a piping bag fitted with a wide round tip. Carefully pipe the mousse into each hollow chocolate skull, starting from the center and working outward to mimic brain folds. Overfill slightly so the top can be smoothed flush with the skull rim.
- Chill Until Set: Place the filled skulls on a tray and refrigerate for at least 3 hours—or overnight—to allow the mousse to firm up completely.
- Final Touches: Before serving, optionally dust with edible silver luster powder using an airbrush or dry brush technique. Add tiny droplets of red gel food coloring to simulate blood vessels for ultra-realistic effect.
Tips
- Temperature Control is Key: Ensure all ingredients are at proper temperatures. Cold cream whips better; warm gelatin blends smoothly; chocolate should never exceed 90°F (32°C) to avoid seizing.
- Avoid Water Contact with Chocolate: Even a few drops can cause white chocolate to seize. Always use dry utensils and bowls.
- Use Gel Food Coloring: Liquid dyes add moisture and may weaken the mousse structure. Gel or paste colors offer intense pigmentation without altering consistency.
- Don’t Rush Chilling Steps: Proper chilling ensures clean unmolding and prevents collapse when filled.
- Freeze Skulls Briefly Before Filling: If handling is tricky, pop the empty shells in the freezer for 5 minutes to strengthen them before filling.
- Work Quickly When Filling: The mousse begins to set once gelatin cools. Prepare all equipment beforehand.
- Label Your Molds: Some skull molds have left/right orientation—mark them to ensure consistent placement.
Variations and Customizations
The beauty of Pink Brain Mousse in White Chocolate Skulls lies in its adaptability. Here are several creative twists to personalize your dessert:
- Flavor Swaps: Replace vanilla with rosewater, matcha, or lychee syrup for exotic flair. For a tangy kick, substitute part of the condensed milk with Greek yogurt (reduce gelatin slightly).
- Chocolate Alternatives: Use dark or ruby chocolate for the skull casing. Ruby chocolate offers a natural pink hue and berry-like taste.
- Alcohol Infusion: Add 1–2 tablespoons of raspberry liqueur, amaretto, or edible rose vodka to the mousse for an adult version.
- Dietary Modifications:
- Vegetarian: Use agar-agar instead of gelatin (use 1 tsp agar powder boiled for 5 mins).
- Vegan: Substitute with coconut cream, aquafaba-based mousse, and dairy-free white chocolate.
- Sugar-Free: Use sugar-free condensed milk alternative and stevia-sweetened chocolate.
- Multi-Layered Mousse: Create a “hemorrhaging brain” with layers: red jelly (strawberry + agar) beneath the pink mousse to simulate bleeding when cut open.
- Glow-in-the-Dark Effect: Use tonic water (under UV light) in a clear gel layer beneath the mousse for a sci-fi twist.
- Kid-Friendly Version: Make mini skulls and call them “Monster Brains.” Serve with gummy worms or candy eyes.
Health Considerations and Nutritional Value
While undeniably decadent, this dessert should be enjoyed in moderation due to its high sugar and fat content. Below is an approximate nutritional breakdown per serving (one skull, ~150g):
| Nutrient | Amount | % Daily Value (Based on 2,000 Cal Diet) |
|---|---|---|
| Calories | 380 kcal | 19% |
| Total Fat | 24g | 31% |
| Saturated Fat | 15g | 75% |
| Cholesterol | 45mg | 15% |
| Sodium | 85mg | 4% |
| Total Carbohydrates | 38g | 14% |
| Dietary Fiber | 1g | 4% |
| Sugars | 34g | — |
| Protein | 5g | 10% |
Key Notes:
- High in Saturated Fat: Primarily from white chocolate and heavy cream. Those monitoring heart health should limit intake.
- Sugar Content: Sweetened condensed milk and chocolate contribute significantly. Diabetics should consider sugar substitutes.
- Allergens: Contains dairy, soy (lecithin), and possibly nuts (check chocolate labels).
- Gelatin Source: Typically derived from pork or bovine collagen—unsuitable for vegetarians or certain religious diets unless specified halal/kosher.
- Calcium & Vitamins: Provides some calcium and vitamin A from dairy ingredients, though minimal given portion size.
Ingredients
White Chocolate Skulls:
500g high-quality white chocolate
1–2 tsp refined coconut oil
Food-grade skull silicone mold
Pink Brain Mousse:
2 cups cold heavy cream
1 (14 oz) can sweetened condensed milk
2¼ tsp unflavored gelatin powder (or 2 sheets leaf gelatin)
¼ cup cold water
1 tsp vanilla extract
4–6 drops pink gel food coloring (or ½ cup strained berry puree)
½ tsp lemon juice (optional)
Garnish (Optional):
Edible luster dust
Red gel food coloring for veins
Dry ice for presentation
Directions
- Lightly oil skull molds and set aside.
- Melt white chocolate using a double boiler; stir in coconut oil. Cool slightly.
- Pour chocolate into molds halfway, rotate to coat, tap out bubbles, chill 20 mins.
- Add second layer of chocolate, chill again until solid.
- Carefully unmold the hollow chocolate skulls; trim edges if needed.
- Bloom gelatin in cold water for 5–7 mins, then dissolve over low heat.
- In a bowl, mix condensed milk, vanilla, lemon juice, dissolved gelatin, and food coloring until smooth.
- If using, fold in berry puree.
- Whip heavy cream to soft peaks.
- Fold whipped cream into the pink base in three batches until uniform.
- Transfer mousse to a piping bag and fill each chocolate skull generously.
- Smooth tops and refrigerate for at least 3 hours or until fully set.
- Before serving, decorate with luster dust and red “veins” for realism.
- Serve chilled on a dramatic platter with optional fog effects.
FAQ
Q: Can I make the skulls ahead of time?
A: Yes! Empty chocolate skulls can be stored in an airtight container in the fridge for up to 2 weeks or frozen for 2 months. Thaw briefly before filling.
Q: Why did my chocolate crack or turn chalky?
A: This is called “blooming” and occurs due to temperature fluctuations or moisture. Store chocolates away from humidity and avoid rapid cooling.
Q: Can I use regular Jell-O instead of gelatin?
A: Not recommended. Jell-O contains added sugars and flavorings that alter texture and taste. Use plain gelatin for best results.
Q: How do I get the brain folds to look realistic?
A: Use a small spoon or toothpick to gently swirl the mousse surface before chilling. Study real brain images for reference.
Q: Is this dessert safe for kids?
A: Yes, but supervise young children due to choking hazards from chocolate shards. Consider making smaller, bite-sized versions.
Q: Can I freeze the filled skulls?
A: Not ideal—the mousse may weep upon thawing. Best kept refrigerated and consumed within 48 hours.
Q: Where can I buy skull molds?
A: Available online via baking supply stores (Amazon, Etsy, Wilton), kitchen specialty shops, or Halloween retailers. Look for FDA-approved silicone.
Summary
The Pink Brain Mousse in White Chocolate Skulls is a stunning fusion of culinary artistry and seasonal whimsy, delivering a luxuriously creamy mousse in a chillingly beautiful chocolate vessel. Perfect for Halloween or any occasion demanding bold presentation, this dessert proves that fear can be delicious.