Rainbow Drip Over Chalkboard Cake Design: A Vibrant Masterpiece
Introduction
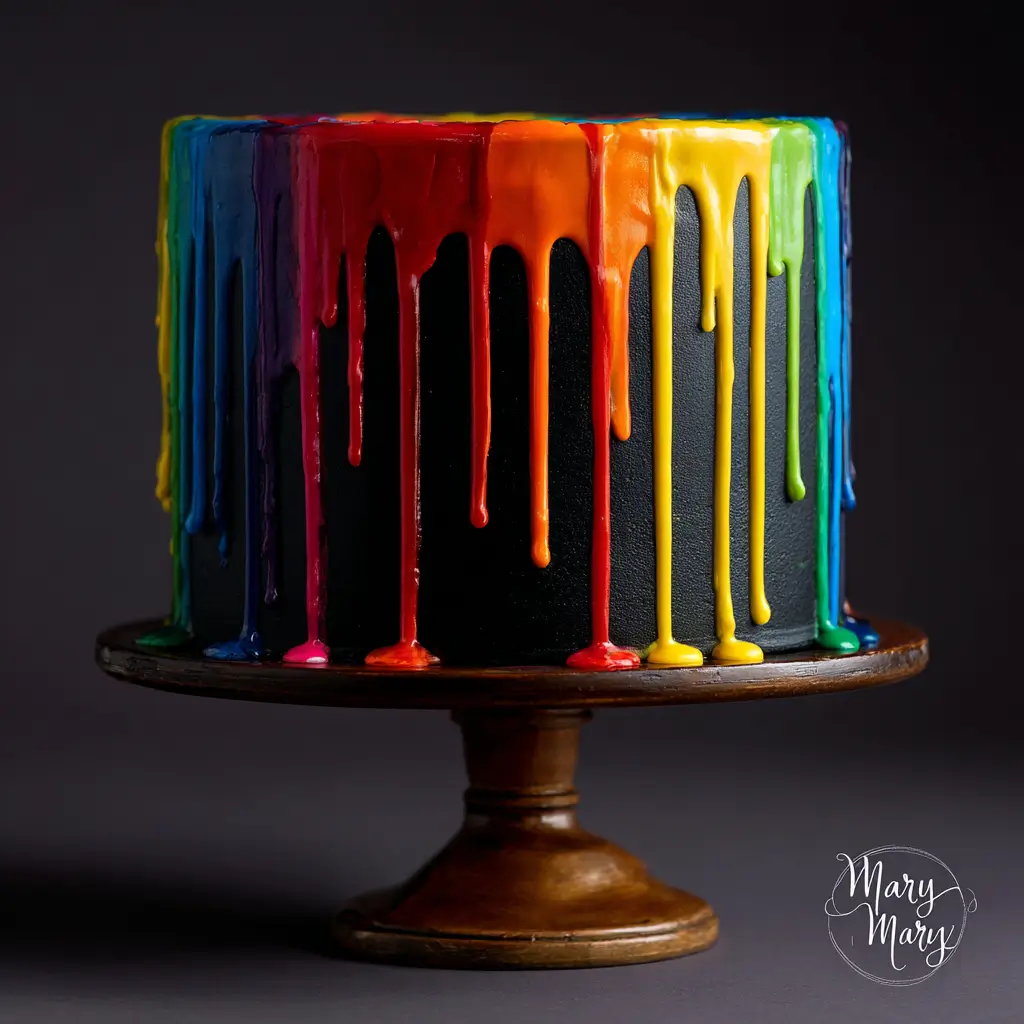
The Rainbow Drip Over Chalkboard Cake Design is more than just a dessert—it’s a celebration of color, creativity, and confectionery art. This stunning cake has taken the world of baking by storm, combining the edgy aesthetic of a chalkboard with the joyful explosion of rainbow hues cascading down its sides. Perfect for birthdays, pride events, baby showers, or any occasion that calls for a splash of fun, this cake is as photogenic as it is delicious. With its sleek black fondant base resembling a classroom chalkboard and vibrant drips of candy-colored ganache or glaze, the contrast is both dramatic and whimsical. Whether you’re a professional pastry chef or a passionate home baker, mastering this design will elevate your cake game to new artistic heights.
The History
The concept of the “chalkboard cake” originated in the early 2010s when bakers began experimenting with edible ink and black fondant to mimic the look of real chalkboards. These cakes often featured hand-drawn messages, doodles, or quotes using food-safe markers, creating a nostalgic, school-inspired theme. As social media platforms like Instagram and Pinterest popularized visually striking desserts, the chalkboard cake evolved into a canvas for greater creativity. Around 2017–2018, the fusion of chalkboard aesthetics with colorful drip cakes—popularized by French-style entremets and modern bakery trends—gave birth to the Rainbow Drip Over Chalkboard Cake. The juxtaposition of dark, matte black against bright, glossy colors became an instant favorite among influencers and bakers alike. Today, this design symbolizes bold self-expression and artistic flair in the world of contemporary cake decorating.
Ingredients Breakdown
Creating a Rainbow Drip Over Chalkboard Cake requires precision in both flavor and structure. Below is a comprehensive breakdown of the ingredients needed for each component:
For the Cake Base:
- 2 ½ cups (315g) all-purpose flour
- 2 ½ tsp baking powder
- ½ tsp salt
- 1 cup (226g) unsalted butter, softened
- 2 cups (400g) granulated sugar
- 4 large eggs, room temperature
- 1 tbsp pure vanilla extract
- 1 cup (240ml) whole milk, room temperature
For the Buttercream Frosting:
- 1 ½ cups (340g) unsalted butter, softened
- 6 cups (720g) powdered sugar, sifted
- ¼ tsp salt
- 2 tsp vanilla extract
- 3–4 tbsp heavy cream or milk
- Gel food coloring (black for chalkboard effect)
For the Rainbow Drip:
- 1 cup (240ml) white chocolate, finely chopped
- ⅓ cup (80ml) heavy cream
- 1–2 tbsp light corn syrup (for shine and fluidity)
- Gel food coloring in rainbow shades: red, orange, yellow, green, blue, purple
For Decoration:
- Edible chalk markers or food-safe paint brushes with luster dust
- Optional: sprinkles, edible glitter, fondant shapes
- Cake board or turntable for display
- Dowel rods (if stacking multiple tiers)
Step-by-Step Recipe
Step 1: Bake the Cake
- Preheat oven to 350°F (175°C). Grease and line three 8-inch round cake pans with parchment paper.
- In a bowl, whisk together flour, baking powder, and salt. Set aside.
- In a stand mixer, cream butter and sugar until light and fluffy (about 3–4 minutes).
- Add eggs one at a time, mixing well after each addition. Stir in vanilla.
- Alternately add dry ingredients and milk in three parts, beginning and ending with flour mixture. Mix until just combined.
- Divide batter evenly among pans and bake for 25–30 minutes, or until a toothpick comes out clean.
- Cool in pans for 10 minutes, then transfer to wire racks to cool completely.
Step 2: Prepare the Buttercream
- Beat butter until creamy. Gradually add powdered sugar, 1 cup at a time, mixing on low speed.
- Add salt, vanilla, and 3 tablespoons of cream. Beat on high for 3–4 minutes until fluffy.
- Tint the entire batch black using gel food coloring. Add sparingly to avoid thinning the frosting.
Step 3: Crumb Coat and Frost
- Level each cake layer with a serrated knife. Place the first layer on a cake board.
- Spread a layer of buttercream, top with the next layer, and repeat. Apply a thin crumb coat over the entire cake.
- Chill for 30 minutes to set the crumb coat, then apply a thick, smooth final coat of black buttercream.
- Use a bench scraper or offset spatula to create a perfectly smooth, matte finish resembling a chalkboard.
- Chill the cake again for at least 1 hour before adding the drip.
Step 4: Make the Rainbow Drip
- Heat cream until just simmering. Pour over white chocolate in a heatproof bowl. Let sit for 2 minutes, then stir until smooth.
- Stir in corn syrup for extra gloss and easier dripping.
- Divide the mixture into 6 small bowls. Tint each with a different gel food coloring to create the rainbow spectrum.
- Transfer each color to separate piping bags or squeeze bottles.
Step 5: Apply the Drip
- Remove the chilled cake from the refrigerator. Begin with the outer edge: snip a small hole in each piping bag.
- Squeeze each colored ganache along the top rim of the cake, allowing it to slowly drip down the sides at even intervals.
- Alternate colors to form a rainbow sequence. Work quickly before the mixture sets.
- Fill the center with remaining ganache or leave it open for decoration.
Step 6: Decorate the “Chalkboard” Surface
- Once the drip has set (about 15–20 minutes), use edible chalk markers to draw messages, doodles, or illustrations on the black surface.
- Popular designs include stars, rainbows, hearts, speech bubbles, or handwritten quotes.
- For added dimension, use a damp brush with edible luster dust to create shaded effects.
- Optionally, add sprinkles around the base or edible glitter to the wet drip for sparkle.
Tips
- Temperature Matters: Ensure your cake is fully chilled before applying the drip. Warm surfaces cause ganache to slide too quickly.
- Ganache Consistency: If the ganache is too thick, gently reheat; if too thin, let it cool slightly. Ideal texture should coat the back of a spoon.
- Color Vibrancy: Use high-quality gel or paste food coloring. Liquid dyes may alter consistency and fade in intensity.
- Smooth Finish: For a flawless black buttercream, use a heated bench scraper—wipe it with hot water and dry before smoothing.
- Work Clean: Wipe the cake board with a damp cloth after frosting to remove smudges and maintain a professional look.
- Storage: Keep the cake refrigerated until serving. Bring to room temperature 30 minutes before serving for best texture.
- Drawing Tips: Practice your chalkboard designs on parchment first. Less is more—keep the message simple and legible.
Variations and Customizations
- Theme-Based Designs: Adapt the chalkboard message for specific occasions—“Happy Birthday,” “Congratulations,” or “Love You” for weddings.
- Flavor Twists: Swap vanilla cake for chocolate, red velvet, or funfetti. Pair with complementary fillings like raspberry jam or cookie butter.
- Drip Alternatives: Use colored candy melts instead of chocolate ganache for brighter hues and faster setting.
- Gluten-Free/Vegan Options: Substitute with gluten-free flour blend and plant-based butter/milk for dietary needs.
- Two-Tone Drip: Combine pastel rainbow drips for baby showers or neon for energetic themes.
- 3D Elements: Add fondant clouds, rainbows, or letters on top for extra drama.
- Mini Versions: Create cupcakes with black frosting and mini rainbow drips for party favors.
- Interactive Cakes: Leave space for guests to “write” their own messages with edible markers during the event.
Health Considerations and Nutritional Value
While undeniably indulgent, the Rainbow Drip Over Chalkboard Cake can be adapted for various dietary preferences and health considerations. The traditional recipe is high in sugar, saturated fat, and calories due to butter, cream, and chocolate. A single slice (1/12 of an 8-inch cake) may contain approximately 450–550 calories, 25–30g of fat, and 50–60g of carbohydrates, primarily from refined sugars and flour.
To make a healthier version:
- Use a sugar substitute like erythritol or monk fruit in both cake and frosting.
- Replace half the butter with unsweetened applesauce or mashed banana to reduce fat.
- Opt for whole wheat pastry flour or almond flour for added fiber and nutrients.
- Use dark chocolate (70% or higher) in the drip for antioxidants and less sugar.
- Limit portion sizes and serve with fresh fruit or yogurt on the side.
Note: Food coloring, especially artificial gels, may affect sensitive individuals. Natural alternatives like beet juice (red), turmeric (yellow), or spirulina (blue/green) can be used, though they may affect taste and vibrancy.
Ingredients
- Cake: Flour, baking powder, salt, butter, sugar, eggs, vanilla, milk
- Frosting: Butter, powdered sugar, salt, vanilla, cream, black gel food coloring
- Drip: White chocolate, heavy cream, corn syrup, gel food colors (rainbow)
- Decor: Edible chalk markers, optional sprinkles or glitter
Directions
- Bake vanilla cake layers and cool completely.
- Prepare black buttercream and frost cake with a smooth, chilled finish.
- Make white chocolate ganache and divide into six portions.
- Tint each portion with rainbow gel colors.
- Apply colored ganache around the top edge of the chilled cake to create controlled drips.
- Once set, decorate the black surface with edible messages or drawings.
- Refrigerate until ready to serve. Slice and enjoy!
FAQ
- Can I make this cake ahead of time?
- Yes! Bake and frost the cake up to 2 days in advance. Store refrigerated. Add the drip and decorations the day of serving.
- How do I prevent the drip from running too far?
- Ensure the cake is cold and the ganache is slightly cooled but still pourable. Test one drip first to gauge consistency.
- Can I use store-bought frosting?
- You can, but homemade buttercream holds color better and offers a smoother texture. If using canned, choose a high-fat brand and tint carefully.
- Is the black frosting safe to eat?
- Yes, when made with food-grade gel coloring. Avoid excessive amounts to prevent bitterness.
- How long does the drip take to set?
- About 15–20 minutes at room temperature, faster if refrigerated.
- Can I freeze this cake?
- Freeze the unfrosted cake layers for up to 2 months. Assemble and decorate after thawing. Avoid freezing after the drip is applied.
- What tools do I need?
- Offset spatula, bench scraper, piping bags, squeeze bottles, cake turntable, mixing bowls, and edible markers.
Summary
The Rainbow Drip Over Chalkboard Cake Design blends artistic elegance with playful color, making it a show-stopping centerpiece for any festive occasion. With a velvety black buttercream base and cascading rainbow ganache drips, this cake is as unforgettable in taste as it is in visual impact.