Pastel Ombre Mint Chocolate Cake: A Dreamy, Elegant Dessert for Every Occasion
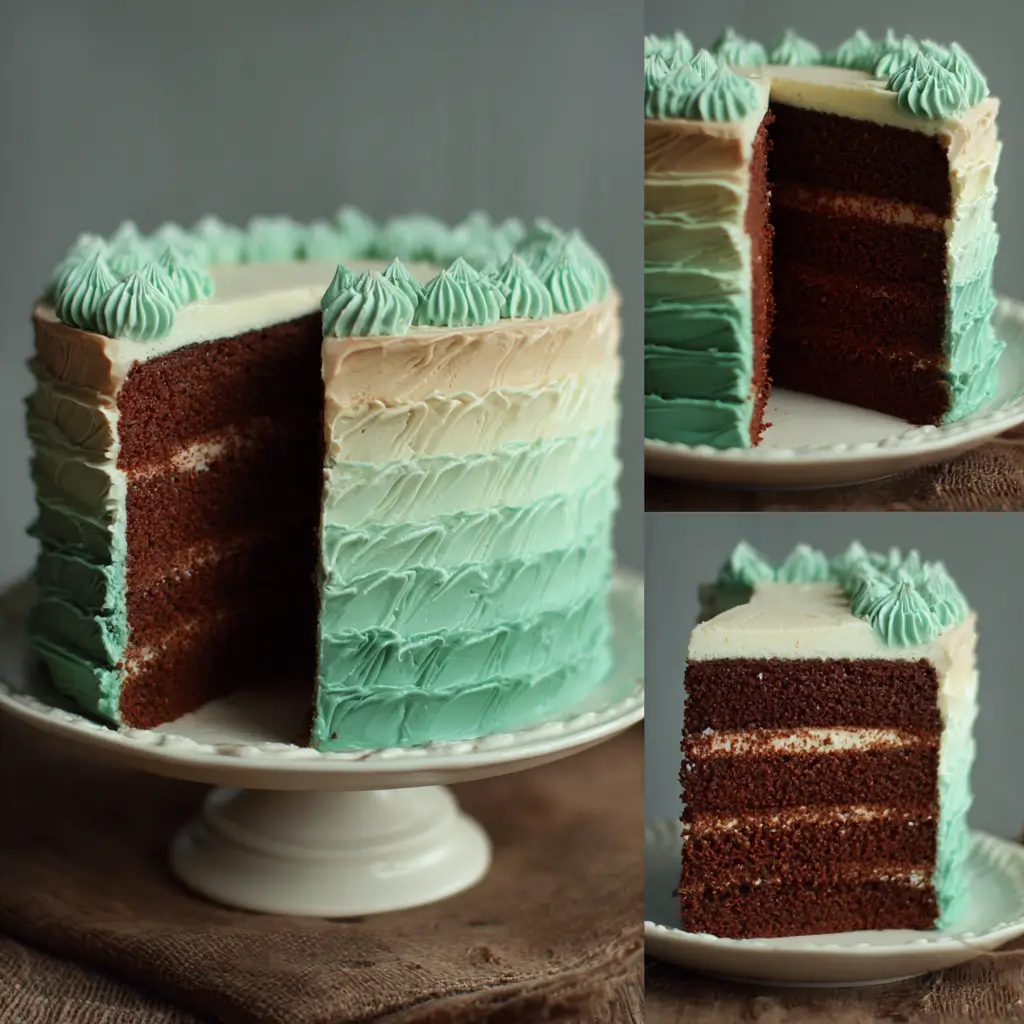
The Pastel Ombre Mint Chocolate Cake is more than just a dessert—it’s a visual masterpiece and a sensory delight. With its soft gradient of mint green hues melting into rich chocolate layers, this cake is as pleasing to the eye as it is to the palate. The delicate balance between cool mint and deep cocoa creates a flavor profile that’s refreshing yet indulgent, perfect for spring celebrations, bridal showers, birthday parties, or even as a show-stopping centerpiece during holiday gatherings. Whether you’re an experienced baker or trying your hand at ombre cakes for the first time, this guide will walk you through every step to create a stunning, bakery-quality cake in your own kitchen.
The History of the Ombre Cake and Mint Chocolate Pairing
Ombre cakes—cakes with a gradient color effect from dark to light—gained widespread popularity in the early 2010s as social media platforms like Pinterest and Instagram highlighted visually striking desserts. The technique originated from European patisserie traditions, where bakers experimented with color layering to mimic natural gradients found in sunsets and ocean waves. Over time, home bakers began adopting food coloring techniques to achieve seamless transitions across cake tiers.
The mint-chocolate combination, on the other hand, has roots going back over a century. Originally popularized by confectioners in the 19th century who infused peppermint into dark chocolate candies, the pairing became a staple in American baking by the mid-20th century. Think of classic mint chocolate chip ice cream or Andes mints—both testaments to the enduring love for this cool-sweet duo. Combining these two trends—the artistry of ombre design and the timeless appeal of mint chocolate—results in a modern classic: the Pastel Ombre Mint Chocolate Cake.
Ingredients Breakdown: What Makes This Cake So Special?
The magic of this cake lies not only in its appearance but also in the quality and harmony of its ingredients. Each component plays a vital role in texture, flavor, and structural integrity.
- All-Purpose Flour: Provides structure and stability to the cake layers. Sifted to ensure a light, airy crumb.
- Cocoa Powder (Unsweetened, Dutch-Process): Adds depth of chocolate flavor without acidity, giving a smooth, rich base that pairs beautifully with mint.
- Granulated Sugar: Sweetens while helping to aerate the batter during creaming, contributing to a tender texture.
- Baking Soda & Baking Powder: Work together to leaven the cake, ensuring each layer rises evenly and remains fluffy.
- Salt: Enhances all flavors and balances sweetness.
- Eggs (Large, Room Temperature): Bind the ingredients and add moisture and richness. Room temperature eggs incorporate better into the batter.
- Buttermilk: Adds tanginess and tenderness, reacting with leavening agents for a soft crumb.
- Vegetable Oil: Keeps the cake moist longer than butter alone would.
- Vanilla Extract: Deepens flavor complexity and rounds out the mint-chocolate profile.
- Hot Water or Coffee: Blooms the cocoa powder, intensifying chocolate flavor without making the cake taste like coffee.
- Peppermint Extract (Pure, Not Imitation): The star of the show—provides authentic mint flavor. Use sparingly to avoid bitterness.
- Gel Food Coloring (Mint Green/Pastel Green Series): Essential for achieving the ombre effect without altering batter consistency. Liquid colors dilute the mix too much.
- Unsalted Butter & Cream Cheese (for Frosting): Form the base of the silky smooth frosting, balancing tanginess and richness.
- Powdered Sugar (Confectioners’ Sugar): Sweetens and thickens the frosting to pipeable perfection.
- Heavy Cream or Milk (as needed): Adjusts frosting consistency for spreading and piping.
Step-by-Step Recipe: How to Make a Pastel Ombre Mint Chocolate Cake
Making an ombre cake may seem intimidating, but with patience and attention to detail, anyone can master it. Follow these steps carefully to achieve professional results.
Ingredients You’ll Need:
- 2 ½ cups (315g) all-purpose flour
- 1 ¾ cups (350g) granulated sugar
- ¾ cup (75g) unsweetened Dutch-process cocoa powder
- 1 ½ tsp baking soda
- 1 ½ tsp baking powder
- 1 tsp salt
- 3 large eggs, room temperature
- 1 cup (240ml) buttermilk, room temperature
- ½ cup (120ml) vegetable oil
- 2 tsp pure vanilla extract
- 1 tsp pure peppermint extract (adjust to taste)
- 1 cup (240ml) hot brewed coffee or hot water
- Gel food coloring in varying shades: white, pale mint, soft mint, medium mint, deep mint (or custom mix)
Frosting Ingredients:
- 2 cups (450g) unsalted butter, softened
- 16 oz (450g) full-fat cream cheese, softened
- 8 cups (960g) powdered sugar, sifted
- 2 tsp vanilla extract
- 1 tsp peppermint extract
- 2–4 tbsp heavy cream or whole milk
- Pastel green gel food coloring (optional, for tinted frosting)
Equipment Needed:
- Five 6-inch round cake pans (or three 8-inch if preferred)
- Parchment paper
- Mixing bowls (at least 5 small ones for ombre layers)
- Stand mixer or hand mixer
- Spatulas
- Cooling racks
- Offset spatula and bench scraper
- Piping bags and tips (optional for decoration)
- Cake turntable (highly recommended)
Directions:
- Preheat & Prepare: Preheat oven to 350°F (175°C). Grease and line five 6-inch round cake pans with parchment paper. For taller layers, use three 8-inch pans and divide batter accordingly.
- Dry Ingredients: In a large bowl, whisk together flour, sugar, cocoa powder, baking soda, baking powder, and salt until no lumps remain.
- Wet Ingredients: In another bowl, beat eggs lightly. Add buttermilk, oil, vanilla, and peppermint extract. Mix until combined.
- Combine: Gradually add wet ingredients to dry, mixing on low speed until just incorporated. Do not overmix.
- Add Coffee: Slowly pour in hot coffee while mixing on low. The batter will be thin—this is normal and ensures a moist crumb after baking.
- Divide Batter: Transfer equal portions of batter into five separate bowls (about 1 to 1.2 cups per bowl).
- Create Ombre Effect: Leave one bowl uncolored (darkest layer due to cocoa). In the next, add a tiny drop of pastel green gel coloring and mix well. Continue adding increasing amounts of green to each subsequent bowl, creating a gradient from dark brown to light mint green. Label them from darkest to lightest.
- Fill Pans: Pour each colored batter into its own prepared pan, starting with the darkest (no green) and ending with the lightest (most green).
- Bake: Place pans in the center of the oven. Bake for 25–30 minutes (6-inch pans) or 30–35 minutes (8-inch), or until a toothpick inserted comes out clean. Rotate pans halfway through for even baking.
- Cool Completely: Let cakes cool in pans for 10 minutes, then transfer to wire racks. Remove parchment and allow to cool completely—preferably overnight wrapped in plastic wrap to lock in moisture.
- Make Frosting: Beat butter and cream cheese until smooth and creamy (about 3 mins). Gradually add powdered sugar, one cup at a time, mixing on low. Add extracts and 2 tbsp cream. Beat on high for 2–3 minutes until fluffy. Add more cream if too thick; more sugar if too thin. Optional: tint outer frosting with a hint of mint green.
- Level Cakes: Use a serrated knife or cake leveler to flatten any domed tops for stable stacking.
- Stack the Cake: Place the darkest layer (no green) on a cake board or turntable. Spread a layer of frosting. Repeat with each progressively lighter layer, placing the palest (lightest green) on top.
- Crumbs Coat (Crumb Coat): Apply a thin layer of frosting over the entire cake to seal in crumbs. Chill in the refrigerator for 20–30 minutes.
- Final Frosting: Apply a generous final coat of frosting. Use an offset spatula and bench scraper to achieve smooth sides. Swirl the top creatively.
- Ombre Effect on Exterior (Optional): Tint small batches of leftover frosting in gradient shades. Pipe horizontal bands around the side of the cake and blend upward with a palette knife for an exterior ombre finish.
- Decorate: Top with chocolate shavings, fresh mint leaves, edible pearls, or white chocolate curls for elegance.
- Chill Before Serving: Refrigerate for at least 1 hour to set the frosting and enhance flavor harmony.
Tips for Success
- Use Gel Food Coloring: Liquid dyes won’t give you vibrant color without thinning the batter. Wilton, Americolor, or Chefmaster gels are ideal.
- Room Temperature Ingredients: Ensures smooth emulsification and even rising.
- Don’t Overmix After Adding Flour: Overmixing develops gluten, leading to a dense cake.
- Weigh Ingredients: For accuracy, especially flour and sugar. Volume measurements can vary.
- Color Intensity Varies: Test colors on a plate before adding to batter. Some brands are stronger than others.
- Chill Layers Before Stacking: Cold layers are less likely to slide or crack when frosted.
- Patience with Crumb Coat: A clean crumb coat is essential for a polished final look.
- Rotate While Smoothing: Use a turntable and apply even pressure with the bench scraper for flawless sides.
- Adjust Mint Flavor: Start with 1 tsp peppermint extract. If desired, increase slightly—but too much can taste medicinal.
- Storage Tip: Keep leftovers covered in the fridge for up to 5 days. Bring to room temperature before serving for best texture.
Variations and Customizations
This cake is highly adaptable to suit dietary needs, flavor preferences, and seasonal themes.
- Gluten-Free Version: Substitute all-purpose flour with a 1:1 gluten-free baking blend (like Bob’s Red Mill). Ensure cocoa powder and other ingredients are certified GF.
- Dairy-Free Option: Use plant-based butter, dairy-free cream cheese (e.g., Kite Hill), almond or oat milk instead of buttermilk (add 1 tsp vinegar to make “buttermilk”), and coconut oil instead of vegetable oil.
- Vegan Adaptation: Replace eggs with flax eggs (1 tbsp ground flax + 3 tbsp water per egg), use dairy-free alternatives, and ensure sugar is vegan-certified.
- Flavor Twists: Swap peppermint for spearmint, add a hint of vanilla bean, or infuse the buttermilk with fresh mint leaves (steep and strain before using).
- Filling Variations: Add layers of mint ganache, chocolate fudge, whipped mint cream, or crushed Andes mints between cake layers.
- Shape & Size: Make cupcakes with ombre batter swirls, or bake in sheet pans for a party-sized version.
- Color Themes: Adapt the ombre for other occasions—lavender for Easter, blush pink for weddings, or baby blue for gender reveals.
- Alcohol Infusion: Brush layers with chocolate mint liqueur (like After Eight) or espresso-mint simple syrup for adult versions.
Health Considerations and Nutritional Value
While undeniably decadent, this cake can be enjoyed mindfully. Here’s what you should know:
- Calories: One slice (1/12 of an 8-inch cake) contains approximately 450–520 calories, depending on frosting thickness and portion size.
- Fat Content: Around 25–30g per slice, mostly from butter, cream cheese, and oil. Opt for reduced-fat cream cheese to lower saturated fat (though texture may suffer).
- Sugar Levels: High due to both cake and frosting (~45–55g per slice). Consider using monk fruit-sweetened powdered sugar alternatives for a lower glycemic option.
- Caffeine: Minimal from cocoa and optional coffee—less than 10mg per slice, generally safe for most.
- Mint Benefits: Peppermint may aid digestion and soothe nausea, though the amount here is flavor-focused rather than therapeutic.
- Allergens: Contains eggs, dairy, wheat, and soy (in most commercial cocoa powders and chocolates). Always check labels if serving those with allergies.
- Portion Control: Serve smaller slices with berries or fruit compote to balance richness.
- Occasional Treat: Best enjoyed in moderation as part of a balanced diet.
Frequently Asked Questions (FAQ)
Can I make this cake ahead of time?
Yes! Bake and frost the cake up to 2 days in advance. Store refrigerated, covered. Decorate the day of serving for freshness.
Why did my ombre layers bleed into each other?
This happens if the previous layer isn’t fully cooled or if you press too hard when stacking. Chill each layer before adding the next.
Can I use boxed chocolate cake mix?
You can, but homemade yields better texture and control over flavor. If using a mix, enhance it with extra cocoa, buttermilk, and espresso powder.
How do I transport this cake?
Use a sturdy cake box with non-slip padding. Keep refrigerated until departure and chill upon arrival. Avoid heat and direct sunlight.
My frosting is too runny. What went wrong?
Too much liquid or under-beating. Chill the frosting for 15–20 minutes, then re-whip. Add more powdered sugar if needed.
Can I freeze the cake layers?
Absolutely. Wrap unfrosted layers tightly in plastic and foil. Freeze for up to 3 months. Thaw in the fridge overnight before frosting.
Is there a way to reduce sweetness?
Reduce powdered sugar in frosting by 1–2 cups and add more cream cheese for tang. Use dark chocolate shavings on top to contrast sweetness.
What can I use instead of buttermilk?
Mix 1 cup milk with 1 tbsp lemon juice or vinegar. Let sit 5–10 minutes until curdled. Works perfectly as a substitute.
Can I make this cake without food coloring?
Yes, but you’ll lose the ombre effect. The cake will still taste delicious with mint-chocolate flavor, just without the visual drama.
How tall will the cake be?
With five 6-inch layers, expect about 6–7 inches tall. Three 8-inch layers will be slightly shorter but wider.
Summary
The Pastel Ombre Mint Chocolate Cake combines elegant gradient aesthetics with the beloved mint-chocolate flavor in a moist, tender crumb and luxuriously creamy frosting. A celebration-worthy dessert that impresses guests and delights the senses with every bite.