Pastel Ombre Marble Cake: A Delicate Symphony of Color and Flavor
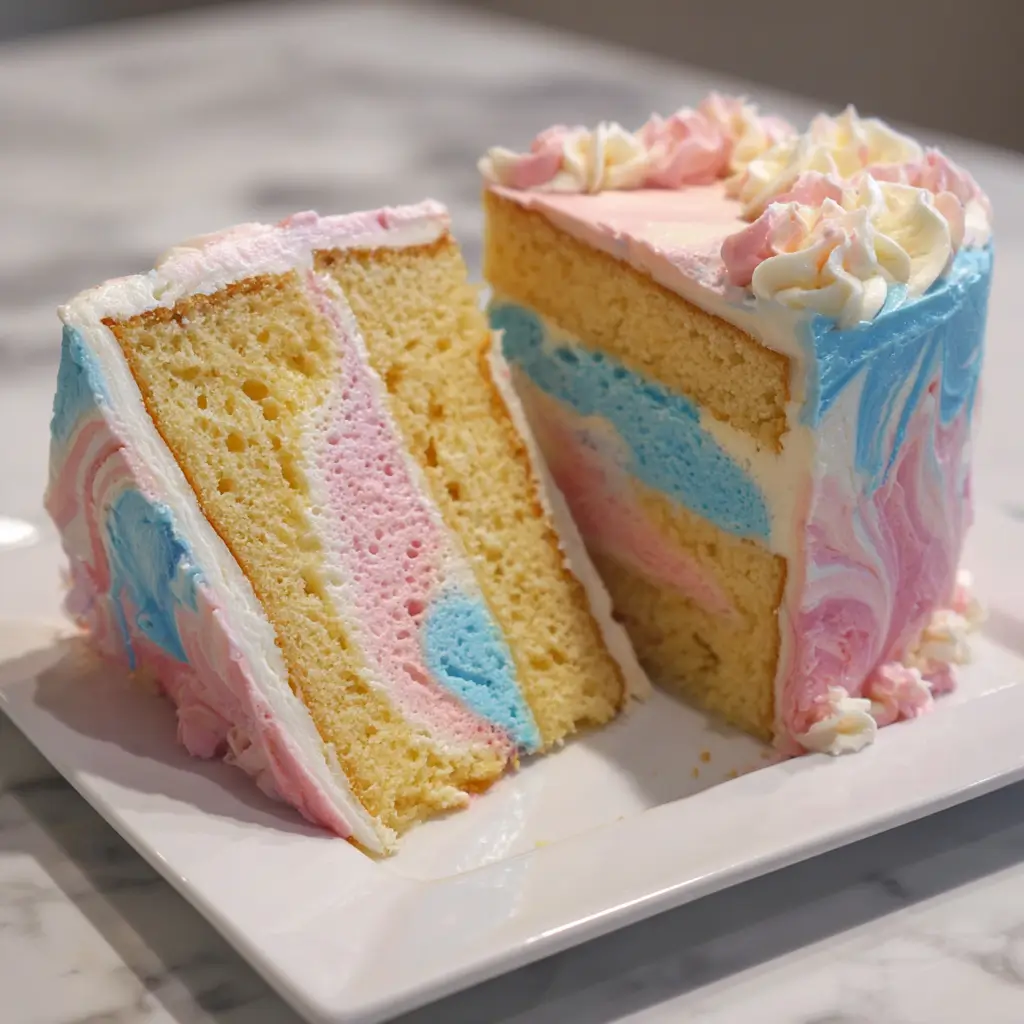
The Pastel Ombre Marble Cake is more than just a dessert—it’s a visual masterpiece that dances on the edge of art and confectionery. With its soft gradient of pastel hues swirled into a delicate marble pattern, this cake is often the centerpiece at celebrations ranging from baby showers to spring weddings. Its luxurious appearance belies a surprisingly approachable recipe, making it a favorite among home bakers who want to impress without spending hours in the kitchen. But beyond its beauty lies a tender, moist crumb infused with vanilla richness and a hint of elegance that lingers with every bite.
The History of the Ombre Marble Cake
While marble cakes have been around since the 19th century—originally created by swirling chocolate and vanilla batters to create a marbled effect—the modern ombre variation is a relatively recent innovation, emerging in the early 2010s alongside the rise of social media platforms like Pinterest and Instagram. Bakers began experimenting with color gradients, inspired by fashion, interior design, and even sunsets, leading to the creation of ombre cakes where shades transition smoothly from light to dark. The Pastel Ombre Marble Cake takes this trend a step further by combining the smooth color fade of an ombre cake with the classic swirl of a marble cake, using soft pastel tones like blush pink, lavender, mint green, and buttery yellow. This fusion reflects a broader movement in baking toward edible artistry, where cakes are not only delicious but also designed to evoke emotion and wonder.
Ingredients Breakdown: Crafting the Perfect Base
The foundation of any great cake is its ingredients, and the Pastel Ombre Marble Cake relies on a balanced blend of quality components to achieve both flavor and structure. Here’s a detailed breakdown:
- All-Purpose Flour: Provides the necessary gluten structure for a soft yet stable crumb. Sifted to prevent lumps and ensure even distribution.
- Granulated Sugar: Sweetens the cake while aiding in moisture retention and contributing to a fine texture.
- Baking Powder & Baking Soda: Work together as leavening agents. Baking powder gives initial lift, while baking soda reacts with buttermilk for additional rise and tenderness.
- Salt: Enhances flavor and balances sweetness.
- Unsalted Butter: Adds richness and helps create a velvety crumb. Must be softened to room temperature for proper creaming.
- Eggs: Provide structure, moisture, and emulsification. Large eggs are standard for consistent results.
- Vanilla Extract: High-quality pure extract enhances the overall flavor profile with warm, floral notes.
- Buttermilk: Adds tanginess and acidity, which reacts with baking soda to create a tender, moist texture. Can be substituted with DIY versions (milk + vinegar) if needed.
- Gel Food Coloring (Pastel Shades): Unlike liquid dyes, gel colors provide vibrant hues without altering batter consistency. Soft pinks, blues, lavenders, mint greens, and pale yellows are ideal for the pastel palette.
- Vegetable Oil (optional): Sometimes added in small amounts to increase moisture and prolong shelf life.
Each ingredient plays a vital role, and precise measurements are key to achieving the perfect balance between structure, moisture, and flavor.
Step-by-Step Recipe: Creating the Masterpiece
Now, let’s walk through the process of making your own stunning Pastel Ombre Marble Cake. This version yields a three-layer 8-inch cake, perfect for 12–16 servings.
Ingredients
- 3 cups (360g) all-purpose flour, sifted
- 2 ½ cups (500g) granulated sugar
- 2 ½ tsp baking powder
- ½ tsp baking soda
- 1 tsp salt
- 1 cup (2 sticks / 226g) unsalted butter, softened
- 4 large eggs, room temperature
- 1 tbsp pure vanilla extract
- 1 ¼ cups (300ml) buttermilk, room temperature
- 1 tsp vegetable oil (optional, for moisture)
- Gel food coloring in pastel shades (pink, blue, lavender, mint, yellow)
Directions
- Preheat & Prepare: Preheat oven to 350°F (175°C). Grease and line three 8-inch round cake pans with parchment paper. Lightly dust with flour or non-stick spray.
- Mix Dry Ingredients: In a medium bowl, whisk together flour, sugar, baking powder, baking soda, and salt. Set aside.
- Cream Butter & Sugar: In a large mixing bowl, beat softened butter on medium speed until creamy (about 1 minute). Gradually add sugar and beat on high for 3–4 minutes until light and fluffy.
- Add Eggs & Vanilla: Add eggs one at a time, mixing well after each. Scrape down the bowl as needed. Mix in vanilla extract.
- Combine Wet & Dry: On low speed, alternate adding the dry ingredients and buttermilk in three parts, beginning and ending with dry mix. Mix just until combined. Do not overmix. Stir in vegetable oil if using.
- Divide Batter: Divide the batter evenly into five separate bowls (use a kitchen scale for precision).
- Color the Batter: Add a small amount of gel food coloring to each bowl, creating a gradient from light to dark. For example:
- Bowl 1: Barely tinted (almost white)
- Bowl 2: Light pink
- Bowl 3: Medium lavender
- Bowl 4: Soft mint green
- Bowl 5: Pale buttercup yellow
Mix gently to avoid deflating the batter.
- Create Marble Effect: Spoon each colored batter into the prepared pans, layering them randomly. Use a skewer or butter knife to gently swirl the colors in a circular motion—don’t over-swirl, or the ombre effect will be lost.
- Bake: Place pans in the center of the oven. Bake for 25–30 minutes, or until a toothpick inserted in the center comes out clean. Rotate pans halfway through for even baking.
- Cool: Let cakes cool in pans for 10 minutes, then turn out onto wire racks to cool completely before frosting.
Tips for Success
- Room Temperature Ingredients: Ensure butter, eggs, and buttermilk are at room temperature to create a smooth, emulsified batter.
- Weigh Your Batter: For perfectly even layers, use a kitchen scale to divide the batter equally among the pans.
- Use Gel Colors: Liquid food coloring can thin the batter and dilute flavor. Gel colors are concentrated and won’t affect texture.
- Don’t Over-Swirl: The goal is a subtle marble effect, not a tie-dye mess. Swirl gently and sparingly.
- Even Oven Heat: Use an oven thermometer to ensure accurate temperature. Hot spots can cause uneven rising or browning.
- Cool Completely: Never frost a warm cake—it will melt the frosting and cause sliding.
- Chill Before Frosting: For cleaner layers, chill cake rounds for 15–20 minutes before assembling.
Variations and Customizations
The beauty of the Pastel Ombre Marble Cake lies in its versatility. Here are some creative ways to personalize it:
- Flavor Twists: Replace vanilla with almond, lemon, or coconut extract for a unique twist. Add lemon zest for brightness.
- Chocolate Version: Substitute ½ cup of flour with cocoa powder in one portion of the batter for a chocolate-pastel hybrid.
- Seasonal Themes: Use Easter-inspired colors (peach, sky blue, mint), or autumn pastels (dusty rose, sage, cream).
- Filling Options: Layer with raspberry jam, lemon curd, or Swiss meringue buttercream for added complexity.
- Gluten-Free: Use a 1:1 gluten-free flour blend. Add xanthan gum if not included.
- Vegan Option: Substitute butter with vegan margarine, eggs with flax eggs (1 tbsp ground flax + 3 tbsp water per egg), and buttermilk with plant-based milk + vinegar.
- Kid-Friendly: Use funfetti batter in one layer or sprinkle edible pearls for extra sparkle.
Health Considerations and Nutritional Value
While undeniably indulgent, the Pastel Ombre Marble Cake can be adapted to suit various dietary needs:
- Calorie Content: One slice (1/12 of cake) contains approximately 350–400 calories, depending on frosting.
- Sugar Reduction: Reduce sugar by ¼ cup with minimal impact on texture, or use a monk fruit blend for lower glycemic impact.
- Dairy-Free: Use plant-based butter and milk alternatives.
- Egg Substitutes: Commercial egg replacers work well in cakes for binding and moisture.
- Whole Wheat Option: Replace up to half the flour with whole wheat pastry flour for added fiber, though the crumb will be denser.
- Portion Control: Serve smaller slices with fresh berries to balance sweetness.
Remember, this cake is meant for celebration—enjoy it mindfully and savor every colorful bite.
FAQ (Frequently Asked Questions)
Can I make this cake ahead of time?
Yes! Bake and cool the layers up to two days in advance. Wrap tightly in plastic and store at room temperature, or freeze for up to a month.
Can I use liquid food coloring?
It’s not recommended. Liquid coloring adds excess moisture and may alter texture. Gel or paste colors are best.
Why did my cake sink in the middle?
Possible causes: underbaking, opening the oven too early, inaccurate measurements, or expired leavening agents.
How do I store the finished cake?
Cover and store at room temperature for 2–3 days, or refrigerate for up to 5 days. Bring to room temperature before serving for best texture.
Can I bake this as a sheet cake?
Absolutely. Use a 9×13 inch pan and bake for 35–40 minutes. Adjust swirling technique accordingly.
What frosting pairs best with this cake?
Classic vanilla buttercream, cream cheese frosting, or Swiss meringue buttercream all complement the flavors beautifully. Tint frosting to match the pastel theme for a cohesive look.
Summary
The Pastel Ombre Marble Cake blends the elegance of a gradient ombre design with the timeless charm of a marble swirl, resulting in a show-stopping dessert that’s as delicious as it is photogenic. With careful layering, soft pastel hues, and a tender vanilla crumb, this cake is sure to become a signature centerpiece for any joyful occasion.