Pastel Ombre Chocolate Layer Cake: A Dreamy, Elegant Dessert for Every Occasion
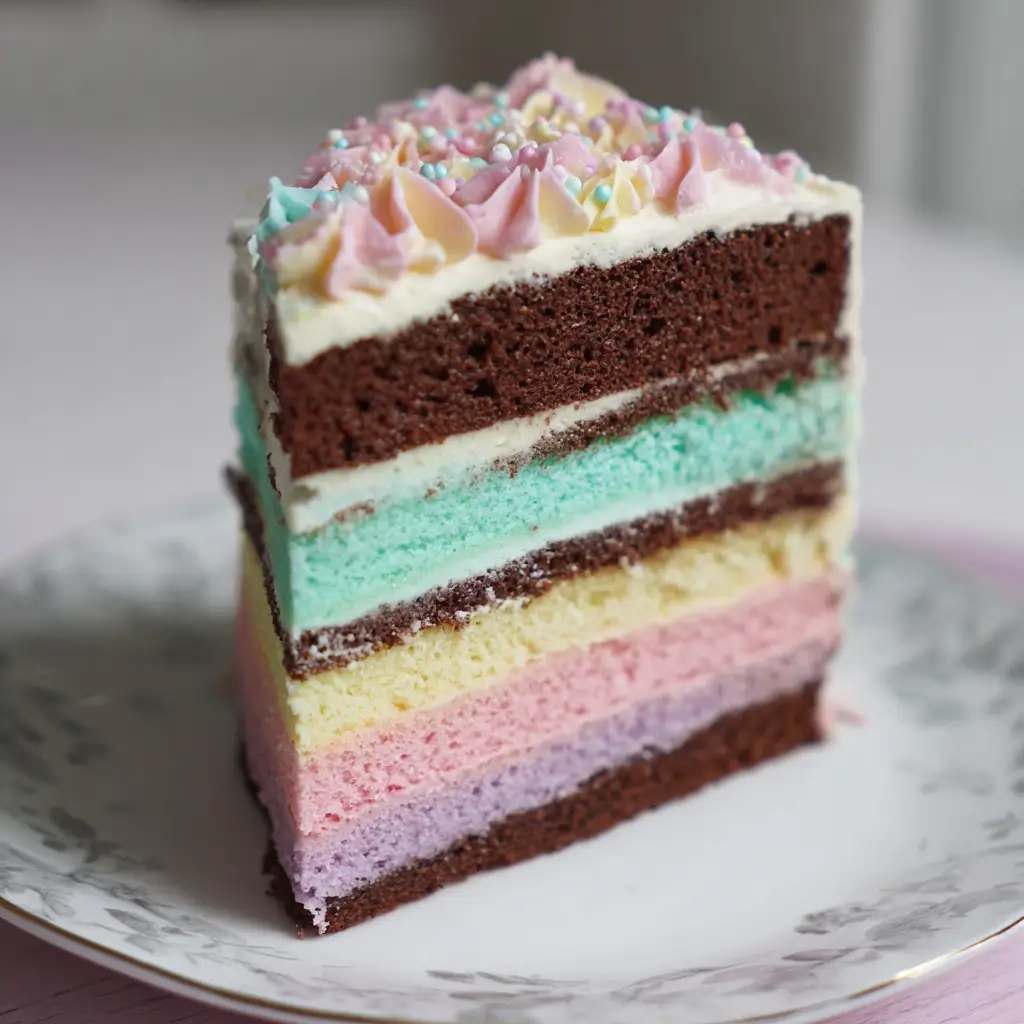
The Pastel Ombre Chocolate Layer Cake is a visual masterpiece and a decadent treat that combines the rich depth of chocolate with the soft elegance of pastel hues. This cake isn’t just about taste—it’s an edible work of art, perfect for birthdays, bridal showers, baby showers, anniversaries, or any celebration where you want to impress. With its smooth gradient layers transitioning from light to deep chocolate tones, this cake captivates attention before the first bite even hits your palate. But beyond its stunning appearance lies a deeply moist, tender crumb infused with high-quality cocoa and balanced sweetness. Whether you’re an experienced baker or an ambitious beginner, this comprehensive guide will walk you through every step of creating this show-stopping dessert, from understanding its origins to mastering the ombre technique, customizing flavors, and ensuring optimal nutrition.
The History: From Victorian Elegance to Modern Artistry
Cake decoration has evolved dramatically over centuries, but the concept of layering colors and textures can be traced back to Victorian-era confections, where elaborate desserts were symbols of status and refinement. The use of multiple cake layers gained popularity in the 19th century, particularly in Europe and America, as leavening agents like baking powder made cakes lighter and more delicate. However, the idea of ombre—derived from the French word for “shade” or “shadow”—originated in textile dyeing and painting, where gradual color transitions created depth and movement.
It wasn’t until the 2010s that ombre cakes exploded in popularity, thanks to social media platforms like Pinterest, Instagram, and YouTube. Bakers began experimenting with food coloring techniques to create seamless gradients within cake layers, often using vanilla or red velvet bases. The Pastel Ombre Chocolate Layer Cake emerged as a sophisticated twist on this trend—marrying the beloved richness of chocolate with the softness of pastel palettes. Unlike traditional dark chocolate cakes, this version embraces a whimsical, romantic aesthetic while maintaining intense chocolate flavor. Today, it stands as a hallmark of modern cake design, blending culinary tradition with artistic innovation.
Ingredients Breakdown: Quality Matters
Creating a flawless Pastel Ombre Chocolate Layer Cake starts with selecting premium ingredients. Each component plays a crucial role in texture, flavor, and structure. Here’s a detailed breakdown:
- All-Purpose Flour: Provides structure. Sifted to prevent lumps and ensure a light crumb.
- Unsweetened Cocoa Powder (Dutch-process preferred): Offers deep chocolate flavor without acidity. Dutch-process cocoa is alkalized, resulting in a smoother, richer taste and darker color—ideal for layering shades.
- Granulated Sugar: Sweetens and helps retain moisture. Also aids in browning during baking.
- Baking Powder & Baking Soda: Leavening agents. Baking powder provides initial lift, while baking soda reacts with acidic components (like buttermilk) for additional rise and tenderness.
- Salt: Enhances all flavors and balances sweetness.
- Eggs (room temperature): Bind ingredients, add structure, and contribute to leavening. Room temperature eggs incorporate better into batter.
- Vegetable Oil or Melted Coconut Oil: Adds moisture and richness. Oil-based cakes stay moist longer than butter-based ones.
- Vanilla Extract: Complements chocolate with warm, floral notes. Use pure extract for best results.
- Buttermilk (or DIY substitute): Adds tanginess, activates baking soda, and keeps the cake tender. Its acidity also enhances cocoa flavor.
- Hot Coffee or Hot Water: Dissolves cocoa and intensifies chocolate flavor without making the cake taste like coffee.
- Gel Food Coloring (pastel shades): Essential for ombre effect. Gel colors are concentrated and won’t alter batter consistency like liquid dyes.
- Buttercream Frosting Base (unsalted butter, powdered sugar, heavy cream, vanilla): Smooth, creamy canvas for decorating. Must be stable enough to support gradient piping.
- Optional Add-Ins: Chocolate shavings, edible glitter, fresh berries, or ganache drip for finishing touches.
Step-by-Step Recipe: Crafting the Perfect Ombre Layers
Yield: One 8-inch, 6-layer cake | Prep Time: 1 hour | Bake Time: 25–30 minutes per batch | Cooling Time: 2 hours | Assembly Time: 1.5 hours
Ingredients
- 3 cups (360g) sifted all-purpose flour
- 2 ½ cups (225g) unsweetened Dutch-process cocoa powder
- 2 ½ cups (500g) granulated sugar
- 2 ½ tsp baking powder
- 1 ½ tsp baking soda
- 1 tsp salt
- 4 large eggs, room temperature
- 1 cup (240ml) vegetable oil or melted coconut oil
- 2 tsp pure vanilla extract
- 1 cup (240g) buttermilk, room temperature
- 1 cup (240ml) hot brewed coffee or hot water
- Gel food coloring in pastel pink, lavender, mint green, peach, sky blue, and pale yellow
For the Vanilla Swiss Meringue Buttercream (Recommended for Stability)
- 6 large egg whites
- 1 ½ cups (300g) granulated sugar
- 1 ½ cups (340g) unsalted butter, softened and cubed
- 2 tsp vanilla extract
- Pinch of salt
- Optional: 1–2 tbsp heavy cream if needed for consistency
Directions
- Preheat & Prepare: Preheat oven to 350°F (175°C). Grease and line six 8-inch round cake pans with parchment paper. Wipe pans with a thin coat of oil and dust with cocoa powder to prevent sticking.
- Mix Dry Ingredients: In a large bowl, whisk together flour, cocoa powder, sugar, baking powder, baking soda, and salt until no lumps remain.
- Combine Wet Ingredients: In another bowl, beat eggs lightly. Add oil, vanilla, and buttermilk; mix until smooth.
- Blend Batter: Gradually add wet ingredients to dry, mixing on low speed until just combined. Slowly pour in hot coffee while mixing. Do not overmix—batter should be smooth and glossy.
- Divide & Color: Divide batter evenly into six separate bowls (approx. 1.5 cups each). Leave one bowl uncolored (will be darkest layer). Using gel food coloring, tint each remaining bowl a different pastel shade: start with pale pink, then lavender, mint, peach, and sky blue. Mix thoroughly with a silicone spatula or small whisk.
- Bake Layers: Pour each colored batter into prepared pans. Tap gently on counter to release air bubbles. Bake for 25–30 minutes or until a toothpick inserted comes out clean. Rotate pans halfway through for even baking.
- Cool Completely: Let cakes cool in pans for 10 minutes, then invert onto wire racks. Remove parchment and allow to cool fully (about 1.5–2 hours). Wrap in plastic once cooled to prevent drying.
- Make Swiss Meringue Buttercream: Combine egg whites and sugar in a heatproof bowl over simmering water (double boiler). Whisk constantly until sugar dissolves and mixture reaches 160°F (71°C). Transfer to stand mixer fitted with whisk attachment. Beat on high until stiff, glossy peaks form and bowl is cool to touch (about 10–12 minutes). Gradually add butter, one cube at a time, beating well after each addition. Add vanilla and salt. If buttercream appears curdled, keep beating—it will come together. Adjust consistency with cream if too thick.
- Color Buttercream: Divide buttercream into six portions. Tint each to match cake layers using gel colors. Keep covered with damp cloths to prevent drying.
- Stack the Cake: Place the darkest (uncolored) layer on a cake board or turntable. Spread a generous layer of matching buttercream. Repeat with next lightest layer, working upward toward the palest color. Use a bench scraper to smooth sides between layers.
- Frost Exterior: Apply a thin crumb coat. Chill for 20 minutes. Then apply final coat, smoothing sides and top with an offset spatula and turntable.
- Create Ombre Effect: Load each colored buttercream into separate piping bags. Starting at the bottom, pipe horizontal bands around the cake, slightly overlapping each color. Use a bench scraper or cake smoother to blend the colors upward, creating a seamless gradient. Chill briefly between steps if needed.
- Decorate: Top with chocolate curls, gold leaf, macarons, or fresh flowers. Optional drip glaze made from white chocolate and heavy cream adds drama.
- Chill Before Serving: Refrigerate cake for at least 1 hour to set frosting. Bring to room temperature before slicing for best texture.
Tips for Success
- Weigh Ingredients: For precision, use a kitchen scale. Volume measurements vary significantly.
- Use Gel Colors: Liquid food coloring dilutes batter and may affect rise. Wilton or Americolor gels are ideal.
- Room Temperature Ingredients: Cold eggs or buttermilk can cause batter to split or bake unevenly.
- Avoid Overmixing: Once flour is added, mix only until incorporated to prevent tough cakes.
- Bake in Batches: Most home ovens fit only two or three pans at once. Rotate positions halfway through.
- Level Layers: Use a serrated knife or cake leveler to trim domes for flat stacking.
- Chill Between Steps: After crumb coating or adding decorations, chilling stabilizes the cake.
- Invest in Tools: Offset spatula, bench scraper, cake turntable, and piping bags make assembly easier.
- Work Quickly with Buttercream: Warm kitchens can soften buttercream. Keep unused portions chilled.
- Freeze Extra Layers: Wrap unfrosted layers tightly and freeze for up to 3 months.
Variations and Customizations
This cake is highly adaptable. Try these creative twists:
- Flavor Infusions: Add espresso powder to enhance chocolate, orange zest for citrus-chocolate fusion, or cinnamon for warmth.
- Dietary Modifications: Use gluten-free flour blend, almond milk + vinegar instead of buttermilk, and vegan butter/egg substitutes for allergen-friendly versions.
- Fillings: Alternate layers with raspberry jam, salted caramel, peanut butter mousse, or chocolate ganache.
- Theme-Based Palettes: Baby boy? Use blues and whites. Gender reveal? Pink and blue ombré. Spring wedding? Soft greens, peaches, and ivories.
- No-Bake Option: Create a mousse-based ombre cake using chocolate ganache layers set in rings.
- Mini Versions: Make cupcakes with ombre swirls using multi-colored batter in each liner.
- Alcohol-Infused: Brush layers with Kahlua, Grand Marnier, or Chambord syrup for adult appeal.
- Nutty Crunch: Add chopped toasted hazelnuts or almonds between layers for contrast.
Health Considerations and Nutritional Value
While undeniably indulgent, mindful modifications can improve the nutritional profile of this cake:
- Calorie Control: One slice (1/12 of cake) contains approximately 450–600 calories, depending on frosting amount. Reduce portion size or serve with fresh fruit.
- Sugar Reduction: Replace 25% of granulated sugar with coconut sugar or use monk fruit sweetener blends (test for texture changes).
- Whole Grain Option: Substitute half the all-purpose flour with whole wheat pastry flour for added fiber.
- Healthy Fats: Choose heart-healthy oils like avocado or sunflower instead of palm-based shortenings.
- Dairy-Free: Use plant-based butter and milk alternatives fortified with calcium.
- Egg Replacements: Flax eggs (1 tbsp ground flax + 3 tbsp water per egg) work in a pinch, though texture may be denser.
- Antioxidant Boost: High-cocoa-content recipes provide flavonoids linked to cardiovascular health—choose natural or Dutch-process cocoa rich in polyphenols.
- Portion Awareness: Serve smaller slices with whipped cream or yogurt to balance richness.
Note: This cake is not suitable for low-sugar, keto, or diabetic diets without major reformulation. Always disclose ingredients when serving guests with allergies.
Frequently Asked Questions (FAQ)
Q: Can I make this cake ahead of time?
A: Yes! Bake layers up to 2 days in advance and store wrapped at room temperature. Frost the day before serving. Refrigerated, the assembled cake lasts 4–5 days.
Q: Why did my cake layers crack?
A: Cracking can result from overmixing, too-hot oven, or uneven pan filling. Ensure proper temperature calibration and avoid opening the oven door early.
Q: Can I use boxed cake mix?
A: You can, but homemade yields better texture and deeper chocolate flavor. If using a mix, enhance it with extra cocoa and buttermilk.
Q: How do I get a smooth ombre effect?
A: Use a bench scraper and spin the cake slowly on a turntable while applying gentle pressure. Practice on a dummy cake first.
Q: Is this cake freezer-friendly?
A: Yes. Freeze unfrosted layers for up to 3 months. Frosted cake can be frozen whole—wrap tightly in plastic and thaw overnight in fridge.
Q: What if I don’t have six pans?
A: Bake in batches. Cool pans quickly by placing them in the freezer for 5 minutes between uses.
Q: Can I make it less sweet?
A: Reduce sugar by ¼ cup in the cake and use less in buttercream. Taste and adjust. Consider adding a pinch of espresso or sea salt to balance sweetness.
Q: Can I use natural food coloring?
A: Possible but challenging. Beet powder (pink), spirulina (green), turmeric (yellow), and butterfly pea flower (blue) can work, though results may be less vibrant.
Summary
The Pastel Ombre Chocolate Layer Cake is a breathtaking fusion of gourmet flavor and artistic design, featuring velvety chocolate layers in a dreamy gradient of soft pastels. From precise baking techniques to customizable variations, this cake offers both visual drama and rich satisfaction in every bite.