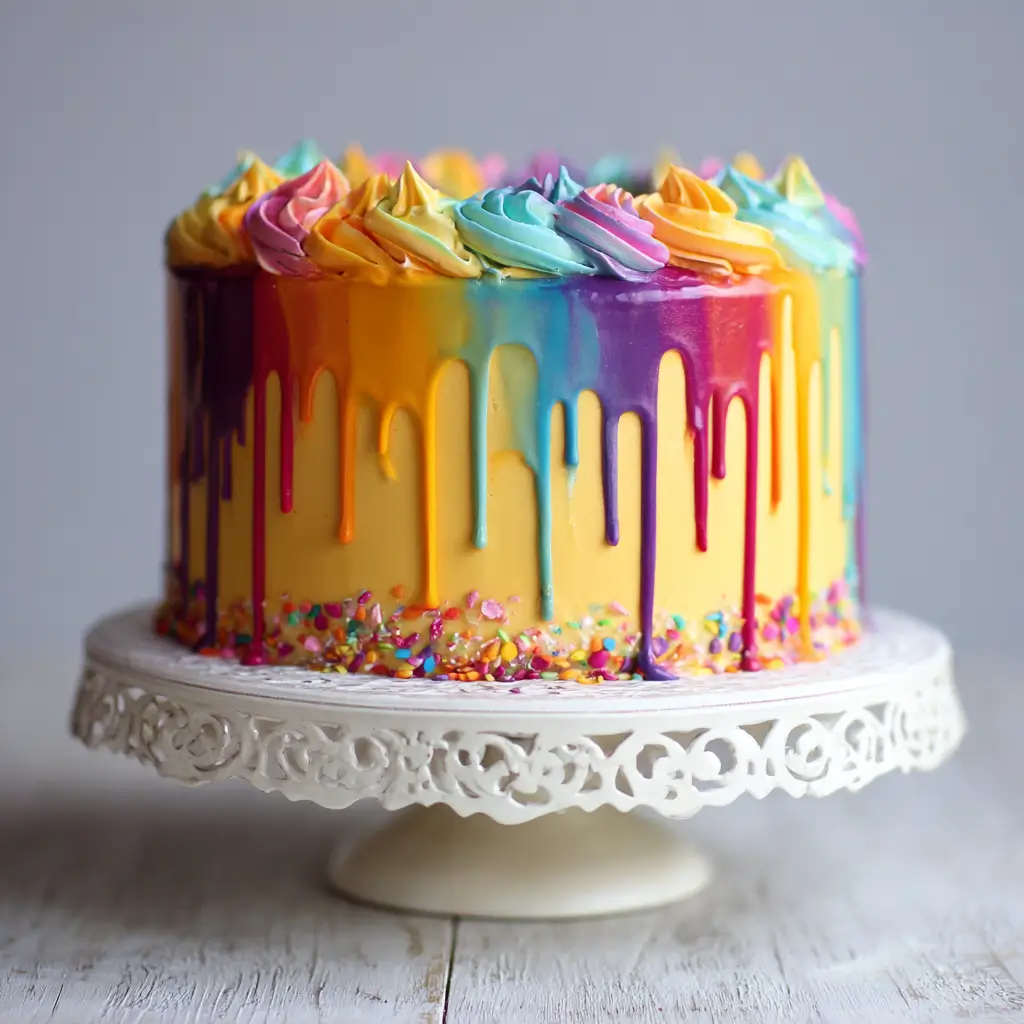
Ombre Rainbow Drip Cake: A Colorful Celebration of Flavor and Art
The Ombre Rainbow Drip Cake is more than just a dessert—it’s a show-stopping centerpiece that combines the joy of vibrant colors with the elegance of modern cake decorating. Whether you’re celebrating a birthday, baby shower, wedding, or simply indulging in life’s sweet moments, this cake captures attention with its gradient hues and glossy chocolate drip. With layers of soft, fluffy sponge infused with rainbow tones and a luxurious ganache cascade, every slice feels like a celebration. This guide walks you through everything you need to know about creating your own stunning Ombre Rainbow Drip Cake from scratch—complete with history, ingredients, step-by-step instructions, pro tips, variations, nutritional insights, and FAQs.
The History of the Ombre Rainbow Drip Cake
The concept of colorful cakes dates back to early 20th-century American baking traditions, where celebratory layer cakes were adorned with bright icings and sprinkles. However, the modern trend of rainbow cakes surged in popularity during the 1960s and 70s, influenced by counterculture movements and a growing fascination with bold visual expression. The addition of food coloring transformed simple vanilla cakes into psychedelic masterpieces.
Fast forward to the 2010s, social media platforms like Instagram and Pinterest revolutionized cake design, elevating desserts into edible art forms. The ombre effect—where colors blend seamlessly from dark to light—became a hallmark of sophisticated baking aesthetics. Simultaneously, the “drip cake” trend emerged, inspired by French patisserie techniques and popularized by celebrity bakers who used tempered chocolate to create elegant cascades down cake sides.
The fusion of these two trends—the rainbow interior and the glossy drip exterior—gave birth to the Ombre Rainbow Drip Cake. Today, it stands as a symbol of creativity, joy, and technical skill in home and professional baking alike, often seen at pride events, children’s parties, bridal showers, and influencer gatherings.
Ingredients Breakdown: What Makes This Cake Special
The magic of the Ombre Rainbow Drip Cake lies not only in its appearance but also in the balance of flavors and textures. Each ingredient plays a crucial role in achieving the perfect crumb, color gradient, and structural integrity needed for stacking and decorating.
- Flour (All-Purpose): Provides structure through gluten formation. Sifted to ensure a light, tender crumb.
- Granulated Sugar: Adds sweetness and helps aerate the batter when creamed with butter, contributing to a fluffy texture.
- Unsalted Butter (Room Temperature): Enhances richness and moisture. Using unsalted allows control over salt levels.
- Eggs (Large, Room Temperature): Bind ingredients together and contribute to leavening and structure.
- Vanilla Extract: Deepens flavor and complements the subtle sweetness of the cake.
- Baking Powder & Baking Soda: Leavening agents that help the cake rise evenly and maintain softness.
- Salt: Balances sweetness and enhances overall flavor complexity.
- Buttermilk: Adds acidity, which reacts with leaveners to create lift, while keeping the crumb moist and tender.
- Fine-Grade Food Coloring (Gel-Based): Essential for achieving vivid rainbow layers without altering batter consistency. Liquid dyes can make the cake too wet.
- Vegetable Oil: Keeps the cake moist and extends shelf life.
For the buttercream:
- Unsalted Butter (Softened): Forms the base of smooth, spreadable frosting.
- Powdered Sugar (Sifted): Sweetens and thickens the buttercream without graininess.
- Cream Cheese (Optional): Adds tanginess and stability, especially useful in warm climates.
- Milk or Heavy Cream: Adjusts consistency for piping and smoothing.
- Clear Vanilla Extract: Maintains white base for clean color blending in ombre frosting.
For the drip:
- Dark, Milk, or White Chocolate (High-Quality): Tempered for a shiny, firm drip that sets beautifully.
- Heavy Cream: Heated and mixed with chocolate to form ganache.
- Edible Glitter or Luster Dust (Optional): For added shimmer on the drip.
- Fondant Decorations, Sprinkles, or Fresh Berries: Final touches for visual flair.
Step-by-Step Recipe: How to Make an Ombre Rainbow Drip Cake
Part 1: Baking the Rainbow Layers
- Preheat & Prepare: Preheat oven to 350°F (175°C). Grease and line three 8-inch round cake pans with parchment paper. Lightly flour the sides to prevent sticking.
- Mix Dry Ingredients: In a bowl, sift together 2 ½ cups all-purpose flour, 2 ½ tsp baking powder, ½ tsp baking soda, and ½ tsp salt. Set aside.
- Cream Butter & Sugar: In a stand mixer fitted with a paddle attachment, beat 1 cup softened unsalted butter and 2 cups granulated sugar on medium-high speed until light and fluffy (about 4–5 minutes).
- Add Eggs & Vanilla: Beat in 4 large eggs one at a time, scraping down the bowl after each. Add 2 tsp vanilla extract and ¼ cup vegetable oil; mix until combined.
- Alternate Wet & Dry: With mixer on low, add ⅓ of the dry mix, followed by ½ cup buttermilk. Repeat, ending with dry ingredients. Mix just until incorporated—do not overmix.
- Divide & Color Batter: Divide batter equally into 5 bowls. Leave one plain (white/cream), then tint others with gel food coloring: violet, blue, green, yellow, orange, red (adjust number based on pans available). Stir gently to avoid air bubbles.
- Layer & Bake: Pour each colored batter into separate pans (or use one pan and bake layers sequentially if limited). Tap pans to release air bubbles. Bake for 20–25 minutes or until a toothpick comes out clean. Cool in pans for 10 minutes, then transfer to wire racks to cool completely.
Part 2: Making the Ombre Buttercream Frosting
- Prepare Buttercream Base: Beat 1 ½ cups softened unsalted butter on medium until creamy (~3 mins). Gradually add 6 cups sifted powdered sugar, 1 tbsp at a time. Add 2–3 tbsp heavy cream and 1 tsp clear vanilla extract. Whip on high for 4–5 minutes until fluffy.
- Divide for Ombre Effect: Place ¾ of the frosting in a large bowl (this will be the outer coating). Divide the remaining ¼ into 3–5 small bowls depending on desired gradient depth.
- Color Frosting Gradient: Tint each small portion with increasing intensity of your chosen color (e.g., pink → magenta → deep red) using gel paste. Keep one portion very pale for the center.
Part 3: Assembling the Cake
- Level & Stack: Trim cooled cake layers to flatten tops. Place the darkest layer (e.g., red) on a cake board or turntable. Spread a thin layer of neutral buttercream. Repeat with each ascending color (red → orange → yellow → green → blue → violet), forming a rainbow spiral when sliced.
- Crum Coat: Apply a thin layer of neutral buttercream over the entire cake to seal in crumbs. Chill for 20–30 minutes.
- Final Frosting with Ombre Effect: Using an offset spatula or bench scraper, apply the ombre-colored frostings vertically around the chilled cake, blending them softly with a palette knife or cake comb to create a seamless gradient from bottom to top.
- Smooth Top: Spread remaining neutral frosting on the top surface, creating a flat, smooth finish ready for the drip.
Part 4: Creating the Chocolate Drip
- Make Ganache: Heat ½ cup heavy cream until steaming (not boiling). Pour over 8 oz chopped chocolate (dark, milk, or white). Let sit 2 minutes, then stir gently until smooth. Cool slightly—around 90°F (32°C)—so it drips slowly without running down too far.
- Apply Drip: Transfer ganache to a squeeze bottle or piping bag with a small round tip. Starting near the edge of the top tier, gently squeeze short lines spaced evenly apart. Allow gravity to pull the ganache down about 1–2 inches. Continue around the perimeter.
- Fill Center: Once drips are set (after ~5 mins), pour remaining ganache into the center and spread carefully to cover the top without disturbing the edges.
- Decorate: Add rainbow sprinkles, edible pearls, fondant rainbows, or fresh fruit. Refrigerate briefly to set the chocolate.
Pro Tips for a Perfect Ombre Rainbow Drip Cake
- Use Gel Food Coloring: Liquid dyes dilute the batter and affect texture. Gel or paste colors deliver intense pigmentation with minimal volume.
- Bake One Layer at a Time (if necessary): If you don’t have enough pans, bake layers individually, cooling the pan between uses. Just keep batter covered to prevent drying.
- Chill Before Carving: Cold cakes are easier to level and less likely to crumble during assembly.
- Crumb Coat is Crucial: Don’t skip this step! It locks in loose particles and ensures a pristine final coat.
- Work Quickly with Ganache: If ganache hardens before use, reheat in 5-second intervals. Too hot = runs too much; too cold = won’t drip.
- Use a Turntable: Rotating cake stand makes frosting and drip application significantly easier and more even.
- Blend Ombre Smoothly: Use a heated spatula or cake scraper to soften transitions between colored frostings.
- Plan Your Palette: Choose harmonious shades—either warm tones (red/orange/yellow) or cool tones (blue/green/purple)—for a cohesive look.
- Freeze Leftover Cake: Unfrosted layers can be wrapped tightly and frozen for up to 3 months. Thaw overnight before assembling.
Variations and Customizations
The beauty of the Ombre Rainbow Drip Cake is its adaptability. Here are creative ways to personalize your masterpiece:
- Flavor Twists: Swap vanilla for funfetti, lemon, almond, coconut, or strawberry cake bases. Match the buttercream flavor accordingly.
- Dietary Modifications:
- Gluten-Free: Substitute flour with a 1:1 GF blend containing xanthan gum.
- Dairy-Free: Use plant-based butter, non-dairy milk, and vegan chocolate for ganache.
- Eggless: Replace eggs with flax eggs (1 tbsp ground flax + 3 tbsp water per egg) or commercial egg replacers.
- Low-Sugar: Use erythritol or monk fruit sweeteners in both cake and frosting (note: may alter texture).
- Theme-Based Designs:
- Pride Edition: Align colors with LGBTQ+ flag; use rainbow sprinkle borders.
- Unicorn Theme: Pastel ombre with glittery drip and horn topper.
- Birthday Bash: Add name plaque, candles, or balloon toppers.
- Gender Reveal: Pink and blue gradient with surprise filling.
- Drip Varieties:
- Colored Ganache: Tint white chocolate ganache with edible luster dust.
- Multiple Drips: Combine dark and white chocolate drips in alternating sections.
- Fruit Coulis: Use raspberry or mango puree for a fruity drip alternative.
- Texture Play: Add crunch with cookie crumbs between layers, or include jam swirls for fruity bursts.
- Mini Versions: Make cupcakes with ombre frosting and mini drips for party favors.
Health Considerations and Nutritional Value
While undeniably delicious, the Ombre Rainbow Drip Cake is a treat best enjoyed in moderation due to its high sugar, fat, and calorie content. Understanding its nutritional profile helps in making mindful choices.
Nutritional Estimate (per slice, approx. 1/12th of an 8-inch cake):
- Calories: 480–620 kcal
- Total Fat: 25–35g (saturated fat: 14–18g)
- Carbohydrates: 65–80g (sugars: 50–60g)
- Protein: 5–7g
- Sodium: 250–400mg
- Fiber: 0.5–1g
Key Health Notes:
- High Sugar Content: Multiple sources—cake, frosting, ganache—contribute to elevated sugar levels. Excessive intake is linked to weight gain, insulin resistance, and dental issues.
- Saturated Fats: Found in butter, cream, and chocolate. Opt for dark chocolate (higher cocoa, less sugar) and reduce butter where possible.
- Allergens: Contains dairy, eggs, wheat, and soy (in chocolate). Always label clearly for guests with allergies.
- Food Dyes: Some artificial colors (especially Red 40, Yellow 5) have been studied for potential hyperactivity effects in sensitive children. Natural alternatives (beet juice, spirulina, turmeric) exist but may yield muted results.
- Balancing Indulgence: Serve smaller slices alongside fresh fruit or yogurt parfaits. Offer healthier dessert options at events.
To lighten the recipe:
- Replace half the butter with unsweetened applesauce or mashed banana.
- Use Greek yogurt instead of sour cream or some butter in frosting.
- Reduce sugar in cake by ¼ cup and in frosting by 1 cup (add vanilla or cinnamon to compensate for flavor loss).
- Choose bittersweet chocolate (70%+) for the drip to lower sugar content.
Full Ingredient List
Cake Layers:
- 2 ½ cups (315g) all-purpose flour
- 2 cups (400g) granulated sugar
- 1 cup (2 sticks / 226g) unsalted butter, room temperature
- 4 large eggs, room temperature
- 2 tsp pure vanilla extract
- ½ cup (120ml) buttermilk
- ¼ cup (60ml) vegetable oil
- 2 ½ tsp baking powder
- ½ tsp baking soda
- ½ tsp salt
- Gel food coloring (red, orange, yellow, green, blue, violet)
Ombre Buttercream:
- 1 ½ cups (3 sticks / 340g) unsalted butter, softened
- 6 cups (720g) powdered sugar, sifted
- 2–3 tbsp heavy cream or milk
- 1 tsp clear vanilla extract
- Gel food coloring (various intensities of one hue or rainbow spectrum)
Chocolate Drip:
- 8 oz (225g) high-quality chocolate (dark, milk, or white), finely chopped
- ½ cup (120ml) heavy cream
- Optional: edible glitter, luster dust, rainbow sprinkles
Optional Additions:
- Rainbow jimmies or nonpareils
- Fresh berries (strawberries, raspberries)
- Fondant decorations
- Edible flowers
Detailed Directions Recap
- Preheat oven to 350°F (175°C). Prepare three 8-inch round cake pans with grease, parchment, and light flouring.
- Sift flour, baking powder, baking soda, and salt. Set aside.
- Cream butter and sugar until pale and fluffy (~5 mins).
- Add eggs one at a time, then vanilla and oil. Mix well.
- Alternate adding dry mix and buttermilk in three parts, starting and ending with dry. Mix until just combined.
- Divide batter into 6 portions. Tint each with gel color to form rainbow spectrum.
- Pour into pans and bake 20–25 mins. Cool completely.
- Make buttercream: beat butter, gradually add powdered sugar, cream, and vanilla. Whip until fluffy.
- Divide frosting; tint small portions for ombre gradient.
- Stack cake layers in rainbow order with buttercream between. Crumb coat with neutral frosting. Chill.
- Apply ombre frosting around sides, blending colors smoothly. Smooth top.
- Heat cream and pour over chocolate. Stir to make ganache. Cool slightly.
- Using squeeze bottle, pipe drip around top edge. Fill center and smooth.
- Decorate with sprinkles or other toppings. Chill 10 mins to set.
- Serve at room temperature for best texture.
Frequently Asked Questions (FAQ)
Q: Can I make the cake layers ahead of time?
A: Yes! Bake and cool layers up to 2 days in advance. Wrap tightly in plastic and store at room temperature, or freeze for longer storage.
Q: Why did my cake sink in the middle?
A: Possible causes include underbaking, opening the oven too early, excess leavening, or overmixing. Ensure accurate measurements and avoid drafts.
Q: How do I prevent colors from bleeding?
A: Use gel colors, avoid overmixing, and chill layers before stacking. A crumb coat acts as a barrier.
Q: Can I use whipped cream instead of buttercream?
A: Yes, but it’s less stable. Stabilize with gelatin or cornstarch, and refrigerate the cake. Not ideal for warm environments.
Q: How long does the cake last?
A: Stored airtight in the fridge, it lasts 5 days. Bring to room temperature before serving. Freeze unfrosted layers for 3 months.
Q: Can I make a two-layer drip cake?
A: Absolutely. Use thicker layers or bake in deeper pans. Adjust baking time accordingly.
Q: What if my ganache won’t drip properly?
A: Temperature is key. If too thick, warm gently. If too runny, chill ganache slightly before reapplying.
Q: Is this cake suitable for kids?
A: Yes, but consider reducing food dyes or using natural alternatives if preferred. Supervise young children due to choking hazards (sprinkles).
Summary
The Ombre Rainbow Drip Cake is a breathtaking confection that blends vibrant rainbow layers with a silky chocolate drip and gradient buttercream, making it a centerpiece for any celebration. With careful preparation, quality ingredients, and artistic flair, you can create a delicious, eye-catching dessert that delights both the palate and the eyes.