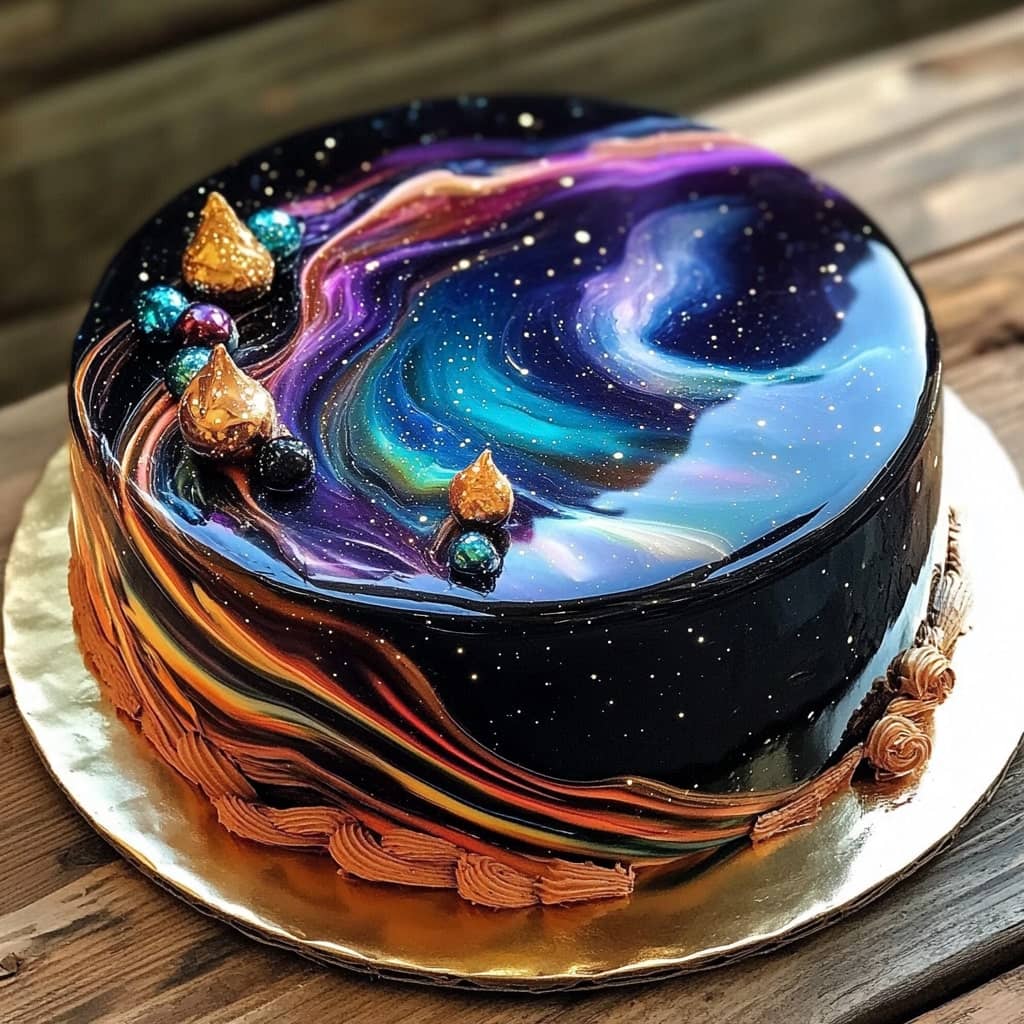
The Galaxy Mirror Glaze Cake is an enchanting dessert that has taken social media by storm due to its dazzling, cosmic appearance. Often described as edible art, the cake features a smooth, shiny glaze that reflects light like a mirror and swirls with vibrant, galactic colors—deep blues, purples, pinks, and silvers. The visual effect mimics the look of stars and galaxies in outer space, making it an awe-inspiring centerpiece for any celebration. More than just eye candy, the Galaxy Mirror Glaze Cake also offers a rich, indulgent flavor profile, typically pairing soft mousse or sponge cakes with luxurious ganache, cream fillings, and a silky mirror glaze. This cake is as much about the process and visual appeal as it is about flavor, and while it may appear complex, the recipe can be tackled by home bakers with patience and precision.
The history of mirror glaze cakes can be traced back to European pastry traditions, particularly in France and Russia. The technique of covering cakes with a glossy glaze has existed for decades, but it gained renewed attention in the early 2010s when pastry chefs began experimenting with vibrant colors and marbled patterns. One of the most notable figures behind the trend is Russian pastry chef Olga Noskova, who gained global fame by posting videos of her mesmerizingly smooth, reflective cakes on Instagram. Her cakes looked like polished marble or liquid glass and were often colored in deep hues, which inspired the galaxy-themed adaptations that followed. The “galaxy” variation specifically draws inspiration from astronomical photos of nebulae and the Milky Way, combining culinary artistry with a fascination for space. Today, the Galaxy Mirror Glaze Cake represents a blend of fine patisserie, modern aesthetics, and social media-driven creativity, becoming a popular choice for birthdays, anniversaries, and other special occasions.
Ingredients Breakdown
The Galaxy Mirror Glaze Cake is composed of several key components: the base cake, the mousse or filling, and the mirror glaze. For the cake base, popular choices include vanilla sponge, chocolate sponge, or genoise, as these provide a firm yet tender texture that holds up well under mousse and glaze. The mousse layer, often made from white chocolate or fruit purée, adds a light, airy texture and complements the sweetness of the glaze. Ingredients for the mirror glaze itself typically include white chocolate, sweetened condensed milk, gelatin, water, and glucose or corn syrup. Gel food coloring is essential for achieving the galaxy effect; black, blue, purple, and pink are commonly used, with silver or edible glitter added for a star-like shimmer. Optional ingredients include flavored extracts, liqueurs, or fruit essences to enhance the cake’s flavor profile.
Step-by-Step Recipe
- Bake the Cake Base: Start by baking a sponge cake using your preferred recipe. Allow it to cool completely. Level the top and cut the cake into desired layers if using more than one.
- Prepare the Mousse: Create a mousse using white chocolate and whipped cream, or fruit purée with gelatin for flavor. Pour the mousse into a silicone mold and insert the cake layer into the center. Freeze for several hours or overnight until solid.
- Make the Mirror Glaze: Soak gelatin sheets in cold water. In a saucepan, heat glucose syrup, sugar, and water to 103°C (217°F). Remove from heat and add the soaked gelatin. Stir in the sweetened condensed milk and pour over chopped white chocolate. Let it sit for a minute before using an immersion blender to create a smooth mixture. Strain the glaze to remove bubbles. Divide the glaze into portions and color each with gel food coloring.
- Assemble and Glaze the Cake: Remove the frozen mousse cake from the mold and place it on a wire rack over a tray. Cool the glaze to around 32°C (89.6°F). Pour the colored glazes together into a large container without mixing them too much. Pour this mixture over the cake in a steady motion to cover the surface. Use a spatula if needed to help the glaze flow evenly.
- Decorate and Finish: Add edible glitter, silver leaf, or stars for extra galaxy sparkle. Allow the glaze to set for about 10 minutes. Carefully transfer the cake to a serving platter and store it in the fridge until ready to serve.
Tips for the Perfect Galaxy Mirror Glaze Cake
Use white chocolate with at least 30% cocoa butter to ensure proper texture and shine. Freeze the cake solid before glazing to help the glaze set quickly and smoothly. Avoid overmixing colored glazes before pouring—too much blending can muddy the colors and ruin the marbled effect. Strain the glaze through a sieve to eliminate air bubbles for a more reflective surface. Work quickly but carefully when glazing to prevent the glaze from cooling too much, which can cause it to thicken and become harder to pour. If you’re a beginner, start with fewer colors and build your way up to more complex galaxy patterns. Invest in quality gel food coloring to achieve vibrant, vivid colors. A silicone mold is highly recommended for shaping the cake and achieving clean, smooth edges.
Variations and Customizations
The Galaxy Mirror Glaze Cake offers endless possibilities for customization. You can switch up the mousse flavors—try raspberry, passion fruit, coffee, or pistachio for variety. For a different texture, use cheesecake or a creamy custard filling instead of mousse. Change the color palette to suit different themes; for instance, use red, gold, and black for a fiery solar system look, or green and blue for an Earth-inspired cake. Add textural elements such as crunchy praline layers or cookie crusts for contrast. You can also incorporate flavored syrups or liqueurs like Grand Marnier or amaretto into the cake layers or glaze. For a non-dairy version, use plant-based creams and chocolates, and substitute agar-agar for gelatin. Mini galaxy cakes or entremets can be made using smaller silicone molds, ideal for individual servings or elegant dessert presentations.
Health Considerations and Nutritional Value
While visually stunning and delicious, the Galaxy Mirror Glaze Cake is a rich dessert that should be enjoyed in moderation. It is high in sugar, fat, and calories due to ingredients like white chocolate, sweetened condensed milk, and heavy cream. A standard slice can contain anywhere from 300 to 500 calories depending on size and composition. The glaze, though beautiful, is primarily decorative and adds substantial sugar content. If you’re looking for healthier alternatives, consider reducing the sugar in the base cake, using low-fat dairy options, or opting for fruit-based mousse instead of chocolate. Some versions use plant-based ingredients for vegan or lactose-free diets, but it’s important to check the label of gelatin alternatives like agar-agar. Those with food coloring sensitivities should use natural dyes derived from beet juice, spirulina, or butterfly pea flower. Overall, the Galaxy Mirror Glaze Cake is best reserved for special occasions and celebrations where its beauty and indulgent nature can be fully appreciated.
FAQ
Q: Can I make the glaze in advance? Yes, the glaze can be made ahead and stored in the refrigerator for up to one week. Reheat to the correct pouring temperature before use.
Q: Why isn’t my glaze shiny? A dull glaze can result from incorrect temperature or overmixing. Ensure the glaze is around 32°C and strain it well to remove bubbles.
Q: Do I need a silicone mold? It’s highly recommended for achieving the perfect dome shape and smooth edges, but a traditional cake tin lined with acetate can also work.
Q: How long does the cake last? The cake should be kept in the refrigerator and consumed within 3–4 days for best texture and taste.
Q: Can I freeze the glazed cake? It’s best to glaze after freezing the cake, not before. A glazed cake should not be refrozen as the glaze can crack or become dull.

Galaxy Mirror Glaze Cake
Ingredients
- 2 1/2 teaspoons 1 envelope unflavored powdered gelatin, bloomed in 1/4 cup (60ml) of additional water (7g)
- 1 1/2 cups 300g granulated sugar
- 3/4 cup 180ml room temperature water
- 2/3 cup 170g sweetened condensed milk
- 2 cups 350g mini white chocolate chips
- Gel food coloring of your choice
Instructions
- Start by combining 1 envelope (approximately 2 1/2 teaspoons) of unflavored powdered gelatin with 1/4 cup of water in a small bowl. Set this mixture aside and allow the gelatin to bloom while you prepare the rest of the glaze.
- Note: This recipe differs slightly from the original 2016 YouTube version. The quantities have been adjusted for a smaller batch, using just 1 envelope (2 1/2 tsp) of gelatin. This amount is sufficient to glaze two 8-inch layer cakes.
- In a separate heatproof bowl, combine 1 1/2 cups of granulated sugar, 3/4 cup of water, and 2/3 cup of sweetened condensed milk. Microwave the mixture on high for 90 seconds. Remove it from the microwave and stir well—the sugar should be mostly, if not completely, dissolved. If it’s not fully dissolved, continue microwaving in 10-second increments, stirring between each, until the sugar dissolves completely.
- Add the bloomed gelatin to the warm mixture and whisk until the gelatin has fully dissolved.
- Next, melt 2 cups of mini white chocolate chips in the microwave. Do this in 15-second intervals, stirring between each session, until the chocolate is smooth and fully melted. Once melted, pour the white chocolate into the warm gelatin mixture.
- Gently whisk everything together until the mixture is fully combined and smooth. Strain the glaze through a fine mesh sieve to remove any unmelted chocolate or undissolved gelatin bits.
- Divide the glaze evenly into four separate bowls. Use gel food coloring to tint each portion in different shades—blue, purple, black, and pink are ideal for achieving a galaxy effect.
- Continue stirring the glazes occasionally to prevent a skin from forming as they cool. Allow the glaze to cool to 90°F (32°C), or until it’s just slightly warm when touched.
- Once cooled, begin assembling the final pour. Pour each of the colored glazes into a large bowl, alternating colors and drizzling them over each other without fully mixing to preserve the marbled effect.
- Place a chilled, buttercream-coated cake (chilled in the freezer for at least 10 minutes or in the refrigerator for at least an hour) onto a smaller, elevated circular object. Set this on top of a rimmed baking sheet to catch any excess glaze runoff.
- Slowly pour the glaze over the center of the cake, working outward in a spiral motion to evenly cover the surface. Let the glaze drip off the sides naturally for about 10 minutes.
- Finally, use a small offset spatula or butter knife to carefully scrape away any excess glaze hanging from the bottom of the cake board, leaving a clean, polished finish.