Go Back
Loaded Butterscotch Cheesecake

Loaded Butterscotch Cheesecake

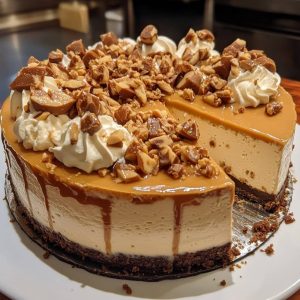
Loaded Butterscotch Cheesecake is a rich, decadent dessert featuring a creamy butterscotch-flavored cheesecake filling with a buttery graham cracker crust, topped with homemade butterscotch sauce and crunchy toffee bits. It’s an indulgent treat perfect for any special occasion or just a sweet dessert to satisfy your cravings.
Prep Time 1 hour
Cook Time 2 hours 10 minutes
Servings 12

Ingredients
  

Crust

  • 1 3/4 cups 235g graham cracker crumbs
  • 1/4 cup 56g packed light brown sugar
  • 7 tbsp 98g unsalted butter, melted

Filling

  • 24 oz 678g cream cheese, at room temperature
  • 3/4 cup 168g packed light brown sugar
  • 3 tbsp 24g all-purpose flour
  • 1 tsp vanilla extract
  • 1/2 cup 112g sour cream
  • 1/2 cup 120ml heavy whipping cream
  • 1 cup 169g butterscotch chips
  • 3.4 oz package dry butterscotch pudding mix
  • 4 large eggs at room temperature

Topping

  • 1 cup 169g butterscotch chips
  • 4 1/2 tbsp 68ml heavy whipping cream
  • Additional butterscotch chips for decorating

Instructions
 

Make the Crust

  • Preheat the oven to 325°F (163°C). Line the bottom of a 9-inch (23cm) springform pan with parchment paper and grease the sides.
  • In a small bowl, combine the ingredients for the crust. Press the mixture into the bottom and up the sides of the springform pan.
  • Bake the crust for 8-10 minutes, then set it aside to cool.
  • Wrap the outside of the pan with aluminum foil to prevent water from the water bath from seeping in (or follow my method for preparing a pan for a water bath). Set the prepared pan aside.

Make the Filling

  • Lower the oven temperature to 300°F (148°C).
  • In a large mixing bowl, blend the cream cheese, sugar, and flour with an electric mixer on low speed until combined. (This helps avoid adding too much air, which can cause cracks in the cheesecake.) Scrape down the sides of the bowl as needed.
  • Add the vanilla extract and sour cream to the mixture. Beat on low speed until fully combined, then set aside.
  • In a medium microwave-safe bowl, add the heavy cream and butterscotch chips. Heat in 15-30 second increments, stirring well between each until the butterscotch chips have melted.
  • Add the melted butterscotch mixture to the cheesecake batter in two parts, mixing until fully incorporated after each addition, and scrape down the sides of the bowl as needed.
  • Add the dry butterscotch pudding mix and mix until fully combined, scraping down the sides of the bowl as needed.
  • Add the eggs one at a time, mixing until well incorporated after each addition and scraping the sides of the bowl after each.
  • Pour the filling into the cooled crust. Place the springform pan inside a larger pan, then fill the outside pan with enough warm water to reach halfway up the sides of the springform pan. Be sure the water doesn’t go above the top edge of the aluminum foil.
  • Bake for 1 hour and 30-35 minutes. The center should be set but still jiggle slightly. (Refer to how to tell when your cheesecake is done baking.)
  • Turn off the oven and leave the cheesecake inside with the door closed for 30 minutes.
  • Crack the oven door open and leave the cheesecake inside for another 10 minutes. This cooling method helps prevent cracks by allowing the cheesecake to cool slowly.
  • Remove the cheesecake from the oven and set it on a cooling rack to cool to room temperature. Then refrigerate it for 5-6 hours or overnight until fully chilled and firm.

Finish It Off

  • Once the cheesecake is cold and firm, remove it from the springform pan and place it on a serving plate.
  • For the butterscotch topping, place the butterscotch chips in a heatproof bowl.
  • Microwave the heavy whipping cream until it just starts to boil, then pour it over the butterscotch chips. Let it sit for 2-3 minutes, then whisk until smooth.
  • Let the ganache cool for about 5 minutes (until it thickens but is still pourable and spreadable). Then pour the topping over the cheesecake and spread it evenly.
  • Top with additional butterscotch chips if desired.
  • Cover the cheesecake and refrigerate until ready to serve. The cheesecake is best enjoyed within 4-5 days.

Notes

Graham Crackers: For the crumbs, you’ll need approximately 15 full sheet graham crackers. If preferred, you can also use vanilla wafer crumbs as an alternative.
Flour: If you're looking for a gluten-free option, cornstarch can be used instead of flour. Just use half the amount called for.
Cream Cheese: Be sure to use brick-style, full-fat cream cheese. Avoid the tubs, low-fat, or whipped varieties as they don’t work as well.
Pudding Mix: Both instant or cook n' serve pudding mixes can be used. However, keep in mind that instant pudding thickens more quickly, which will result in a thicker filling.
Refrigerator Storage: If you have leftover cheesecake, store it in an airtight cake carrier or wrap it in plastic wrap. You can use toothpicks to create a small gap between the plastic wrap and the topping to prevent it from sticking. For sliced cheesecake, arrange the pieces in a single layer in an airtight container. This cheesecake is best when eaten within 4-5 days.
Freezer: Before freezing, let the cheesecake firm up in the freezer for a couple of hours. Then wrap it in a double layer of plastic wrap. Alternatively, you can freeze individual slices in a single layer in an airtight container. The cheesecake can be stored in the freezer for up to 3 months. When ready to serve, thaw it in the fridge. If you're prepping ahead, it’s better to freeze the cheesecake without the topping, as the apple topping may not look as fresh after being frozen.