Storage: Honey buns can be stored in an airtight container or bag for up to 5 days. I like to microwave any leftover honey buns for about 5 to 10 seconds, just until warm, before serving. They can also be frozen for up to three months.
Yeast Tips: When working with yeast-based recipes like this one, it's important to ensure the water is at the correct temperature. If the water is too hot, it will kill the yeast, and if it's too cold, the yeast won’t activate, preventing the dough from rising properly. The ideal temperature range for the water is between 105°-110°.
Shortening: Melted shortening gives these honey buns the best bakery-style texture. However, you can substitute melted butter if you prefer.
Flatten the Buns: Flattening the buns at each stage helps to create that classic dense yet melt-in-your-mouth texture, as opposed to the fluffy, bread-like texture of a cinnamon roll.
Best the Next Day: These honey buns are delicious when served warm, but I personally think they are even better after sitting in an airtight container on the counter for a day or two. This allows them to develop the softness that is typical of store-bought honey buns.
Warm Milk/Water: You can substitute warm milk for the warm water in the dough if you prefer.
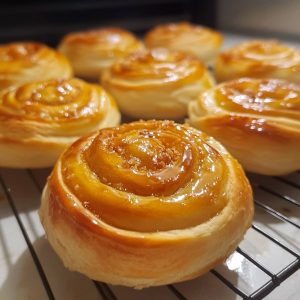
Homemade Honey Buns
Homemade honey buns are a delightful, sweet treat perfect for any occasion, offering a warm, soft texture and a delicious honey glaze. With simple ingredients and easy steps, you can create a batch of these delicious buns from scratch, bringing a taste of homemade comfort to your table.
Ingredients
For the Dough:
- ▢½ cup warm water
- ▢3 tablespoons granulated sugar
- ▢1 tablespoon active yeast
- ▢2 ⅔ cups all-purpose flour
- ▢⅓ cup honey
- ▢¼ cup melted shortening
- ▢3 large egg yolks
- ▢1 teaspoon vanilla extract
- ▢½ teaspoon salt
- ▢Vegetable oil for frying
For the Cinnamon Sugar:
- ▢¼ cup granulated sugar
- ▢1 ½ teaspoons cinnamon
For the Glaze:
- ▢4 ⅔ cups powdered sugar
- ▢2 ½ tablespoons honey
- ▢1 tablespoon melted butter
- ▢½ teaspoon vanilla extract
- ▢¼ teaspoon salt
- ▢Warm water as needed
Instructions
- In the bowl of a stand mixer fitted with a whisk attachment, combine warm water, 2 teaspoons of sugar, and yeast. Whisk until just combined, then let sit for 5 minutes until frothy.
- Switch the attachment to a dough hook and add the remaining sugar, flour, honey, melted shortening, egg yolks, vanilla, and salt. Knead on medium speed for 8 minutes. The dough will be sticky, but when stretched, it should hold and become transparent.
- Transfer the dough to a clean bowl lightly sprayed with baking spray and cover with plastic wrap or a clean kitchen towel. Let it rise for 1 hour, or until doubled in size.
- While the dough rises, prepare the cinnamon sugar. In a small bowl, whisk together the cinnamon and sugar.
- Once the dough has risen, turn it out onto a lightly floured surface. Roll the dough into a rectangle about 12” long and 8” wide. Dust with the cinnamon sugar mixture and gently press it into the dough.
- Roll the dough up from the long side, then turn the roll diagonally. Use a knife to score 8 pieces, each about 1” wide. Trim the ends of the roll, about 1 ½”, and then cut along the scored lines. Place each piece onto a parchment-lined baking sheet with at least 2” of space between them. The pieces should be oblong in shape. Gently press and shape each one with your fingers, then let rise for about 45 minutes, or until puffy but not doubled in size.
- Meanwhile, pour oil into a large pan or stockpot and heat over medium until it reaches 365°F. Once the rolls have risen, gently press them down with your fingers. Carefully place a few honey buns into the hot oil, making sure not to overcrowd the pan. Fry for 90 seconds on one side, then flip and fry for an additional 90 seconds on the other side.
- While the buns are frying, prepare the glaze. In a medium bowl, whisk together the powdered sugar, honey, melted butter, vanilla, and salt. Gradually add 1/3 cup (or up to 1/2 cup) of warm water, whisking until you reach the desired consistency.
- Once the honey buns are golden brown on both sides, remove them from the oil and place them onto a wire cooling rack set over a paper towel-lined baking sheet. Gently press down to flatten each bun, then immediately dip each one into the glaze. This will create a crisp texture once set.
- Repeat the frying process with the remaining honey buns.