Chocolate Oreo Drip Cake That’ll Wow Your Guests
The Chocolate Oreo Drip Cake combines rich chocolate layers, Oreo-studded frosting, and a luscious chocolate ganache drip to create a visually stunning and decadent dessert perfect for any celebration. Its irresistible flavor and elegant presentation make it a guaranteed crowd-pleaser that will wow guests and satisfy Oreo lovers alike.
Ingredients
Cake Ingredients
- 400 g unsalted butter or Stork
- 400 g light brown sugar
- 400 g eggs about 8 medium
- 325 g self-raising flour
- 75 g cocoa powder
- 2 teaspoons baking powder
- 4 tablespoons whole milk
Oreo Buttercream Frosting
- 300 g unsalted butter at room temperature
- 650 g icing sugar
- 154 g Oreos 1 pack
- 2 to 5 tablespoons whole milk
Decoration
- 175 g dark chocolate
- 1 to 2 tablespoons vegetable or sunflower oil
Oreos
- Crushed Oreos
Instructions
For the Cake!
- Preheat your oven to 180°C (160°C fan) and line three 20cm (8-inch) cake tins with baking parchment—set aside. In a stand mixer, beat the butter and light brown sugar together until light and fluffy. Add the flour, cocoa powder, beaten eggs, and baking powder, then briefly beat until just combined—be careful not to overmix! If the batter is too thick, stir in the whole milk to loosen it. Divide the batter evenly among the three tins and smooth the tops. Bake for 25–30 minutes, or until a skewer inserted in the center comes out clean and the cake springs back when touched. Once baked, allow the cakes to cool in the tins for 10 minutes before removing them to a wire rack to cool completely. If the cakes have domed, cool them upside down to slightly flatten the tops.
For the Decoration!
- Using a stand mixer, beat the room temperature butter until smooth and creamy. Gradually add the icing sugar in thirds, beating well after each addition until fully combined. Continue beating the buttercream for several minutes until it becomes lighter and fluffier. In a food processor, blitz the Oreos into fine crumbs and fold them into the buttercream. Beat again until smooth, adding whole milk as needed to achieve a creamy, spreadable consistency.
- Once the cakes have cooled, place the first layer on your serving plate and spread about 2 tablespoons of buttercream evenly on top. Add the second cake layer, spread another 2 tablespoons of buttercream, then top with the final cake layer. Reserve enough buttercream for decorating. Use the leftover buttercream to cover the sides and top of the cake. Start with a thin crumb coat layer using a large metal scraper, then refrigerate the cake for 10 minutes. Apply a second, slightly thicker layer of buttercream, smoothing it out with an offset spatula and the metal scraper until even. If the Oreos were blitzed finely, the buttercream will remain smooth despite the cookie bits.
- To make the drip, melt the dark chocolate in a heatproof bowl until smooth. Add 1 tablespoon of vegetable or sunflower oil and stir well. Continue adding oil, about 1/2 tablespoon at a time, until the chocolate reaches a pourable drip consistency—usually around 1 1/2 tablespoons total. Using a disposable piping bag, pipe the ganache carefully around the edge of the cake to create drips. You don’t need much for each drip as the chocolate will flow down naturally. Pour the remaining chocolate onto the top and smooth it out to cover fully. Refrigerate the cake for about 15 minutes to set the ganache.
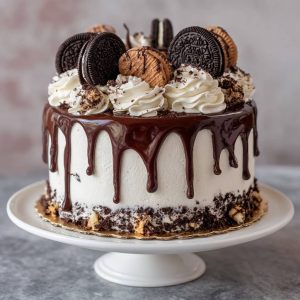
- Finally, use some leftover buttercream to pipe rosettes on top of the cake, place a whole Oreo on each rosette, sprinkle with crushed Oreos, and you’re done! Enjoy your stunning and delicious Chocolate Oreo Drip Cake!
Notes
You definitely don’t have to create perfectly straight-edged buttercream if you prefer a more rustic look, but I just love how clean and polished it appears! You can simply slather the frosting on, and it will still taste absolutely delicious. However, if you want to achieve that smooth, sharp finish, I highly recommend using a metal scraper for decorating the buttercream, along with disposable piping bags—I honestly wouldn’t be able to manage without them! All the decorations are entirely optional, but I really adore this style of cake. If you want to make a smaller version, try using two 8-inch cake tins with these adjusted ingredient amounts: 300g butter, 300g sugar, 245g flour, 55g cocoa powder, 1.5 teaspoons baking powder, 6 medium eggs, and 3 tablespoons of milk. Baking time might increase by 5 to 10 minutes, and you can use about two-thirds of the decoration recipe. This cake will keep well in an airtight container for up to 3 days!