
Introduction
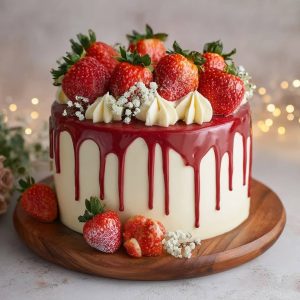
A Strawberry Drip Cake with Real Fruit Filling is a visually stunning and flavor-packed dessert that brings together the richness of moist cake layers, the natural sweetness of real strawberries, and the indulgent elegance of a glossy chocolate or strawberry drip. It’s a showstopper centerpiece, often gracing the tables at birthdays, anniversaries, baby showers, and weddings. This cake is more than just a treat—it’s an experience, balancing artistry with the freshness of real ingredients. The juicy strawberry filling nestled between fluffy cake layers enhances each bite, offering a delightful burst of fruitiness that contrasts beautifully with the sweet exterior. Whether topped with fresh berries, whipped cream, or edible flowers, this cake exudes charm and sophistication.
The History of the Strawberry Drip Cake
While the exact origins of the Strawberry Drip Cake are difficult to pinpoint, the concept combines two popular dessert traditions: layered fruit cakes and drip cakes. Drip cakes surged in popularity in the mid-2010s, thanks in part to social media platforms like Instagram and Pinterest, where bakers showcased their artistic drips of ganache cascading down the sides of cakes. The strawberry element, rooted in traditional European and American baking, often featured in shortcakes and summer puddings, found a natural pairing with this contemporary cake trend. Real fruit fillings, harking back to homemade preserves and compotes, add an authentic, old-world charm to the otherwise modern design of the drip cake. The result is a delightful fusion of tradition and trend, appealing to both classic tastes and modern aesthetics.
Ingredients Breakdown
Cake Layers: 2 ½ cups all-purpose flour, 1 tbsp baking powder, ½ tsp baking soda, ¼ tsp salt, 1 cup unsalted butter (softened), 1 ¾ cups granulated sugar, 4 large eggs, 2 tsp vanilla extract, 1 cup whole milk, ½ cup sour cream
Strawberry Filling: 2 cups fresh strawberries (hulled and diced), ½ cup granulated sugar, 2 tbsp cornstarch, 1 tbsp lemon juice
Buttercream Frosting: 1 ½ cups unsalted butter, 5 cups powdered sugar, 2 tsp vanilla extract, 2-4 tbsp heavy cream
Strawberry or White Chocolate Drip: 1 cup white chocolate chips or pink candy melts, ¼ cup heavy cream, pink or red gel coloring (optional)
Decorations: Fresh strawberries, edible gold leaf, sprinkles, mint leaves, or piped rosettes (optional)
Step-by-Step Recipe:
- Preheat and Prepare Pans: Preheat your oven to 350°F (175°C). Grease and line three 8-inch round cake pans with parchment paper.
- Mix Dry Ingredients: In a large bowl, sift together the flour, baking powder, baking soda, and salt. Set aside.
- Cream Butter and Sugar: In another bowl, beat the butter and sugar until light and fluffy, about 3-5 minutes.
- Add Eggs and Vanilla: Add eggs one at a time, mixing well after each addition. Stir in the vanilla extract.
- Incorporate Wet and Dry Ingredients: Add the dry ingredients in three parts, alternating with the milk and sour cream. Begin and end with the dry mixture. Mix until just combined.
- Bake the Cakes: Divide the batter evenly among the prepared pans. Bake for 25–30 minutes, or until a toothpick inserted in the center comes out clean. Let cakes cool completely.
- Prepare Strawberry Filling: In a saucepan, combine strawberries, sugar, cornstarch, and lemon juice. Cook over medium heat until the mixture thickens and becomes jam-like, around 10–12 minutes. Cool to room temperature.
- Make Buttercream Frosting: Beat butter until creamy, then gradually add powdered sugar. Add vanilla and enough heavy cream to achieve your desired consistency. Beat until fluffy.
- Assemble the Cake: Place the first cake layer on a cake board or plate. Pipe a ring of buttercream around the edge to create a dam, and fill the center with strawberry filling. Repeat with remaining layers.
- Crumb Coat and Chill: Apply a thin layer of buttercream around the entire cake to seal in crumbs. Chill for 20–30 minutes.
- Final Coat: Apply the final coat of buttercream, smoothing it with an offset spatula or bench scraper.
- Prepare the Drip: Heat heavy cream until just simmering and pour over white chocolate chips or candy melts. Let sit 1–2 minutes, then stir until smooth. Add gel coloring if desired. Cool slightly.
- Apply the Drip: Use a spoon or squeeze bottle to drip the ganache around the edges of the chilled cake. Let it drip naturally down the sides.
- Decorate: Top with fresh strawberries, rosettes, sprinkles, or edible gold leaf for a luxurious finish. Chill until ready to serve.
Tips for the Perfect Strawberry Drip Cake
Always use room temperature ingredients to ensure even mixing and a smooth batter. For the most vibrant flavor, use ripe, fresh strawberries in the filling rather than frozen ones, which can become watery. Chill the cake between steps—especially before applying the drip—to ensure clean lines and stability. Don’t overmix the batter, as it can lead to a dense cake. Use a squeeze bottle for the drip to control the flow and direction better. Test the drip consistency on the side of a bowl first—if it’s too runny, it will slide off; too thick, and it won’t drip at all. Consider using a cake turntable for smoother frosting application. Store leftovers in an airtight container in the refrigerator, and bring to room temperature before serving for the best texture and flavor.
Variations and Customizations
For a chocolate-strawberry twist, substitute part of the cake flour with cocoa powder and use chocolate ganache for the drip. Add a layer of whipped cream between the strawberry filling and cake for a strawberries-and-cream effect. Try different fruit fillings such as raspberry, mango, or blueberry for a fun flavor change. Infuse the buttercream with strawberry purée or freeze-dried strawberry powder for a pink hue and enhanced flavor. Decorate seasonally—use mini candy canes and silver sprinkles for winter holidays, pastel flowers for spring, or sparklers and flags for summer celebrations. Make it gluten-free by using a 1:1 gluten-free flour blend and dairy-free by substituting with vegan butter and plant-based milk and cream. Add a touch of liqueur (like Grand Marnier or Chambord) to the fruit filling for an adult version.
Health Considerations and Nutritional Value
This cake is rich in calories, sugar, and saturated fat, as expected from a celebratory dessert. A typical slice (1/12 of the cake) contains approximately 450–600 calories, depending on the amount of frosting and filling used. However, using real strawberries adds natural vitamins and antioxidants like vitamin C, folate, and potassium. You can lighten the cake by reducing the sugar, using Greek yogurt instead of sour cream, or substituting some of the butter with applesauce. Choose organic strawberries when possible to avoid pesticide residues. For a lower-sugar option, use monk fruit sweetener or stevia in the cake and filling. Always check for food allergies when serving guests—dairy, eggs, and gluten are present unless specifically modified. Despite its indulgence, the use of fresh fruit provides a wholesome touch that sets it apart from artificial alternatives.
FAQ
Can I make the cake layers in advance? Yes, cake layers can be baked up to two days in advance, wrapped tightly, and stored in the refrigerator or frozen for longer storage.
Can I use frozen strawberries for the filling? You can, but they may release more water; be sure to cook the filling longer to thicken it properly.
Why is my drip running all the way down? The ganache may be too warm or the cake not chilled enough—let the ganache cool slightly before applying.
How long does the finished cake last? It stays fresh for 3–4 days in the refrigerator in an airtight container.
Can I make it vegan? Yes, by using plant-based milk, dairy-free butter, and egg substitutes like flax eggs or aquafaba.
Do I need a mixer? While a hand mixer or stand mixer makes the process easier, it can be done by hand with extra effort.
Can I color the drip? Absolutely. Use oil-based or gel food coloring for best results—avoid water-based dyes as they can seize chocolate.
What size cake pans should I use? Three 8-inch pans work best for this recipe, but you can adjust baking time for different sizes.
Strawberry Drip Cake with Real Fruit Filling
Ingredients
- Strawberry Drip Cake 15 cm / 6″, 3 Layers
- Cake Batter:
- 100 g granulated sugar
- 2 large eggs
- ¼ teaspoon salt
- 100 ml buttermilk plain or strawberry-flavored
- 94 g Alba oil or any neutral-tasting vegetable oil
- 120 ml strawberry purée see purée recipe below
- 200 g all-purpose flour
- 1½ teaspoons 8 g baking powder
- ½ teaspoon 4 g baking soda
- Optional: Pink food coloring for enhanced color
- Strawberry Purée:
- 500 g fresh strawberries
- 250 g jam sugar sugar with added pectin
- 1 tablespoon rosewater optional, for a floral hint
- Instructions: Blend strawberries and cook with jam sugar until thickened. Add rosewater if using. Let cool before using in cake and ganache.
- Cream Cheese Filling:
- 160 g Swiss Meringue Buttercream prepared in advance
- 40 g Philadelphia cream cheese
- 40 g Mascarpone
- 2 tablespoons instant vanilla pudding powder with modified cornstarch for stability
- Instructions: Blend all ingredients together until smooth and creamy. Chill until ready to use.
- White Chocolate Ganache for coating the cake:
- 300 g white chocolate finely chopped
- 100 ml heavy cream
- A generous pinch of salt
- Instructions: Heat cream until just simmering pour over chocolate and salt, let sit briefly, then stir until smooth.
- Strawberry Ganache for drip effect:
- 100 g prepared strawberry purée
- Remaining white ganache after coating the cake
- Instructions: Combine and blend until silky and pourable. Chill slightly if needed for optimal drip consistency.
- Decorations Customize as desired:
- Fresh strawberries
- Sugar sprinkles
- Chocolate bark store-bought or homemade
- Meringue kisses Baisers
- Macarons
- Edible sugar flowers fondant accents, or any preferred cake toppers
Instructions
Prepare the Strawberry Purée
- Start by washing the strawberries thoroughly, then pat them dry and cut them into quarters. Place the strawberries into a saucepan along with the gelling (jam) sugar and bring the mixture to a boil, stirring occasionally. Once boiling, reduce the heat and allow it to simmer gently for 10–15 minutes. After simmering, remove the pan from the heat and stir in the rosewater if you’re using it. Strain the mixture through a fine-mesh sieve to separate the purée from the pulp. The leftover pulp can be frozen and saved for future use—perhaps in a buttercream. For this recipe, you’ll only need the strained purée. Set it aside and allow it to cool completely before using.
Bake the Cake
- Preheat your oven to 180°C (350°F). Prepare a 15 cm (6″) round baking pan by lining it with parchment paper or greasing and flouring it. In a medium bowl, whisk together the flour, baking powder, and baking soda, then set this mixture aside. In the bowl of a stand mixer, combine the sugar, eggs, and salt. Beat them together on high speed for at least 10 minutes until the mixture is pale, thick, and airy. In a separate bowl, mix together the buttermilk, oil, strawberry purée, and food coloring (if using). Note that without food coloring, the cake will have a brownish tone rather than a vibrant pink. Turn your mixer to its lowest speed and slowly pour the liquid mixture into the whipped eggs and sugar. Add the liquid gradually, mixing for 30–60 seconds until just incorporated.
- Next, gently fold in the dry ingredients. You can do this by hand or on the lowest mixer setting—be careful not to overmix. Once fully combined, immediately pour the batter into your prepared baking pan and bake for approximately 40 minutes, or until a skewer inserted in the center comes out clean. Allow the cake to cool on a wire rack for 10–15 minutes before removing it from the pan. Once fully cooled, wrap the cake in plastic wrap and chill it before torting and filling.
Prepare the White Ganache
- Finely chop the white chocolate and place it in a heatproof bowl. In a small saucepan, heat the heavy cream and a pinch of salt until it’s just about to boil—do not let it boil fully. Pour the hot cream over the chopped chocolate and let it sit undisturbed for 1–2 minutes. Then stir gently by hand until combined. To emulsify the ganache, use a stick blender, being careful not to incorporate too much air. Let the ganache cool at room temperature until it reaches the texture of creamy peanut butter.
Make the Cream Cheese Filling
- Prepare 160 g (or more if needed) of Swiss Meringue Buttercream (SMBC) using your preferred method. Bring the Philadelphia and Mascarpone cheeses to room temperature, then mix them together briefly until smooth. Add the instant vanilla pudding powder and let the mixture sit for a few minutes to thicken. Gently fold the cream cheese mixture into the SMBC by hand—avoid overmixing to preserve its smooth, airy texture.
Torte and Fill the Cake
- Once the cake is fully chilled, slice it horizontally into three even layers. Fill the cake with two layers of the cream cheese buttercream, using about 120 g per layer. Smooth it out evenly, then stack the layers carefully. Chill the filled cake for at least 30 minutes to set the filling and stabilize the structure.
Cover the Cake with Ganache
- After chilling, mask the cake with the white chocolate ganache. A turntable and angled spatula are helpful tools for getting smooth, clean sides. Spread a generous amount of ganache over the top and sides, smoothing it out as you go. Once coated, chill the cake again for another 30 minutes to allow the ganache to set.
Make the Strawberry Ganache
- Take the leftover white ganache (you should have approximately 100 g) and gently melt it. Stir in 100 g of the reserved strawberry purée until fully blended. Whip the mixture on high speed in your mixer for a few minutes to make it light and creamy. Use this to create the drip effect: spoon or pipe the strawberry ganache over the edges of the cold cake and allow it to drip naturally. (You can refer to a drip cake video tutorial for technique if needed.)
Decorate the Cake
- Now for the fun part—decorating! Arrange all your decorations (such as fresh strawberries, sugar sprinkles, meringue kisses, macarons, chocolate bark, and sugar flowers) on a large plate beforehand so they’re ready to go. Begin decorating by placing the largest elements first, followed by medium-sized items, and finish with the smallest ones. Since the ganache remains soft for a while, you’ll have time to adjust or reposition elements as needed. Add sugar sprinkles last so they don’t sink into the ganache.