
Introduction
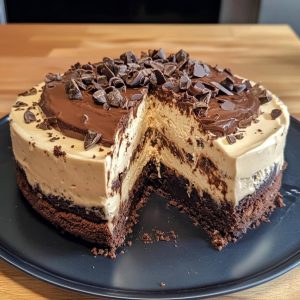
A Mocha Brownie Ice Cream Cake is the perfect dessert for coffee and chocolate lovers. Combining the richness of brownies with the creamy, cool texture of ice cream, all enhanced by the bold flavors of coffee, this dessert is an irresistible treat for any occasion. The layers of fudgy brownies, creamy ice cream, and mocha flavor come together in a harmonious dessert that’s sure to impress family and friends. Whether for a birthday, a special celebration, or simply an indulgent sweet fix, this cake brings a delightful twist to traditional ice cream cakes.
The History of Mocha Brownie Ice Cream Cake
While the history of ice cream cakes goes back to the early 20th century, the combination of coffee flavors, brownies, and ice cream is a more recent indulgence. Ice cream cakes became increasingly popular in the 1950s, particularly with the rise of chains like Dairy Queen offering them as part of their menu. The concept of adding flavors like mocha (a mix of coffee and chocolate) and brownie layers has been a more modern interpretation, capitalizing on the growing love for coffee-inspired desserts. This Mocha Brownie Ice Cream Cake is a contemporary take on that idea, with layers of deliciousness that cater to coffee, chocolate, and ice cream enthusiasts alike.
Ingredients Breakdown
For the brownie layer:
- 1 box brownie mix (or homemade brownie recipe)
- Eggs, oil, and water as specified on the brownie mix box (or ingredients if making from scratch)
For the mocha ice cream layer:
- 1 quart coffee ice cream (or your favorite coffee-flavored ice cream)
- 1 tablespoon instant coffee granules (for a stronger coffee flavor)
For the chocolate sauce:
- 1 cup heavy cream
- 8 oz semi-sweet chocolate chips
- 2 tablespoons sugar
For the topping:
- Whipped cream (optional, for garnish)
- Chocolate shavings or cocoa powder for decoration
Step-by-Step Recipe
- Bake the Brownies
Preheat the oven according to the brownie mix instructions (usually 350°F). Grease and line a 9-inch springform pan or cake pan. Prepare the brownies according to the box instructions or your homemade recipe. Once baked, let them cool completely in the pan. - Prepare the Mocha Ice Cream
Allow the coffee ice cream to soften slightly so it’s easier to spread. If desired, mix instant coffee granules into the ice cream to enhance the coffee flavor. - Layer the Cake
Once the brownies are completely cool, slice them to fit the bottom of the springform pan. You may need to trim them to make a perfect fit. Place the brownie layer at the bottom of the pan and press it down slightly. - Spread a generous layer of softened mocha ice cream on top of the brownie layer. Smooth it out with a spatula to create an even layer. Return the pan to the freezer for 1-2 hours to allow the ice cream to firm up.
- Make the Chocolate Sauce
In a small saucepan, bring the heavy cream to a simmer over medium heat. Once it begins to simmer, remove it from the heat and add the chocolate chips and sugar. Stir until the chocolate is melted and smooth. Let the sauce cool to room temperature. - Assemble the Cake
Once the mocha ice cream layer has set, drizzle a layer of chocolate sauce over the ice cream, and then cover with another layer of the brownie. Press it gently so that the layers stick together. - Return the cake to the freezer and allow it to set completely for at least 4 hours or overnight.
- Serve
When ready to serve, top the Mocha Brownie Ice Cream Cake with whipped cream, chocolate shavings, or a dusting of cocoa powder. Let the cake sit for 5-10 minutes before cutting to make slicing easier.
Tips for the Perfect Mocha Brownie Ice Cream Cake
- Be sure to let the ice cream soften just a bit before spreading it, as this will help create a smooth, even layer.
- To ensure your cake layers stay together, use a springform pan, which allows for easy removal.
- If you’re short on time, you can use store-bought brownie mix and ice cream. Homemade brownies and ice cream, however, will enhance the flavor.
- Feel free to swap the coffee ice cream for other flavors like chocolate or vanilla if preferred.
- For a more decadent version, drizzle extra chocolate sauce over the cake before serving.
Variations and Customizations
- If you want to make it more decadent, add crushed espresso beans or chopped chocolate to the mocha ice cream layer.
- Swap the coffee ice cream for other flavor options, such as chocolate, vanilla, or hazelnut ice cream.
- Add a layer of caramel or nuts between the brownie and ice cream layers for additional texture and flavor.
Health Considerations and Nutritional Value
While the Mocha Brownie Ice Cream Cake is a delicious indulgence, it’s not the healthiest dessert option due to its high sugar and fat content. The brownies and ice cream contribute significant calories, and the addition of whipped cream and chocolate sauce further increases the dessert’s calorie count. For a lighter version, you could try using low-fat or sugar-free ice cream and reduce the amount of chocolate sauce. Keep in mind that it is best enjoyed in moderation as a special treat.
FAQ
- Can I make this cake ahead of time?
Yes, you can make this cake a day or two ahead of time. Just store it in the freezer until you’re ready to serve. - Can I use homemade brownies instead of a mix?
Absolutely! Homemade brownies will work perfectly in this cake, and they might even enhance the flavor. - Can I substitute a different flavor of ice cream?
Yes, you can replace the coffee ice cream with chocolate, vanilla, or any ice cream flavor of your choice. - How do I store the Mocha Brownie Ice Cream Cake?
Store any leftover cake in an airtight container in the freezer. It will last for up to a week, but it’s best enjoyed fresh.
Mocha Brownie Ice Cream Cake
Ingredients
Brownie Mix
- 18.4 oz or similar box of brownie mix, plus ingredients listed on the box
Ice Cream
- 2 tbsp warm water
- 4 tsp instant espresso
- 8 oz cream cheese softened
- 1/8 cup milk
- 1/2 cup sugar
- 1/8 cup Kahlua optional
- 8 oz Cool Whip or homemade whipped cream*
Oreo Fudge Layer
- 16 Oreos crushed
- 1 1/2 cups hot fudge sauce I used Hershey’s Hot Fudge Topping
- Whipped Cream Icing
- 2 1/2 tsp instant espresso
- 1 tbsp warm water
- 1 1/4 cups heavy whipping cream
- 1/2 cup powdered sugar
Instructions
NOTE:
- 8-inch springform pans work best for this recipe as they make it easy to remove the cake once assembled. If you don’t have a springform pan, line your pan with clear wrap before adding parchment paper and the cake board. The clear wrap will help lift the cake out of the pan once it’s assembled and frozen. Be sure to use the same pan for making your cake layers and assembling the ice cream, so the layers fit perfectly in the final pan for assembly.
BROWNIES:
- Prepare the brownie batter according to the instructions on the box.
- Grease two 8-inch pans (preferably springform pans, as mentioned above) and line the bottoms with parchment paper to make removal easier. Bake at the temperature specified on the box, reducing the baking time to around 20 minutes.
- Once the brownies are done baking, allow them to cool completely.
ICE CREAM:
- After the brownies have cooled, prepare the ice cream. In a small bowl, add espresso to warm water and stir to dissolve.
- In the bowl of a stand mixer, or using a hand mixer in a large bowl, beat the cream cheese until smooth.
- Add the milk, sugar, espresso, and Kahlua (if using) to the cream cheese and mix until fully combined.
- Gently fold in the Cool Whip.
ASSEMBLING IT ALL:
- Line the sides of an 8-inch springform pan with parchment paper, making sure it extends above the top edge of the pan, as the cake will be taller than the pan. Optionally, place a cardboard cake circle at the bottom of the pan.
- NOTE: Ensure you’re using the same 8-inch pan that was used for the brownie layers. Not all 8-inch pans are exactly the same size, so the layers need to fit perfectly into the final pan.
- Place the first brownie layer at the bottom of your pan.
- Spread half of the hot fudge sauce over the brownie and sprinkle with half of the crushed Oreos, spreading them evenly.
- Add half of the ice cream on top of the brownie and Oreos.
- Place the second brownie layer on top of the ice cream.
- Spread the remaining half of the hot fudge sauce over the brownie and top with the remaining crushed Oreos, spreading evenly.
- Add the remaining ice cream on top.
- Freeze the ice cream cake completely for 6-8 hours.
- Once frozen, remove the cake from the springform pan and peel off the parchment paper from the sides.
WHIPPED CREAM ICING:
- Place the mixing bowl and whisk attachment in the freezer for about 10 minutes.
- In a small bowl, dissolve the espresso in warm water.
- Remove the bowl and whisk from the freezer and whip the cream on high until it begins to thicken.
- Add the espresso extract and powdered sugar and continue whipping on high until thick and creamy.
- Ice the cake with the whipped cream icing and return it to the freezer until ready to serve.
- Tip: If making your own whipped cream, use about 1 1/4 cups heavy whipping cream.